1959 Beetle.. Before and After-Now with RWC

Give details and pictures of your ACVW projects here.
Post Reply
User avatar
retrovan
Donor
Donor
Posts: 8709
Joined: Mon Feb 07, 2011 8:51 pm
What model do you have?: 52T1,68FB,72Bay,75FL
Location: Eich! no, in Jefferys Bay
Has thanked: 421 times
Been thanked: 539 times
Contact:
Netherlands

1959 Beetle.. Before and After-Now with RWC

Post by retrovan »

Hi YaAll,
As a project I am going to post my 1959 Beetle In the BEFORE and After I am Done with It.
This was a project, but now I want to up it to be MY Beetle, lets see if it can be done.
Here it is when I started,............

Image

will post as I make the list of things I want to do.
:hangloose:

Car came from this post ;- viewtopic.php?f=23&t=13051#p126697
Last edited by retrovan on Fri Dec 16, 2016 12:46 pm, edited 2 times in total.


1952 Split Beetle 1835cc
1968 Fastback 2Lt.type4
1972 Low Light Bay Panel Van 2Lt type 4
1975 Fleetline Panel Van 1914cc
2020 MeFusco Beetle Truck 2Lt type 4
1972 FT Hahn SP 1776 cc
User avatar
retrovan
Donor
Donor
Posts: 8709
Joined: Mon Feb 07, 2011 8:51 pm
What model do you have?: 52T1,68FB,72Bay,75FL
Location: Eich! no, in Jefferys Bay
Has thanked: 421 times
Been thanked: 539 times
Contact:
Netherlands

Re: 1959 Beetle.. Before and After

Post by retrovan »

Hi,
Did say that I would be posting a List of "To Do" things, to make my Beetle more acceptable.
1) Fix Headlights.................Glass rattles around with no clips. Connect wires, as they have been cut and taped up ?? DONE
2) Replace rusted Head light rings, reflectors, and inner parts (in for chrome) DONE
3) Repair or replace rusted front fender indicator inners. (still looking for clear glass cigar shape) DONE
4) Repair hooter wires as they seem to be cut off as if the steering wheel was removed.? DONE
5) Get heater working as all heater pipe are totally unconnected as if never fitted, or remover suddenly.DONE
6) Cut wiper stub shafts shorter, and re-engineer fitting of wiper arm, to allow front lid to open.DONE
7) Paint rusted wiper arms. DONE
8 ) Remove oversized spare wheel, and fit correct tyre for spare, so that it will fit into bonnet location and that the bonnet can close. (wheels in for powder coating, still looking for 5" x 15 type) DONE
9) Rework bonnet latching to make it WORK, as it will not close, and if forced, will not open again. DONE
Make engine lid catch work, as it just flops around. DONE
10) Fit window scrapper rubbers to inside of doors. DONE
11) clean up other loose rubbers.DONE
12) Clean rust and cover to prevent getting out of hand. DONE
13) Set brakes, and park brake, set pedal travel. DONE
14) Find our why clutch shudders.?????????// ( replaced rear box mounts, fixed cable bend, fixed pedal travel) DONE
15) take up play in steering, or rebuild.?? (set and filled box with wynns)(DONE)
16) Fix gear selection, and / or buses, as impossible to find gears.(DONE)
17) Fit cabin light, covered over???
18) open drain holes in doors, note to self, remove door panels, may be rusted inside?? DONE
19 fit clips to hold door panels to door.DONE
20) Bend roof rack legs to fit roof line to stop paint damage.
21) check and replace bad front shocks check front steering. (DONE king pins & link pins)DONE
21a) No steering damper, fit one, urgent. DONE
22) install indicator light in car. DONE
23) Fix electric choke, not working. DONE
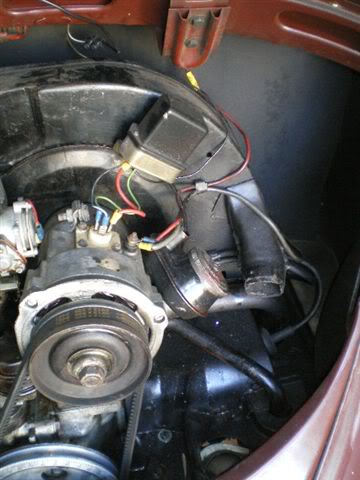
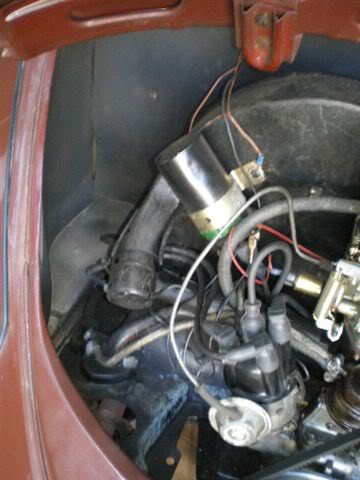
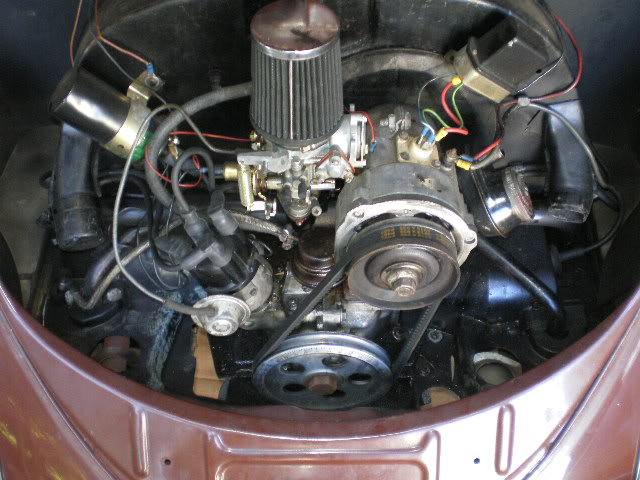
24) Replace engine, as it leaks oil, has play on its crank, have bent pulley, has mismatch tins from different models, that do not keep the engine heat out, DONE
25) Fit engine seal as it has non. DONE
26) fit seat back rest swivel clips, remove wire. DONE
27) Bumper, Drill and tap holes as most bolts are not fitted, or short bolts in by 2 threads. DONE
28) Fender, Drill and tap holes as most bolts are not fitted, or short bolts in by 2 threads. DONE
29) Remove both back drums, and replace seals, and may be bearings, as oil has dropped on shoe's. DONE
30) Remove fuel tank, and set steering box, drain box of old oil, fill with wynn's, grease front beam, and replace tank after fitting new petrol filter. (DONE)
Wheff...... these are the ones I have so far discovered, who knows what still unseen???????????????
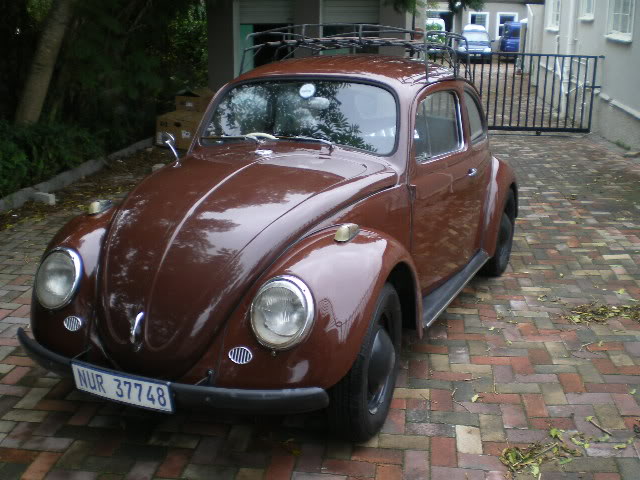
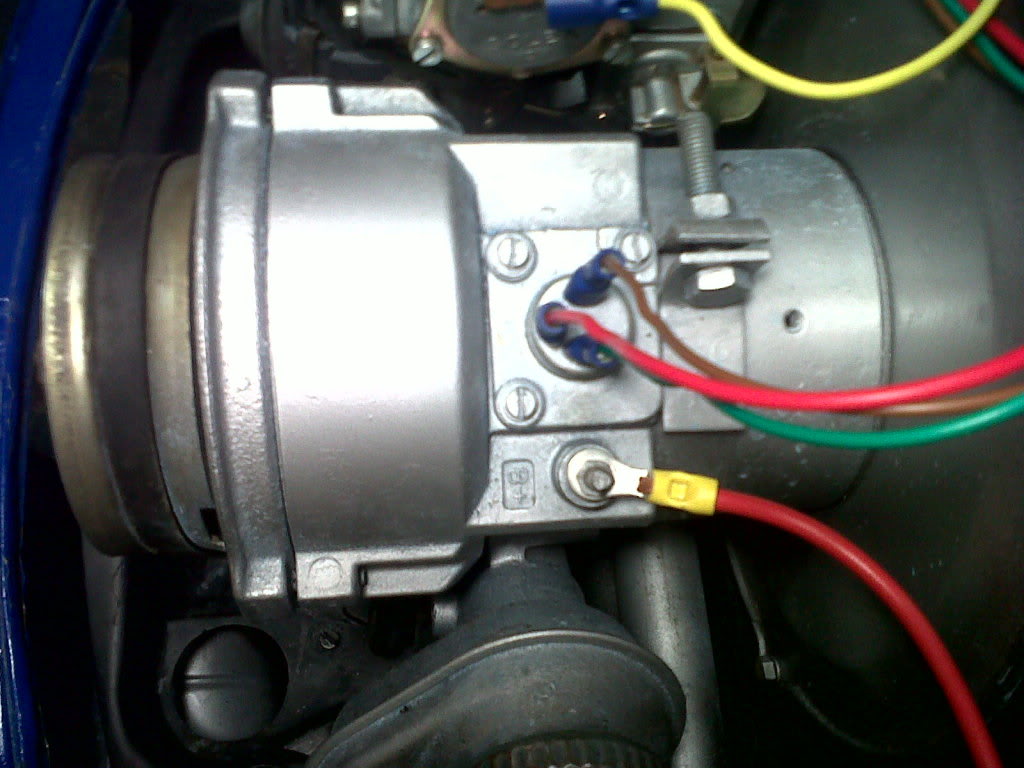
The most magical part of this car is that the engine bay is perfectly clean, no oil anywhere.....BUT the motor is covered in OLD oil, blow out oil from the breather, and oil dripping from all joints, YET there is NON on the engine compartment as can be seen from the photos here under????????????????????????/
Image Image
Image
As the motor is not the same as the Papers, now it becomes a mission to get this thing onto my name, ... what joy..... :roll:
Its a good thing that I am not a suspicious person, who knows what I would have thought................ :x :x :x
Well.... till later
Last edited by retrovan on Fri Sep 16, 2011 11:30 pm, edited 9 times in total.
1952 Split Beetle 1835cc
1968 Fastback 2Lt.type4
1972 Low Light Bay Panel Van 2Lt type 4
1975 Fleetline Panel Van 1914cc
2020 MeFusco Beetle Truck 2Lt type 4
1972 FT Hahn SP 1776 cc
1963
Drip
Posts: 42
Joined: Tue Apr 26, 2011 4:09 pm
What model do you have?: 1963 1200
Location: Cape Town
South Africa

Re: 1959 Beetle.. Before and After

Post by 1963 »

Yay! Do a nice job Retrovan! I had a 59 once ... when I was in the army, I gave it (100% complete, but stripped down to the chassis) to an old school friend on condition he restored it. A few years later, I saw him again - his parent had dragged it all off to the scrapyard. It still makes me feel sick to my stomach.
User avatar
splitbusahollic
Advertiser
Advertiser
Posts: 1265
Joined: Tue Sep 07, 2010 7:10 pm
What model do you have?: a couple of buses
Facebook: vintage kombi
Location: Port Elizabeth
Has thanked: 87 times
Been thanked: 54 times
Contact:
South Africa

Re: 1959 Beetle.. Before and After

Post by splitbusahollic »

That seems like a lot to do for the price you paid Herman :?:
i saw on the resto thread by the previous owner that he was waiting to fit the wooden steering and new engine ! :hangloose:
soo then why would you mess with a new motor ?
i would love to see the wooden steering sometime when you in the area...maybe i could get one for my '63 bus ! :TIC:
good luck anyway....
vintage kombi.co.za (Website)
vintage kombi on Facebook
Eugene Pfeil
Oil Stain
Posts: 182
Joined: Sun Apr 03, 2011 6:28 pm
What model do you have?: 68 beetle
Location: Gauteng, Heidelberg
Has thanked: 1 time
Been thanked: 1 time
Contact:

Re: 1959 Beetle.. Before and After

Post by Eugene Pfeil »

Hi, i am busy with my wiring on my beetle. I see your alternator is the same as mine. Where does that 2 wires go to, I know the one goes to the battery.
User avatar
retrovan
Donor
Donor
Posts: 8709
Joined: Mon Feb 07, 2011 8:51 pm
What model do you have?: 52T1,68FB,72Bay,75FL
Location: Eich! no, in Jefferys Bay
Has thanked: 421 times
Been thanked: 539 times
Contact:
Netherlands

Re: 1959 Beetle.. Before and After

Post by retrovan »

Eugene Pfeil wrote:Hi, i am busy with my wiring on my beetle. I see your alternator is the same as mine. Where does that 2 wires go to, I know the one goes to the battery.
Hi,
All Gennies, and alternators look alike, beware.
If it is an alternator, find out if it has the voltage regulator inside, if yes, normally one wire to the battery and one to the charge light.
But if not sure, have a auto electrician look at it, as you may blow the voltage regulator.
Maybe post photos, so the members could identify it, and offer connection advice.
1952 Split Beetle 1835cc
1968 Fastback 2Lt.type4
1972 Low Light Bay Panel Van 2Lt type 4
1975 Fleetline Panel Van 1914cc
2020 MeFusco Beetle Truck 2Lt type 4
1972 FT Hahn SP 1776 cc
User avatar
Hloni
Exhaust Pipe
Posts: 1538
Joined: Tue May 27, 2008 4:30 pm
What model do you have?: It was a '75.
Location: Sharonlea, Randburg
Has thanked: 14 times
Been thanked: 11 times

Re: 1959 Beetle.. Before and After

Post by Hloni »

Yeah, I thought that this car looked familiar. But I could be wrong :-)
"Volkswagen customers want a relationship with their cars. Names like The Thing, Beetle, Fox, and Rabbit support this" - Kerri Martin
3011
User avatar
retrovan
Donor
Donor
Posts: 8709
Joined: Mon Feb 07, 2011 8:51 pm
What model do you have?: 52T1,68FB,72Bay,75FL
Location: Eich! no, in Jefferys Bay
Has thanked: 421 times
Been thanked: 539 times
Contact:
Netherlands

Re: 1959 Beetle.. Before and After

Post by retrovan »

Hi,
Still waiting for bad motor documentation to transfer car. :cry:
Would seem that the engine would have to be replaced, (add to list) :roll:
Finding King & link pins, with bushes. (add to list) :roll:
Replace back & front wheel bearings and seals. (add to list) :roll:
I was going to wait with the beetle rebuild, till the Fastback was done, but with the delay at spray shop, I think I may as well dig in.
Was hoping to have at least ONE aircooled going, but like "the Elusive James". all aircooled are standing.
1952 Split Beetle 1835cc
1968 Fastback 2Lt.type4
1972 Low Light Bay Panel Van 2Lt type 4
1975 Fleetline Panel Van 1914cc
2020 MeFusco Beetle Truck 2Lt type 4
1972 FT Hahn SP 1776 cc
User avatar
retrovan
Donor
Donor
Posts: 8709
Joined: Mon Feb 07, 2011 8:51 pm
What model do you have?: 52T1,68FB,72Bay,75FL
Location: Eich! no, in Jefferys Bay
Has thanked: 421 times
Been thanked: 539 times
Contact:
Netherlands

Re: 1959 Beetle.. Before and After

Post by retrovan »

Managed to get me some king pins and link pins and spent the day removing the old and bringing in the new
The old king & link pins looked as if the came out of the 50's, :oops: they did. :roll:
Was a therapeutic job, till the king pins would not budge. :cry:
And when a "moerring tool" could not shift them, we landed up at the press. :wink:
Must say the OLD girl is more sure footed now, not as if the old dear has been at the cooking sherry. :oops:
Tomorrow we fill steering box with oil, and set play. :D
Set the brakes yesterday, so now we can head for the highway for some high speed testing. :lol: :lol:
1952 Split Beetle 1835cc
1968 Fastback 2Lt.type4
1972 Low Light Bay Panel Van 2Lt type 4
1975 Fleetline Panel Van 1914cc
2020 MeFusco Beetle Truck 2Lt type 4
1972 FT Hahn SP 1776 cc
Eugene Pfeil
Oil Stain
Posts: 182
Joined: Sun Apr 03, 2011 6:28 pm
What model do you have?: 68 beetle
Location: Gauteng, Heidelberg
Has thanked: 1 time
Been thanked: 1 time
Contact:

Re: 1959 Beetle.. Before and After

Post by Eugene Pfeil »

Image

Here is the picture of my alternator on my 68 bug. I got some wiring diagrams. It seems that the alternator warning light connects on to voltage regulator
User avatar
retrovan
Donor
Donor
Posts: 8709
Joined: Mon Feb 07, 2011 8:51 pm
What model do you have?: 52T1,68FB,72Bay,75FL
Location: Eich! no, in Jefferys Bay
Has thanked: 421 times
Been thanked: 539 times
Contact:
Netherlands

Re: 1959 Beetle.. Before and After

Post by retrovan »

Eugene Pfeil wrote:Image

Here is the picture of my alternator on my 68 bug. I got some wiring diagrams. It seems that the alternator warning light connects on to voltage regulator
Hi,
With a 4 wire, this normally means the voltage regulator is out side, so the light will be on the regulator.
Your engine looks good, nice work.
Herman
1952 Split Beetle 1835cc
1968 Fastback 2Lt.type4
1972 Low Light Bay Panel Van 2Lt type 4
1975 Fleetline Panel Van 1914cc
2020 MeFusco Beetle Truck 2Lt type 4
1972 FT Hahn SP 1776 cc
Eugene Pfeil
Oil Stain
Posts: 182
Joined: Sun Apr 03, 2011 6:28 pm
What model do you have?: 68 beetle
Location: Gauteng, Heidelberg
Has thanked: 1 time
Been thanked: 1 time
Contact:

Re: 1959 Beetle.. Before and After

Post by Eugene Pfeil »

Thanx. I am still learning on how to do all the stuff, as I am only 17 years old. Which models had this type of alternator, because I can't get a diagram on the samba. And is this a alternator or a generator? I got diagrams from another guy and on the diagram stands that it is a generator. I am very confused.
User avatar
buggyfan
Long Block
Posts: 2979
Joined: Wed Mar 12, 2008 2:26 am
What model do you have?: lwb beachbuggy
Location: newlands,jhb
Has thanked: 95 times
Been thanked: 87 times
South Africa

Re: 1959 Beetle.. Before and After

Post by buggyfan »

Its an alternator with an external regulator.check out speedy Jims' home page
http://www.aircooledvwsa.co.za/viewtopi ... tt#p269451" onclick="window.open(this.href);return false;
Dawie
Fuel Injection
Posts: 2110
Joined: Sat Sep 30, 2006 10:25 pm
What model do you have?: Aircooled, various
Location: Kaapstadt
Has thanked: 42 times
Been thanked: 207 times
South Africa

Re: 1959 Beetle.. Before and After

Post by Dawie »

Think that alternator with external regulator was only used in 1974 type 1 engines.
Staying Aircooled is so much nicer.
Do'nt assume anything- (While doing fault-finding).
User avatar
retrovan
Donor
Donor
Posts: 8709
Joined: Mon Feb 07, 2011 8:51 pm
What model do you have?: 52T1,68FB,72Bay,75FL
Location: Eich! no, in Jefferys Bay
Has thanked: 421 times
Been thanked: 539 times
Contact:
Netherlands

Re: 1959 Beetle.. Before and After

Post by retrovan »

Due to still awaiting the body of the Fastback to come back from Spray shop, Set my time onto the Beetle.

Removed the engine, !st to see how bad the engine was, 2nd to find the shudder that happened on pull away, 3Rd to clean the engine bay, 4th to renew the seal rubbers for the engine.

Found oil leaks on the gear box, but these were due to loose bolts on the joints, nipped them up and the leaks stopped.

Found the bend in the clutch cable to be 70 mm instead of the 25 to 40 mm as laid down by VW.

Found gearbox rubber mountings have split rubber from steel, and needs new ones.

Clutch cable was fitted un-greased, so we reset the bend, serviced it with grease, an reinstalled it.

Now for the peddle assembly, remove, service and reinstall, with clips, and not wire.

Need to fight the old engine bay surround rubber out of the slot, and fight the new one in, this is one hell of a job.

Then we may as well make a new hole for the petrol pipe through the fire wall, so that it does not have to be cut between the engine and lip of body, May be safer that way.!!

Also found release bearing dry, think it was washed out with petrol at some stage, will be boiling in grease for a few hours.

Still looking for a 155 x15 NEW tyre, for the spare, as the 165 X15 will not fit into the 1959 spare wheel well.
Till next time.
Herman
1952 Split Beetle 1835cc
1968 Fastback 2Lt.type4
1972 Low Light Bay Panel Van 2Lt type 4
1975 Fleetline Panel Van 1914cc
2020 MeFusco Beetle Truck 2Lt type 4
1972 FT Hahn SP 1776 cc
Post Reply