Great work, wow !
Some motivation right there.
Indeed, a lot of time goes into things people dont see, but if you dont spend the time on it it stands out like a sore thumb.
Keep it up and post some more progress pics.
I bought myself this book ages ago, great book that shows how the panels fit together.
https://www.loot.co.za/product/fletcher ... -2593-g560
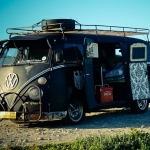
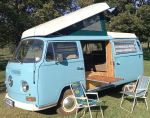
'70 Westfalia Project
-
Donovan D
- Donor

- Posts: 2229
- Joined: Sun Jun 01, 2008 6:27 pm
- What model do you have?: 67 Panel
- Facebook: http://www.facebook.com/profile.php?id=536371512
- Location: Brackenfell
- Has thanked: 148 times
- Been thanked: 73 times

-
sean

- Transmission
- Posts: 2400
- Joined: Sun Aug 03, 2008 8:51 pm
- What model do you have?: Bays & Splits
- Location: Somerset West
- Has thanked: 63 times
- Been thanked: 227 times
Re: '70 Westfalia Project
Great to see the bus is being put back together properly. As you mentioned it doesn't get directly seen as input work or realise the amount of time it takes, but the end result is just so much better. Could you imagine doing a nice paint job but leaving all those hideous modifications done by an ape with a grinder? I still fail to understand how someone can hack it with a grinder, stand back and say its an amazing job and its improved the vehicle in every possible way. Its always a disaster.
I'm too busy fixing a disaster caused by an baboon and a grinder in this lockdown period. Ill share some pics shortly.
I'm too busy fixing a disaster caused by an baboon and a grinder in this lockdown period. Ill share some pics shortly.
-
AlanH
- Crankshaft
- Posts: 732
- Joined: Thu Jan 17, 2013 7:20 am
- What model do you have?: '70 Westy
- Location: Pretoria
- Has thanked: 117 times
- Been thanked: 86 times

Re: '70 Westfalia Project
So some more work done and things are looking up.
So with the weather being a bit overcast and cold I decided to scrape of all the layers of old paint and bodyputty of the bumper. Let me tell you there was lots. Then set about cleaning the bumper with my baby grinder and a wire wheel. Worked well untill the last corner when the second grinder packed up. The bearings packed up on both. They don't seem to like continues use. So luckily for me I had one more that will be nursed until end of Lockdown. During the bad weather I also decided to sandblast the loose parts and prime them so they don't rust again. When the weather was better I started with the job I was dreading. I started by welding in the kickboard holder. I did this so I could get to all the welding spots later on . Next up was th efloor sheet that I fitted. So after a final fitment and clamping it was time to weld. I did practice welding for quite some time so hope this won't bothch things. After grinding the welding down again, and all looked good it was time to reward myself. I fetched the rubber mat I had purchased about two years ago and lay it on the floor as a test fit. And while it looked so good I decided to also test if the washer bottle and previously painted airvent fitted. Beginning to look like something I like. So next I will start at the back but still have a question if anyone here has seen this on their Westy. Is this how Westfalia fixd the Rock n Roll Bed?
Seems a bit crude to me. Till next time, keep on working on your projects. You won't get an opportunity like this again soon.
You do not have the required permissions to view the files attached to this post.
Wanted parts:
Left sunvisor
Sink faucet
Exhaust to swap for Beetle exhaust
Left sunvisor
Sink faucet
Exhaust to swap for Beetle exhaust
-
sean
- Transmission
- Posts: 2400
- Joined: Sun Aug 03, 2008 8:51 pm
- What model do you have?: Bays & Splits
- Location: Somerset West
- Has thanked: 63 times
- Been thanked: 227 times
Re: '70 Westfalia Project
Here is a pic of the top of the bracket from my westy.
I don’t believe that bracket underneath is correct. I’m sure a type of rivnut was used. I have no slot through the firewall as in your picture.
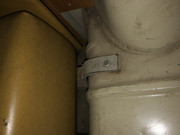
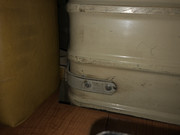
I don’t believe that bracket underneath is correct. I’m sure a type of rivnut was used. I have no slot through the firewall as in your picture.
-
AlanH
- Crankshaft
- Posts: 732
- Joined: Thu Jan 17, 2013 7:20 am
- What model do you have?: '70 Westy
- Location: Pretoria
- Has thanked: 117 times
- Been thanked: 86 times
Re: '70 Westfalia Project
Tx Sean,
That's good news, was already loosing respect for Westfalia if that is how they installed the bed.
So I will have to fix that as well. I'll make a nice support brackwt underneath and also use rivnuts.
That's good news, was already loosing respect for Westfalia if that is how they installed the bed.
So I will have to fix that as well. I'll make a nice support brackwt underneath and also use rivnuts.
Wanted parts:
Left sunvisor
Sink faucet
Exhaust to swap for Beetle exhaust
Left sunvisor
Sink faucet
Exhaust to swap for Beetle exhaust
-
AlanH
- Crankshaft
- Posts: 732
- Joined: Thu Jan 17, 2013 7:20 am
- What model do you have?: '70 Westy
- Location: Pretoria
- Has thanked: 117 times
- Been thanked: 86 times
Re: '70 Westfalia Project
Some more progress.
Took some time but it's done.
I fitted the hatch and extra support members underneath that were either butchered or not standard.
I then closed the rear part with another donors sheet metal and now it's sorted. Next will be the engine bay and then the dreaded corner bottoms.
Took some time but it's done.
I fitted the hatch and extra support members underneath that were either butchered or not standard.
I then closed the rear part with another donors sheet metal and now it's sorted. Next will be the engine bay and then the dreaded corner bottoms.
You do not have the required permissions to view the files attached to this post.
Wanted parts:
Left sunvisor
Sink faucet
Exhaust to swap for Beetle exhaust
Left sunvisor
Sink faucet
Exhaust to swap for Beetle exhaust
-
AlanH
- Crankshaft
- Posts: 732
- Joined: Thu Jan 17, 2013 7:20 am
- What model do you have?: '70 Westy
- Location: Pretoria
- Has thanked: 117 times
- Been thanked: 86 times
Re: '70 Westfalia Project
OK, so I did some more on the Westy but it doesn't show. 
I removed all the little clips and brackets so they don't get damaged when the bus gets blasted.
I also removed the drive shafts and gearbox.
Then I removed all the remaining glass and stripped the doors.
The vent windows got new rubbers and were cleaned beforehand.
The rust spot on the rear right corner was fixed and I just need to treat it before welding in the outer skin.
Removed the selector shaft for the gearbox and now need more rubbers.
So all in all quite a bit of work done but I can already smell the end result.
I'm waiting for my rotisserie to be made so I can remove the axles and also do some more prep work underneath.
Wanted parts:
Left sunvisor
Sink faucet
Exhaust to swap for Beetle exhaust
Left sunvisor
Sink faucet
Exhaust to swap for Beetle exhaust
-
AlanH
- Crankshaft
- Posts: 732
- Joined: Thu Jan 17, 2013 7:20 am
- What model do you have?: '70 Westy
- Location: Pretoria
- Has thanked: 117 times
- Been thanked: 86 times
Re: '70 Westfalia Project
It's always great to be able to say more has been done.
So as said I cut out the rust on the rear right corner and repaired the channel and made an outer skin to be welded once the raw metal has been prepped against rust. Now I have the left rear corner to do. Although I have repair panels I think I could fix the corners without using the repair panels but it will take some panel beating. Then I moved to the roof and wanted to clean up the ugly repair job where the luggage roof attaches.
It had different size palted riveted to the roof which showed nasty cracks when removed. These were welded up, but I want to repair that spot with a bit more strength so am intending fitting in discs with rivnuts in them. also I will place a washer under the round plated to spread the load a bit. Then I thought I deserver a day with less physical work and set about respraying the dash and the vent cover and som other items that looked a bit tatty. Unfortunately the black is not to my liking and I will buy some nice satin black and redo them.
Once the dash was dry I could not resist replacing the cleaned switches and fit the period correct radio I got from a friend.
You do not have the required permissions to view the files attached to this post.
Wanted parts:
Left sunvisor
Sink faucet
Exhaust to swap for Beetle exhaust
Left sunvisor
Sink faucet
Exhaust to swap for Beetle exhaust
-
AlanH
- Crankshaft
- Posts: 732
- Joined: Thu Jan 17, 2013 7:20 am
- What model do you have?: '70 Westy
- Location: Pretoria
- Has thanked: 117 times
- Been thanked: 86 times
Re: '70 Westfalia Project
Ok, so I could not add the last pictures so here goes.
Till next time...
You do not have the required permissions to view the files attached to this post.
Wanted parts:
Left sunvisor
Sink faucet
Exhaust to swap for Beetle exhaust
Left sunvisor
Sink faucet
Exhaust to swap for Beetle exhaust
-
Bugger
- Advertiser

- Posts: 7947
- Joined: Fri Jun 09, 2006 6:25 pm
- What model do you have?: a Few Models
- Facebook: Pierre Bugger Eksteen
- Location: Johannesbirg
- Has thanked: 18 times
- Been thanked: 58 times
Re: '70 Westfalia Project
Great work man great work
Sent from my SM-G965F using Tapatalk
Sent from my SM-G965F using Tapatalk
Adapterplates Available for Rotary in Beetle and others aswell
And Special Boxes built for Rotary Conversions and Scubies
Pierre
082 600 8663
CLick on Banner Below to be routed to the Web site

And Special Boxes built for Rotary Conversions and Scubies
Pierre
082 600 8663
CLick on Banner Below to be routed to the Web site
-
Bugger
- Advertiser
- Posts: 7947
- Joined: Fri Jun 09, 2006 6:25 pm
- What model do you have?: a Few Models
- Facebook: Pierre Bugger Eksteen
- Location: Johannesbirg
- Has thanked: 18 times
- Been thanked: 58 times
Re: '70 Westfalia Project
Do you know if there is a book like that for the Split bus?Donovan D wrote:Great work, wow !
Some motivation right there.
Indeed, a lot of time goes into things people dont see, but if you dont spend the time on it it stands out like a sore thumb.
Keep it up and post some more progress pics.
I bought myself this book ages ago, great book that shows how the panels fit together.
https://www.loot.co.za/product/fletcher ... -2593-g560
Sent from my SM-G965F using Tapatalk
Adapterplates Available for Rotary in Beetle and others aswell
And Special Boxes built for Rotary Conversions and Scubies
Pierre
082 600 8663
CLick on Banner Below to be routed to the Web site
And Special Boxes built for Rotary Conversions and Scubies
Pierre
082 600 8663
CLick on Banner Below to be routed to the Web site
-
Donovan D
- Donor
- Posts: 2229
- Joined: Sun Jun 01, 2008 6:27 pm
- What model do you have?: 67 Panel
- Facebook: http://www.facebook.com/profile.php?id=536371512
- Location: Brackenfell
- Has thanked: 148 times
- Been thanked: 73 times
Re: '70 Westfalia Project
Not sure, I have never seen one.
---------- 67 Panelvan -----------
---------- 56 Oval ----------
---------- 56 Oval ----------
-
AlanH
- Crankshaft
- Posts: 732
- Joined: Thu Jan 17, 2013 7:20 am
- What model do you have?: '70 Westy
- Location: Pretoria
- Has thanked: 117 times
- Been thanked: 86 times
Re: '70 Westfalia Project
Ok, so with the rainy cold weather I was not really in the mood much to work in the workshop, but did do a few things.
Tested the Blaupunkt Emden III radio and it works.
I drilled another hole in the dash so I can put in the wiper switch.
Sanded the dash once more so I can give it a last coat of paint. I actually was very happy with the last coat but thought it best to have a decent thickness of paint on there.
I also welded up the thirty holes drilled into the rain gutter. What the hell the PO needed so many holes I will never know. What a s..t job. Oh, and the gutter was very bent as there were also about 5 hoops brazed onto the gutter and the gutter was deformed. So I made a tool that I could place behind the gutter and slowly get the gutter back to standard.
Well that's it for now.
Wanted parts:
Left sunvisor
Sink faucet
Exhaust to swap for Beetle exhaust
Left sunvisor
Sink faucet
Exhaust to swap for Beetle exhaust