Fuel injection rebuild

Give details and pictures of your ACVW projects here.
Simmy
Oil Pump
Posts: 220
Joined: Thu Mar 30, 2017 9:07 pm
What model do you have?: 1978 Beetle
Location: Johannesburg
Has thanked: 5 times
Been thanked: 5 times
South Africa

Re: Fuel injection rebuild

Post by Simmy »

Rod one done... 3 to go.

Bearings lubed, splines got some copper compound and the threads were blue loctited. Side play is 0.45mm which is just on the right side of tight. Also... Mad sure the Notches are pointing to the sump.

Image

Image


User avatar
Tony Z
Donor
Donor
Posts: 14994
Joined: Wed Sep 14, 2005 8:33 am
What model do you have?: 2.3L 69; 1302; P/Van
Location: Klipheuwel (near Durbanville), Cape Town or working at sea
Has thanked: 191 times
Been thanked: 487 times
South Africa

Re: Fuel injection rebuild

Post by Tony Z »

nice progress as always.
Pity about the heads. I suspect youll need to blast it out with a light metal grit. Protect the guides with old/stock valves in place and you should be OK
Haans
Camshaft
Posts: 893
Joined: Wed Apr 20, 2016 7:10 pm
What model do you have?: 1960 ghia
Location: Nelson Mandela Metro
Has thanked: 1 time
Been thanked: 107 times
South Africa

Re: Fuel injection rebuild

Post by Haans »

Eina, that must hurt!! Good luck with the heads

Keep your chin up! You've gone way too far to loose momentum now!
Besides too many people watching you now!!!,

Haans
Simmy
Oil Pump
Posts: 220
Joined: Thu Mar 30, 2017 9:07 pm
What model do you have?: 1978 Beetle
Location: Johannesburg
Has thanked: 5 times
Been thanked: 5 times
South Africa

Re: Fuel injection rebuild

Post by Simmy »

Thanks guys. Spoke with Gary again, and agreed to let them handle it. They will take it back to bare metal (using a light grit) and recoat and put in some old dummy valves to protect seats and guides. Hopefully there wont be any further wailing and gnashing of teeth.

Also discovered last night that my old case had been bored out one oversize on the pressure relief plungers... Am I correct in saying that only the pressure relief (i.e. pulley-side) is usually bored out, and not the pressure control (i.e. flywheel-side)? I didnt measure them last night, but the smaller control plunger seemed to fit, although was a tad tight.
I might just turn down the old plunger on the lathe since its only 0.5mm on the diameter.
Simmy
Oil Pump
Posts: 220
Joined: Thu Mar 30, 2017 9:07 pm
What model do you have?: 1978 Beetle
Location: Johannesburg
Has thanked: 5 times
Been thanked: 5 times
South Africa

Re: Fuel injection rebuild

Post by Simmy »

Got a little delayed by the oil control pistons. As it turns out, the pressure control is generally not bored out, and is 16.0mm dia. The pressure relief valve, however can be bored out 2 sizes from 16.0 to 17.0mm dia. As it turns out all of the stock that Volkspares had was 1 oversize at 16.5mm. seems rare to find a case and piston that is still stock.

Ultimately I landed up just turning down an oversize one to fit the new case, along with a new set of springs and the modified plug with the temp sensor. After polishing the bores a little, the plungers move happily up and down

Image

Image


After the faffing with the valves, gave the case another clean and have now put back all of the plugs.

Image
User avatar
Tony Z
Donor
Donor
Posts: 14994
Joined: Wed Sep 14, 2005 8:33 am
What model do you have?: 2.3L 69; 1302; P/Van
Location: Klipheuwel (near Durbanville), Cape Town or working at sea
Has thanked: 191 times
Been thanked: 487 times
South Africa

Re: Fuel injection rebuild

Post by Tony Z »

dont forget to install the stock idiot light
the VDO one is generic and works at a higher pressure than the idle pressure of our bugs
Simmy
Oil Pump
Posts: 220
Joined: Thu Mar 30, 2017 9:07 pm
What model do you have?: 1978 Beetle
Location: Johannesburg
Has thanked: 5 times
Been thanked: 5 times
South Africa

Re: Fuel injection rebuild

Post by Simmy »

Tony Z wrote: Sun Dec 15, 2019 8:31 pm dont forget to install the stock idiot light
the VDO one is generic and works at a higher pressure than the idle pressure of our bugs
Thanks for the heads up. I wasn't aware of the difference... I have only used the VDO senders because of the convenience of the dual function. Regardless, it's just a plug for now. I will try source the Tee and secondary sender at some point.
Simmy
Oil Pump
Posts: 220
Joined: Thu Mar 30, 2017 9:07 pm
What model do you have?: 1978 Beetle
Location: Johannesburg
Has thanked: 5 times
Been thanked: 5 times
South Africa

Re: Fuel injection rebuild

Post by Simmy »

Question regarding the alignment / Indexing if the distributor drive gear...

I am following Wilson's book and it seems a little misleading and I would like someone to double check me here.
According to Wilson, you align the drive dog offset perpendicular with the case parting line and drop in the crank with #1 at TDC. I have done this and follow the logic. Now the but... Wilson says the timing dots on the crank should straddle the parting line, but they don't in my case. You can see in the image that they are perpendicular to that point.

Am I going mad or is this just a misprint?

Dizzy aligned with #1 firing position with drive gear notch perpendicular and as per Bentley Manual.
Image

The crank in, but at TDC you can see the dots are upright?
Image

Unfortunately I haven't found any forum / video that shows all three reference points.
User avatar
Tony Z
Donor
Donor
Posts: 14994
Joined: Wed Sep 14, 2005 8:33 am
What model do you have?: 2.3L 69; 1302; P/Van
Location: Klipheuwel (near Durbanville), Cape Town or working at sea
Has thanked: 191 times
Been thanked: 487 times
South Africa

Re: Fuel injection rebuild

Post by Tony Z »

forget about where the dots line up when inserting the dizzy.

Insert the crank and the cam, making sure the dots mesh. Turn #1 to firing TDC - you can check this on the cam, #1's followers will be on the lobes base circle.
Insert dizzy drive to get it as close to perpendicular to the case parting line as possible.
Insert dizzy and line up to the mark, lock it down.

From memory, the dizzy drive offset is towards the pulley, but I cannot remember - I use the Haynes manual for this part
Simmy
Oil Pump
Posts: 220
Joined: Thu Mar 30, 2017 9:07 pm
What model do you have?: 1978 Beetle
Location: Johannesburg
Has thanked: 5 times
Been thanked: 5 times
South Africa

Re: Fuel injection rebuild

Post by Simmy »

Thanks for the confirmation Tony. I think I have it right then.

After a little more work last night, we have the innards of a short block! Everything turns smoothly and feels slick. Didn't seal the case as I want to triple check myself that everything is in place or torqued beforehand.

Image
User avatar
Tony Z
Donor
Donor
Posts: 14994
Joined: Wed Sep 14, 2005 8:33 am
What model do you have?: 2.3L 69; 1302; P/Van
Location: Klipheuwel (near Durbanville), Cape Town or working at sea
Has thanked: 191 times
Been thanked: 487 times
South Africa

Re: Fuel injection rebuild

Post by Tony Z »

looking good
Simmy
Oil Pump
Posts: 220
Joined: Thu Mar 30, 2017 9:07 pm
What model do you have?: 1978 Beetle
Location: Johannesburg
Has thanked: 5 times
Been thanked: 5 times
South Africa

Re: Fuel injection rebuild

Post by Simmy »

Finally god the heads back from ceramic coating. Thankfully the finished product is greatly improved over the last attempt. Only issue... They didn't do the backs of the valves! Only picked it up now that I have disassembled it all.

Regardless, here are some pics for the interested parties:

Image

Image

Image

Image
User avatar
Tony Z
Donor
Donor
Posts: 14994
Joined: Wed Sep 14, 2005 8:33 am
What model do you have?: 2.3L 69; 1302; P/Van
Location: Klipheuwel (near Durbanville), Cape Town or working at sea
Has thanked: 191 times
Been thanked: 487 times
South Africa

Re: Fuel injection rebuild

Post by Tony Z »

pity about the valves.
It should still run nice and cool....
Simmy
Oil Pump
Posts: 220
Joined: Thu Mar 30, 2017 9:07 pm
What model do you have?: 1978 Beetle
Location: Johannesburg
Has thanked: 5 times
Been thanked: 5 times
South Africa

Re: Fuel injection rebuild

Post by Simmy »

True, but I will still take the valves back... The delay is unfortunate, but at the cost it had better be done right.

I can still finish off the short block, and fit the truss bar in the meanwhile.
Simmy
Oil Pump
Posts: 220
Joined: Thu Mar 30, 2017 9:07 pm
What model do you have?: 1978 Beetle
Location: Johannesburg
Has thanked: 5 times
Been thanked: 5 times
South Africa

Re: Fuel injection rebuild

Post by Simmy »

Merry Christmas everyone. I hope that you are all enjoying a bit of time off!

I have been a little bad at posting recently, but have been busy with a couple of things on the engine...

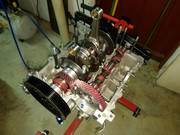
Assembled the short block. Used the Grey Victor Reinz gasket maker. Only even with only a thin layer it oozed out a little, which was then scraped off around the oil pump, flywheel and sump.

Image

I tried to seal off every bolt so this thing stays oil tight. Here was my approach: sealer under the washer, sealant under the nut and blue threadlocker.
The head studs were trickier. After attempt 1, I found they still wobbled around which probably meant they weren't going to seal. Basically threafbg them in wiped off all of the sealant. Landed up pulling them all out and wiping sealant into the case savers. They all feel nice and tight now even if they aren't threaded in all the way.
Image

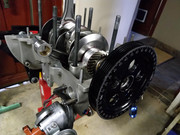
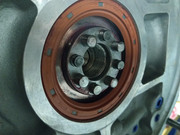
Checking end play was fun. The dowels are really tight, so getting the wheel on and off was a pain. First found two dowels were just to long and had to grind them down. Then found the end play was out. Despite earlier measurements, came back with 0.13mm, so had to swap out the shims and got it back down to 0.07mm as per spec.
Image

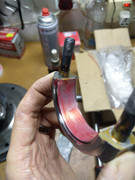
Next put in the oil seal. I ran a thin coat of sealant round the outer edge before knocking it in. Also made sure to seat it in a little past flush.
Image

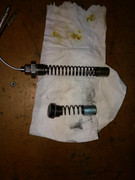
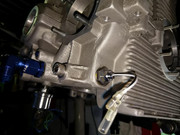
Next went the extended sump. Decided to double but and lock tight everything in. Unfortunately the nose of the pick up got a little squashed at some point, but not matter.
Image

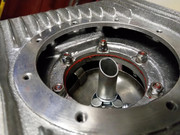
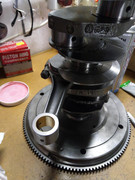
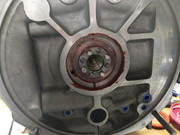
Finally get to show off the mag plate :D
Image

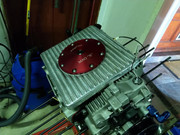
The oil pump is also finally in. I have left out the gears for now, as I will be turning the engine over to final check deck height. Will prime the pump with vaseline then.
Image

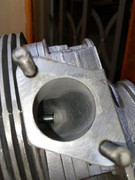
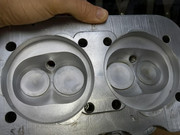
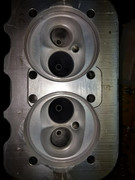
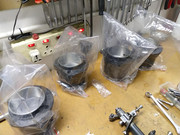
Spent most of yesterday morning cleaning pistons, barrels and rings. After thoroughly lubing the rings with a mix of assembly paste and oil, set the rings as below and popped them into the barrels. It's a very tedious and messy job...
Image

Touched up the paint as well from the lapping process. Now have 4 cylinders ready to go.
Image

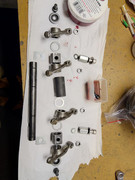
Lastly cleaned up the rocker arms. Trying to keep things organised and as clean as possible... I am leaving the swivel feet submerged in a mix of oil and moly lube overnight to really get into the oil passage ways which are impossible to get to.
Image
Post Reply