Page 16 of 27
Re: Fuel injection rebuild
Posted: Wed May 15, 2019 8:05 am
by Tony Z
either 1.25 or 1.35 is a great DH to have.
I wouldnt worry about the difference but if it makes you sleep better then go for it. Nothing wrong.
I've got 1.38mm on my bus.
The #3 running hotter is mainly on the non-doghouse engines. It does run a little hotter than #4 but not much compares to the old inferior cooling system. Lets just say that #3 will run about as hot as #2, which runs hotter than #1 (which runs about the same temp as #4).
The non-doghouse engines even came with a retarded timing built into the dizzy for #3, but this was done away with when VW moved to the doghouse shroud.
Re: Fuel injection rebuild
Posted: Wed May 15, 2019 8:59 am
by Simmy
Thanks for the explanation. I always thought it was the diversion of cooling air to the oil cooler which left cylinder 3 with less airflow and pressure. But the internal oil cooler makes much more sense now.
Re: Fuel injection rebuild
Posted: Wed May 15, 2019 7:48 pm
by Tony Z
the early cooler had the air blow over the cooler and then onto the 3&4 cylinders, with #3 getting less air.
The dog house takes air out of the shroud at the fan and the rest goes over the cylinders fairly evenly.
Re: Fuel injection rebuild
Posted: Wed May 22, 2019 8:07 am
by Simmy
Finished refurbing the thermostat and it's flaps. After shiming and bushing the linkage, I was actually happy with how it worked and left the flap bushes alone, other than applying some copper compound to help it. Just need to make up the coupling between rod and thermostat, and then we are good to go!
Washers and spacers for the linkage with new e-clips. Bushes were made up from some copper sheet.
Bushes in place
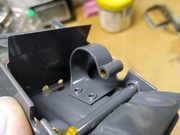
All assembled. Added some extra holes for the return spring, as I felt it may be over-tensioned.
Re: Fuel injection rebuild
Posted: Thu Aug 22, 2019 10:43 am
by Simmy
Hey folks. Pleased to see there has been bunch of activity whilst I have been AWOL... There are some very talented and patient v-dubbers out there!
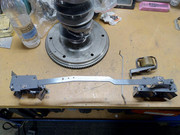
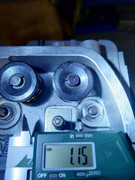
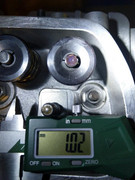
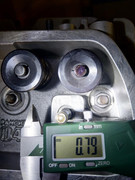
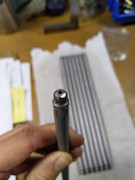
For back into my project again. Finally cut the pushrods after about of week of fiddling with the valve geometry to make sure I understood it and that it was the same on both sides.
Eventually went for no shims under the rockers since it gave the smallest visible wipe pattern. Sharpened up an old adjuster to make it easier to see the pattern.
Unfortunately it seems one of the pushrod ends is no good. Pretty sure I didn't bash it, but I certainly didn't pick it up early-on. So Tony... You can expect an IM shortly to see if we can sort out a new one!
The final adjuster movement at 3 shim heights (ignore the location of the mark... The test adjuster doesnt contact at the same point as the swivel feet)
A new set of chomoly PRs!
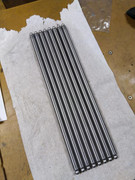
The bad egg in the batch.... The rest were completely unmarked, so I call manufacturing defect

Re: Fuel injection rebuild
Posted: Fri Aug 23, 2019 8:44 pm
by Tony Z
send me the tip back. I've got a few Manton tips, which if the same size, I'll send you one.
Re: Fuel injection rebuild
Posted: Mon Aug 26, 2019 7:49 am
by Simmy
That tip is not coming out... I am sure you already know this, but its a really tight press fit. Heat and a hammer is getting me nowhere. Also not sure if the stretching that takes place makes it possible to safely replace the tip. I know that aluminium rods tolerate this, but chromoly?
I mailed CB yesterday to see if they can assist (hoping to get them to send a new rod and tip).
Re: Fuel injection rebuild
Posted: Mon Aug 26, 2019 7:03 pm
by Tony Z
keep me posted.
Re: Fuel injection rebuild
Posted: Wed Aug 28, 2019 7:57 am
by Simmy
Managed to get them to send one new pushrod... unfortunately their shipping costs the earth (works out to about R500 for the one). Still cheaper than entire set though :\
Re: Fuel injection rebuild
Posted: Thu Aug 29, 2019 6:44 am
by Tony Z
yip, their shipping costs are on the other end of the sanity spectrum. Even within the US, their costs are mad.
Re: Fuel injection rebuild
Posted: Mon Sep 09, 2019 9:21 pm
by Simmy
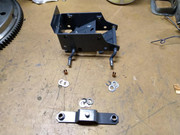
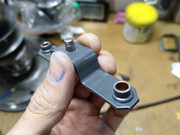
Still waiting on the new pushrod, but moved on to fitting the tinware, manifolds and alternator. Had to make up a set of aluminium sleds for the lower cooling tin, since I won't be using the heater boxes.
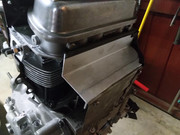
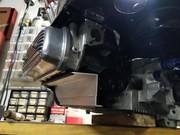
Some of the tin needs to be powder coated again for various reasons, but will get to that after I have trial fitted the high pressure fuel lines.
Re: Fuel injection rebuild
Posted: Tue Sep 10, 2019 7:27 am
by Wentzel
Coming together nicely. I bet you can't wait to hear it run.
I know the feeling mine is almost the same.
Re: Fuel injection rebuild
Posted: Tue Sep 10, 2019 9:43 pm
by Simmy
Thanks Wentzel!
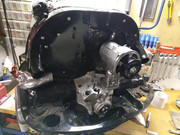
I am looking forward to it running, but am not looking forward to the first start! Still lots of little things to do to get it there though, but hoping I can get the long block assembled soon
Re: Fuel injection rebuild
Posted: Wed Sep 11, 2019 3:30 pm
by fourier
Good going, nearly there!
I like the addition of the allumimium industrial sled tins, and functional thermostatic flaps.
Simmy wrote: ↑Mon Sep 09, 2019 9:21 pm
Still waiting on the new pushrod...
Hope CB did not send the pushrod via USPS! I have waited up to six months for parts deliveries from them, as it relies on SA Post Office.
Re: Fuel injection rebuild
Posted: Wed Sep 11, 2019 4:40 pm
by Simmy
I want to make the cooling system bullet proof, hence the time spent on those details. Also found the tin really doesn't fit well on aftermarket parts... pity everyone isn't as exacting as those old Germans.
Don't say that!! I was in such a rush about getting it sorted, I didn't really pay attention to the courier and that it meant SAPO. I really do hope that some magic happens!