Replacing push rod tubes 1600 dual port

Ask and give advice here
Post Reply
Ricoffy
Oil Stain
Posts: 113
Joined: Fri Jul 12, 2019 11:06 am
What model do you have?: 1600 off-road thing
Location: Ovambo Land
Has thanked: 34 times
Been thanked: 5 times

Replacing push rod tubes 1600 dual port

Post by Ricoffy »

Hi Gents,

Trust you are doing well. I am busy building a farm buggy listed under this thread: viewtopic.php?f=23&t=38835

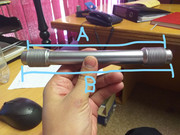
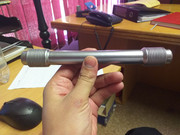
I need to replace the push rod tubes and could not find any of the spring-loaded tubes locally, so I got these:
Image

I need some advice (I am a complete noob on mechanical issues) on how to install them correctly. This is what I intend to do:

1) Remove valve cover;

2) Remove rocker assembly;

3) Remove push rods (and keep them in order as I remove it)
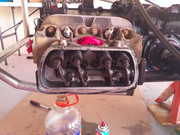
4) Remove the head;

5) remove the old tubes and replace with new tubes (in this regard, with what grease can I seal the new tube seals - standard WB grease? I have also read somewhere that the tubes need to be stretched to 190mm - but as I measure the new tubes the length between the seals as they seat properly is already at 190mm. Is it still necessary to stretch them or is it a stretch until it fits properly situation?)

6) Re-attach the head (What is the tightening order?)

7) Insert the push rods and re-attach the rocker assembly;

8) Check clearances.

Any advice would be appreciated.

Thank you in advance


Knowledge is knowing a tomato is a fruit.
Wisdom is knowing not to use it in a fruit salad...
Ricoffy
Oil Stain
Posts: 113
Joined: Fri Jul 12, 2019 11:06 am
What model do you have?: 1600 off-road thing
Location: Ovambo Land
Has thanked: 34 times
Been thanked: 5 times

Re: Replacing push rod tubes on a 1600 dual port motor

Post by Ricoffy »

A = 190mm

B = 210mm


Image

A pic of the rocker assembly


Image
Knowledge is knowing a tomato is a fruit.
Wisdom is knowing not to use it in a fruit salad...
User avatar
retrovan
Donor
Donor
Posts: 8709
Joined: Mon Feb 07, 2011 8:51 pm
What model do you have?: 52T1,68FB,72Bay,75FL
Location: Eich! no, in Jefferys Bay
Has thanked: 421 times
Been thanked: 539 times
Contact:
Netherlands

Re: Replacing push rod tubes 1600 dual port

Post by retrovan »

Most guys stretch the tubes past 190 mm as it will seat better if clamped down by the head.

The heads are normally center bottom left, center top right, center bottom right, center top left, outer bottom right, outer top left, outer bottom left, outer top right.

As most cars you need to start in the center , crisscross to the outside.

Herman
1952 Split Beetle 1835cc
1968 Fastback 2Lt.type4
1972 Low Light Bay Panel Van 2Lt type 4
1975 Fleetline Panel Van 1914cc
2020 MeFusco Beetle Truck 2Lt type 4
1972 FT Hahn SP 1776 cc
73type2
Pushrod
Posts: 987
Joined: Fri Apr 21, 2017 11:37 am
What model do you have?: '73 T2 Single Cab
Location: Cape Town
Has thanked: 141 times
Been thanked: 100 times
France

Re: Replacing push rod tubes 1600 dual port

Post by 73type2 »

Try to position the tubes so that the seam faces up. I don't know if it really helps but I was told it reduces the chance of leaks.
User avatar
Edmond
Valve
Posts: 1121
Joined: Sun Jun 15, 2008 7:57 pm
What model do you have?: 1973 Baja Bug
Location: Burgundy Estate, Cape Town
Has thanked: 22 times
Been thanked: 31 times

Re: Replacing push rod tubes 1600 dual port

Post by Edmond »

Be careful when removing the heads that you don't unseat the sleeves by the casing otherwise you will have to clean off the old sealant and reseal them before a major oil leak appears
Dawie
Fuel Injection
Posts: 2110
Joined: Sat Sep 30, 2006 10:25 pm
What model do you have?: Aircooled, various
Location: Kaapstadt
Has thanked: 42 times
Been thanked: 207 times
South Africa

Re: Replacing push rod tubes 1600 dual port

Post by Dawie »

Number
1)
2)
3)
4)
and 5)
After removing tinware, clean long block to "medically clean" status BEFORE removing heads. Pressure cleaning, scratching away dirt, degreaser, dishwashing soap, boiling water, pressurised air, etc.

Also: an old trick is to fine polish the sealing surfaces in a circular direction. Using common sense methods. Both case and heads. Also pushrod tubes. In the end, the sealing surfaces should see no casting flashes or seams.

Those pushrod seals from the cheapy engine gasket kits, discard them and use proper pushrod seals. Because the cheapy seals are not resistant to oil and not resistant to heat. They harden and leak within a few months.
Doing so will ensure a lifetime of no leaking.
Staying Aircooled is so much nicer.
Do'nt assume anything- (While doing fault-finding).
Ricoffy
Oil Stain
Posts: 113
Joined: Fri Jul 12, 2019 11:06 am
What model do you have?: 1600 off-road thing
Location: Ovambo Land
Has thanked: 34 times
Been thanked: 5 times

Re: Replacing push rod tubes 1600 dual port

Post by Ricoffy »

Dawie wrote: Wed Aug 21, 2019 11:31 pm Number
1)
2)
3)
4)
and 5)
After removing tinware, clean long block to "medically clean" status BEFORE removing heads. Pressure cleaning, scratching away dirt, degreaser, dishwashing soap, boiling water, pressurised air, etc.

Also: an old trick is to fine polish the sealing surfaces in a circular direction. Using common sense methods. Both case and heads. Also pushrod tubes. In the end, the sealing surfaces should see no casting flashes or seams.

Those pushrod seals from the cheapy engine gasket kits, discard them and use proper pushrod seals. Because the cheapy seals are not resistant to oil and not resistant to heat. They harden and leak within a few months.
Doing so will ensure a lifetime of no leaking.
Thanks Dawie.

Is there a gasket between the heads and the case I have to look out for?
Knowledge is knowing a tomato is a fruit.
Wisdom is knowing not to use it in a fruit salad...
Haans
Camshaft
Posts: 893
Joined: Wed Apr 20, 2016 7:10 pm
What model do you have?: 1960 ghia
Location: Nelson Mandela Metro
Has thanked: 1 time
Been thanked: 107 times
South Africa

Re: Replacing push rod tubes 1600 dual port

Post by Haans »

These tubes are a pain!!.....but if you follow the advice given here,....you stand a chance that maybe only one tube end will sweat!!!😳🤣🤣🤣🤣.
Please note that when you believe it is clean,......start the process again!!!!!!!! It can never be clean enough!
When the torque process starts,....chase everybody away!!!!,.....no ,....yes no interuptions!!! Make a drawing of sequence,......I did. If I can recall the 1st sequence is different to the 2nd sequence.
Some say glue to the seals on the ends of the tubers,.....others say plain engine oil ?????? Wait for the gurus to give guidance with this

Do not take a drink or speak to anybody untill you are done!!!

Enjoy!!!!!!! Haans
Post Reply