Page 8 of 27
Re: Fuel injection rebuild
Posted: Fri Sep 28, 2018 6:06 pm
by Tony Z
I've been wondering how much progress you;ve made but never actually got around to asking.
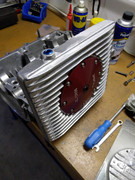
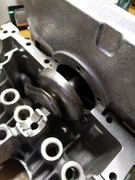
Looks like you've been busy! Case is looking good, plenty cleaning up has happened since I saw it last. Plugs look good, well done
Re: Fuel injection rebuild
Posted: Sat Sep 29, 2018 7:08 am
by Wentzel
Looking great, I have been thinking about the extra breather on top of the case but havent made up my mind. Probably a good idea for non stock engines.
Re: Fuel injection rebuild
Posted: Sun Sep 30, 2018 3:50 pm
by Simmy
Between crutches and an exam, I just didn't get around to much work on the car, let alone posting about it.
But I did put in the extra vent. It's certainly overkill for this engine, but I am not venting the valve covers, so I want it breathing as well as it can.
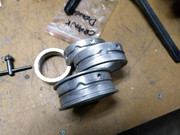
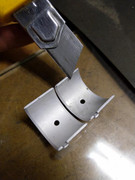
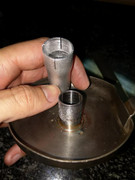
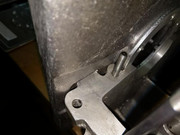
Also managed to check out the new bearings and their fit withing the case. In the end I managed to get a set of Mahle mains, KS for the cam and AE bearings for the big ends on the rods. The Mains are reasonable, but I don't really like the look of the split bearings. There are surface defects on the outer face of the bearing, and they are a different material... Much shinier. Anyone noticed this before? Is it normal?
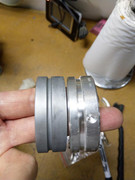
They also need notches to match the oil hole.
Re: Fuel injection rebuild
Posted: Mon Oct 01, 2018 11:33 am
by Tony Z
your shiney bearings are probably just a different batch. I wouldnt worry. Remember, white metal is classed as a bearing material but it is a sacrificial material, not meant to be used as a bearing, but as a "get out of the way instead of seizing" if there isnt any oil.
The oil holes... modifying the bearings is common practice now, they never line up. Just another reason that building an engine (or blueprinting) isnt a quick job like so many think.
You better make sure you do the thrust bearing too - that one will seize if you dont cut a slot for it.
Re: Fuel injection rebuild
Posted: Mon Oct 01, 2018 6:22 pm
by Simmy
Thanks Tony. I was a little worried and was thinking about getting another set, but I wasn't sure if it would land up with the same issue.
I plan to notch all of the bearings except number 1, which seems to be inline with the hole already. There isn't anything else to be done other than notching, cleaning and generally measuring them is there?
Re: Fuel injection rebuild
Posted: Mon Oct 01, 2018 11:19 pm
by Tony Z
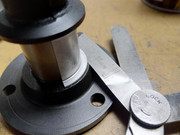
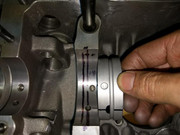
I just grind a path (notch) in the backs to allow the full oil supply to enter the groove without being limited by the bearing. Generally there isnt much more needed.
Check the cam bearings too, I've found some which cover the oil drain slot by the plug.
Re: Fuel injection rebuild
Posted: Sat Oct 06, 2018 7:30 pm
by Simmy
Re: Fuel injection rebuild
Posted: Sat Oct 06, 2018 7:39 pm
by Tony Z
nice one and well spotted.
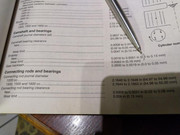
From memory, I sand my cam bearings to 0.1mm and install like that. Some people have said you should put the cam in the case with the bearings fitted to 0.00mm endplay, torque the block together and smack the cam back and forth with a mallet a few times, then check the thrust.
Re: Fuel injection rebuild
Posted: Sat Oct 06, 2018 7:42 pm
by Simmy
Ha! Found the answer to my question... It looks like I am actually dead on! There is a typo in the Haynes manual that threw me off, but I double checked Bentley where they list it correctly.
Re: Fuel injection rebuild
Posted: Sat Oct 06, 2018 7:47 pm
by Tony Z
nicely done!
Re: Fuel injection rebuild
Posted: Sat Oct 06, 2018 9:37 pm
by Simmy
Thanks Tony. And I prefer your method... Mallets just sound like a way of persuading it to fit.
I have also been avoiding torquing the case together since the wrench I have is rated for 30-150Nm. I will go invest in one later this week before I go and see how well it spins with the case bolted up.
Re: Fuel injection rebuild
Posted: Sat Oct 06, 2018 10:18 pm
by Wentzel
Some good progress, when do you plan to do final assembly? I also read about the mallet but used the sanding method too since the other method seems rough.
Will be working on my engine too this week. I find it relaxing to sort all the small things at your own pace.
Sent from my EML-L09 using Tapatalk
Re: Fuel injection rebuild
Posted: Sun Oct 07, 2018 8:57 am
by Simmy
Thanks Wentzel. I haven't been over to the project other threads in a while, so I have lost track of where you are with yours. I hope it's going well!
It is rather satisfying, and it certainly teaches one to develop patience! However, I find that people don't understand why it takes so long to finish this sort of project.
I don't really have a deadline... The closest I have is "ideally this year". But I have opted to run it in on the stock carb and fuel system, so at least that will simplify some of the build and help me get to the end.
Re: Fuel injection rebuild
Posted: Tue Oct 09, 2018 7:22 am
by Simmy
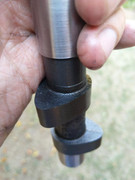
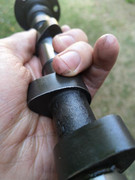
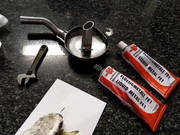
So with the cam and oil pump looking OK, I moved on to the oil pickup and extended sump.
The pickup extension was glued on with the Wurth equivalent of JB weld (and it even smells the same). I did run a test on it to make sure it would work... So far our kettles handle remains attached, and there was no change in hardness after submerging a sample in oil for 2weeks).
I roughing up the surfaces should also ensure that it stays stuck.
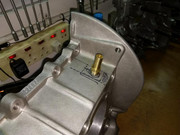
Then the extended sump. Clearance in some places was a little tight, so those areas were filed down. A plug was also added in case I want to add a return line for a turbo later on. And then I just trial fitted the mag plate for the fun of it

I hope to go and get a torque wrench today and then I can clamp the case together to really see how things are fitting together.
Re: Fuel injection rebuild
Posted: Tue Oct 09, 2018 12:04 pm
by retrovan
Due to the near stripped threads on the oil change plate, I used longer bolts to go through the extended sump, through the normal mounting holes and fitted a lock nut with thread lok onto the inside of the original sump.
Now I am sure it will not come loose and I can apply a higher torque to the bolts without fear of stripping and loosing my sump and oil.
No leaks and now much safer system.
Put a hole into it for a temp thermocouple while you have it out, you can always plug it for now.
I would still put a clamp on the pipe extension, as oil additives may kill the sealant.
Herman