Page 10 of 13
Re: Project Fleetline
Posted: Fri Oct 07, 2011 7:55 am
by fig
sean wrote:I think this will hopefully be the final bit of mechanical attention to get it in tip top shape.
Until the next thing needs attention ...
I don't know if you replaced the rear axle seal and o-rings, but it seems the one available now are total crap. I'm finding that I often have to replace them several times in quick succession before getting a set that actually seals. nd inevitably each time they leak they foul the brakes, which then need relining even though they're new.
As well as fixing the Dormobile's flywheel oil leak this weekend, I also have to redo the new axle seals on the newly rebuilt transmission as both of them are leaking.

With a leak as bad as you describe, Sean, it's probably the small o-ring that sits between the bottom outer bearing and the spacer that has failed.
Does anyone have a recommendatio for a trustworthy brand of rear axle seal kits? The last set I got from the FLAPS had a piece of bent wire instead of a split pin for the axle nut.

Re: Project Fleetline
Posted: Fri Oct 07, 2011 8:35 am
by sean
The only seals I replaced were the axle seals, I didn’t see any o-rings so maybe this is the problem.
With the brakes it will be the third time they have to be re-lined. Getting a bit annoyed now.
Re: Project Fleetline
Posted: Fri Oct 07, 2011 8:44 am
by calooker
The seal kits available local is a hit & a miss when it comes to quality, I can get the German kits, R140 each, they work out a lot cheaper when the cheap local seals mess up your shoes, and you need the job done all over again.
Re: Project Fleetline
Posted: Fri Oct 07, 2011 8:57 am
by retrovan
fig wrote:sean wrote:............
I don't know if you replaced the rear axle seal and o-rings, but it seems the one available now are total crap. I'm finding that I often have to replace them several times in quick succession before getting a set that actually seals........
Hi Fig,
I think You are correct, with the rubber from the rubber tree shortage, the manufacturer seems to be reducing the percentage in the mix, so they become harder.
What I find, works for me, is to wipe the seal surface with Brake Fluid, before I start and to let it soak in,
Then I fit bearings, wipe the "O"rings, Big and Small, with WB grease, and fit them, then wipe the seal with WB grease and fit it.
This allows the seal to soften, and be lubricated for the start-up so it will not run dry.
(PS.. Brake Fluid Lubricates, and softens rubber.)
Hope this helps....
Herman
Re: Project Fleetline
Posted: Fri Oct 07, 2011 11:52 am
by Tony Z
I always buy my seals from bearing man
Another quick tip. You are supposed to put the seal into the cover and then slip it over the spacer to make the seal.
I have found that the seal sometimes flips over, not sealing as it should.
My success rate with those seals is better if I put the spacer into cover, then install the seal so I can see it is 100%. Then fit all three to the drive shaft as 1 unit
Re: Project Fleetline
Posted: Fri Oct 07, 2011 12:19 pm
by retrovan
Tony Z wrote:I always buy my seals from bearing man
Another quick tip. You are supposed to put the seal into the cover and then slip it over the spacer to make the seal.
I have found that the seal sometimes flips over, not sealing as it should.
My success rate with those seals is better if I put the spacer into cover, then install the seal so I can see it is 100%. Then fit all three to the drive shaft as 1 unit
I Second that ...

Re: Project Fleetline
Posted: Fri Oct 14, 2011 3:18 pm
by davidminigreen
Hi Sean, fantastic work on your Fleetline, looks fantastic. I have just got a Feetline myself and if I didn't know better I would think it was the same bus, the rust you had is nearly identical to mine. I've done the roof and windows and i'm now working on the floors (expensive bit!), the chasis is in really good condition so no worries there. I will post some pics up soon an the Projects section.
One question please. there is an electrical plug in the engine bay on the top right, what is it for?
Nice work
David
Re: Project Fleetline
Posted: Sat Oct 15, 2011 3:31 pm
by jolas
Hi David, welcome, we would love to see photos of your Fleetline project asap, please tell us more about yourself and your bus, where about you are, etc, etc - there is an introduction thread for this.
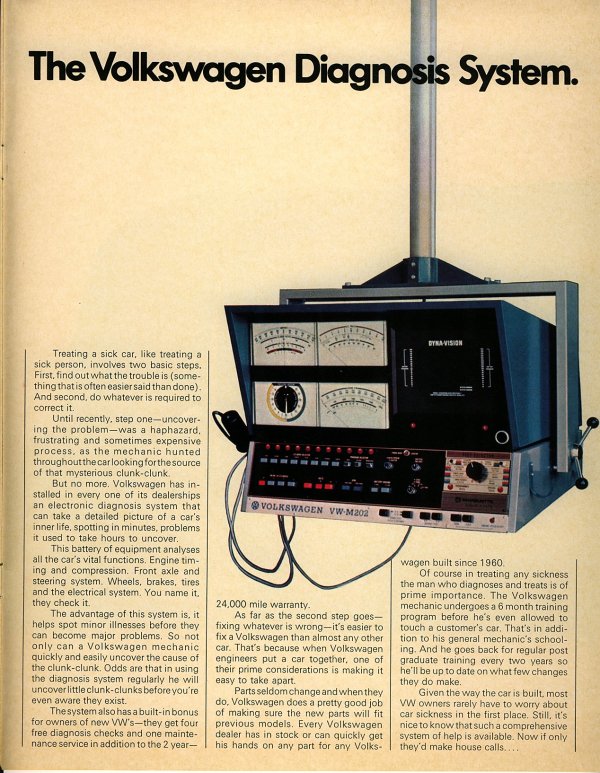
The intention back in the day was to plug your bus into a "machine" for a diagnostic report when it went in for a service, etc, etc., the mechanics would have plugged it into that box your refer to.
I would love to know myself if they actually used this on a large scale and how accurate it was - Fig do you know more

Cheers
Re: Project Fleetline
Posted: Sun Oct 16, 2011 9:36 pm
by sean
Ok, so Friday after work I went over to collect my gearbox. A bit more work was needed than I bargained for, but hopefully all was done that was necessary. The reduction box bearings were replaced, the old ones were in quite a state, lot of pitting, the selector rod was replaced as the old one was worn where it goes through the bush in the nose cone, the 4th gear was helixed (hope I got the term right there?), the one selector fork was worn, obviously from holding into gear to stop it jumping out and helicoils were inserted into the reduction boxes where they attach to the spring plates. The report back was that the rest of the gearbox was still in very good condition, so no further work needed.
Got home and installed the gearbox, did my brakes over, bleeding etc, all the wheels on and then installed the motor. I also got the new clutch kit and had the flywheel skimmed. Attached the bumper, hubcaps, the lot, everything and as it was late I left it for the morning to take it for a test drive.
Pulled it out of the garage and started driving up the road, after about 5m the back wheels locked up.

I got one hell of fright.
Put it back into neutral but the gearbox wasn’t. It’s stuck in a gear but I can feel the selector moving. Something is seriously wrong.
It won’t select other gears now either.
So after all of this work and my trip for the day ruined, I had to take the gearbox out again. So this week I have to take the gearbox back that they can see what they did wrong.

At least the clutch felt nice and smooth while pulling it out the garage.
Worn bearing

Worn selector rod

Clutch kit with flywheel skimmed

Re: Project Fleetline
Posted: Mon Oct 17, 2011 2:08 pm
by fig
jolas wrote:Hi David, welcome, we would love to see photos of your Fleetline project asap, please tell us more about yourself and your bus, where about you are, etc, etc - there is an introduction thread for this.
The intention back in the day was to plug your bus into a "machine" for a diagnostic report when it went in for a service, etc, etc., the mechanics would have plugged it into that box your refer to.
I would love to know myself if they actually used this on a large scale and how accurate it was - Fig do you know more
Cheers
Bummer about the gbox Sean

Welcome to ACVWSA David. As jolas says, please introduce yourself in the newbies thread and then post pics of your Fleetline in its own thread!

Yes, the electrical connector you refer to is, as jolas said, where the VW dealer would have connected the dagnostic computer. I think they introduced this on all models of VW in the early 1970s; the earliest reference I've seen was in a 1970 411 owner's manual, but I don't think all models got them at the same time. I really don't know if the info provided in the diagnostic report was useful and I don't know anyone who has a working VW diagnostic computer from the 1970s, so these things are redundant nowadays.
Re: Project Fleetline
Posted: Mon Oct 17, 2011 6:34 pm
by retrovan
Here a post, thanks to Pine, on the same unit.........
Re: Project Fleetline
Posted: Thu Oct 20, 2011 1:40 pm
by sean
Collected my gearbox yesterday and installed it last night. Took it for a drive early this morning and it is working beautifully. It’s much quieter and no jumping out of 4th.

All happy again.
I was there when they stripped it and it was a thick washer come spacer between the 4th gear and bearing which had locked itself to the bearing. As the bearing pattern was imprinted into the washer from the years of use on assembly it was not in the same place and as it was an uneven surface gripped the outer shell of the bearing and ceased against it.
This could almost not be seen with the eye but when run over with very fine emery paper it could be noticed. This was replaced and re-assembled again.
My rear seat backrest should be done at the upholsterer tomorrow, so nearly coming to a completion.
Re: Project Fleetline
Posted: Thu Oct 20, 2011 2:31 pm
by jolas
Cool !
Re: Project Fleetline
Posted: Thu Oct 20, 2011 5:06 pm
by davidminigreen
Hi, thanks for the information on the socket, I thought it might have been for testing.
I will introduce myself in the newbe section and get some pics of my Fleetline up. You may recognise it as it's been near the beach fron in Fish Hoek for many years at 2nd Hand Surf.
Re: Project Fleetline
Posted: Fri Oct 21, 2011 7:30 am
by fig
This one?
