Well done TonyZ. A lot of work and the skills I must say ... well done !
72 - Freddie Booysen
72 Bay - unnamed WIP
72 D/C - Blue abomination!
74 Beetle - BEE
[emoji1221]
Tony Z has a Baywindow Panel Van
Forum rules
Only post pictures of YOUR cars here.
Only post pictures of YOUR cars here.
-
freddiebooysen

- Crankshaft
- Posts: 765
- Joined: Sun Aug 07, 2016 7:56 am
- What model do you have?: 1972
- Location: Pretoria
- Been thanked: 47 times
-
sean

- Transmission
- Posts: 2403
- Joined: Sun Aug 03, 2008 8:51 pm
- What model do you have?: Bays & Splits
- Location: Somerset West
- Has thanked: 63 times
- Been thanked: 227 times

Re: Tony Z has a Baywindow Panel Van
Thanks for the posts Tony, always very interesting to see your work. I'm not so sure about your Retrovan move with that grinder and the input shaft though.....  I was looking for a long one for ages...... You just need to turn the diff to where there is an opening, then the reverse gear can slide forward into that opening and the input shaft screwed out to remove.
I like your idea of making a performance motor but with drivability in mind. Many of these "performance" motors I have ever experienced are a waste in my mind because they are not easy to live with, and to me actually sound quite sickly too, its just not the same compared to a lovely smooth running original motor.
I would one day like to take your bus for a drive to experience this motor you have build.
-
retrovan
- Donor

- Posts: 8717
- Joined: Mon Feb 07, 2011 8:51 pm
- What model do you have?: 52T1,68FB,72Bay,75FL
- Location: Eich! no, in Jefferys Bay
- Has thanked: 425 times
- Been thanked: 543 times
- Contact:

Re: Tony Z has a Baywindow Panel Van
sean wrote: Wed Jun 21, 2017 8:07 am ..... I'm not so sure about your Retrovan move with that grinder ........
Herman
1968 Fastback 2Lt.type4
1972 Low Light Bay Panel Van 2Lt type 4
1975 Fleetline Panel Van 1914cc
2020 MeFusco Beetle "Bakkie" 2Lt type 4
1972 FT Hahn SP 1776 cc
1972 Low Light Bay Panel Van 2Lt type 4
1975 Fleetline Panel Van 1914cc
2020 MeFusco Beetle "Bakkie" 2Lt type 4
1972 FT Hahn SP 1776 cc
-
Tony Z

- Donor
- Posts: 14992
- Joined: Wed Sep 14, 2005 8:33 am
- What model do you have?: 2.3L 69; 1302; P/Van
- Location: Klipheuwel (near Durbanville), Cape Town or working at sea
- Has thanked: 192 times
- Been thanked: 488 times
Re: Tony Z has a Baywindow Panel Van
@sean
Trust me, I tried and I tried and I tried. I even packed it up and came back the next day. We arent talking 20 min here and then pulling out the grinder, we are talking hours of checking, double checking and trying again. No matter what I did this input shaft wouldnt fit over the diff. It came close, but I just couldnt get it to come out.
This 091 diff is a lot larger than the diff in the 1600 box. That input shaft came out in seconds. And then I had to put it back in because I couldnt get the 091's one out.
You can believe me when I say that I didnt want to cut the shaft and I only did it for lack of other options. Maybe I did it wrong, but I cant see that shaft coming out over the diff.
My 1700 engine was built with the same logic in mind. A bit of extra power and torque, but not a street monster.
It comes down to application and building an engine for that specific application.
You can visit anytime you want, just call ahead of time. I've told you this before.
ANGRRR
http://www.aircooledvwsa.co.za/viewtopi ... 23&t=14775
1302S
http://www.aircooledvwsa.co.za/viewtopi ... 23&t=33521
Panel Van
http://www.aircooledvwsa.co.za/viewtopic.php?p=288723
http://www.aircooledvwsa.co.za/viewtopi ... 23&t=14775
1302S
http://www.aircooledvwsa.co.za/viewtopi ... 23&t=33521
Panel Van
http://www.aircooledvwsa.co.za/viewtopic.php?p=288723
vader wrote: The Force is strong with you young Sith Lord Z!
-
slak

- Donor
- Posts: 1031
- Joined: Wed Jul 14, 2010 11:07 am
- What model do you have?: Baja, Bay , Beetle
- Facebook: http://www.facebook.com/editprofile.php
- Location: Jhb , Germiston
- Has thanked: 7 times
- Been thanked: 32 times
Re: Tony Z has a Baywindow Panel Van
I Like U'r way of thinking on the engine build especially going with std Valve sizes because that
will speed the air up in the low revs to such an extend that the torq created in the low revs will allow
U to almost pull away in 2nd gear even with the 110 cam and in the higher revs the cam will start doing
its work nicely to make it run almost the same as a std 1600 just with way more power
i am also in the proccess of building a bigger motor for my bus that is why i bought one of those Alu blocks the other day
i am planning to build a 90.5mm x 78mm 2007cc motor as my thinking goes i want it to rev almost identical to a 1600
but be able to run all day long with no problems on the bottom end i was thinking of going with a w100 cam an 40 x 35 valved
heads but your way also makes good sense
U Only Live Once Right !!!
-
Tony Z
- Donor
- Posts: 14992
- Joined: Wed Sep 14, 2005 8:33 am
- What model do you have?: 2.3L 69; 1302; P/Van
- Location: Klipheuwel (near Durbanville), Cape Town or working at sea
- Has thanked: 192 times
- Been thanked: 488 times
Re: Tony Z has a Baywindow Panel Van
@slak
The engle 100 cam was awesome in my 1700, it should also be good in the 2007 of yours.
The engle 100 cam was awesome in my 1700, it should also be good in the 2007 of yours.
ANGRRR
http://www.aircooledvwsa.co.za/viewtopi ... 23&t=14775
1302S
http://www.aircooledvwsa.co.za/viewtopi ... 23&t=33521
Panel Van
http://www.aircooledvwsa.co.za/viewtopic.php?p=288723
http://www.aircooledvwsa.co.za/viewtopi ... 23&t=14775
1302S
http://www.aircooledvwsa.co.za/viewtopi ... 23&t=33521
Panel Van
http://www.aircooledvwsa.co.za/viewtopic.php?p=288723
vader wrote: The Force is strong with you young Sith Lord Z!
-
Tony Z
- Donor
- Posts: 14992
- Joined: Wed Sep 14, 2005 8:33 am
- What model do you have?: 2.3L 69; 1302; P/Van
- Location: Klipheuwel (near Durbanville), Cape Town or working at sea
- Has thanked: 192 times
- Been thanked: 488 times
Re: Tony Z has a Baywindow Panel Van
I just found a photo of my bus which I thought I'd post here.
It still had dirt on it from the trip to Bloem when this photo was taken - we cant wash our cars here in CPT thanks to the water shortage.
And yes, thats me carrying the backpack, what you cant see is mini Z's nappy getting changed inside the van

It still had dirt on it from the trip to Bloem when this photo was taken - we cant wash our cars here in CPT thanks to the water shortage.
And yes, thats me carrying the backpack, what you cant see is mini Z's nappy getting changed inside the van
ANGRRR
http://www.aircooledvwsa.co.za/viewtopi ... 23&t=14775
1302S
http://www.aircooledvwsa.co.za/viewtopi ... 23&t=33521
Panel Van
http://www.aircooledvwsa.co.za/viewtopic.php?p=288723
http://www.aircooledvwsa.co.za/viewtopi ... 23&t=14775
1302S
http://www.aircooledvwsa.co.za/viewtopi ... 23&t=33521
Panel Van
http://www.aircooledvwsa.co.za/viewtopic.php?p=288723
vader wrote: The Force is strong with you young Sith Lord Z!
-
didi

- Valve
- Posts: 1133
- Joined: Sat Oct 29, 2005 7:16 pm
- What model do you have?: 1970 SO67R T2
- Location: Just visiting
- Has thanked: 9 times
- Been thanked: 38 times
Re: Tony Z has a Baywindow Panel Van
Hi Tony,Tony Z wrote: Sun Aug 28, 2016 9:13 pm OK, so maybe its time for a bit of an update.
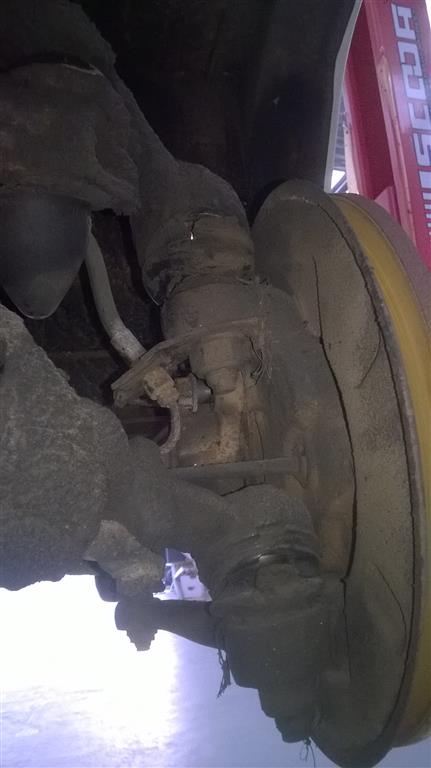
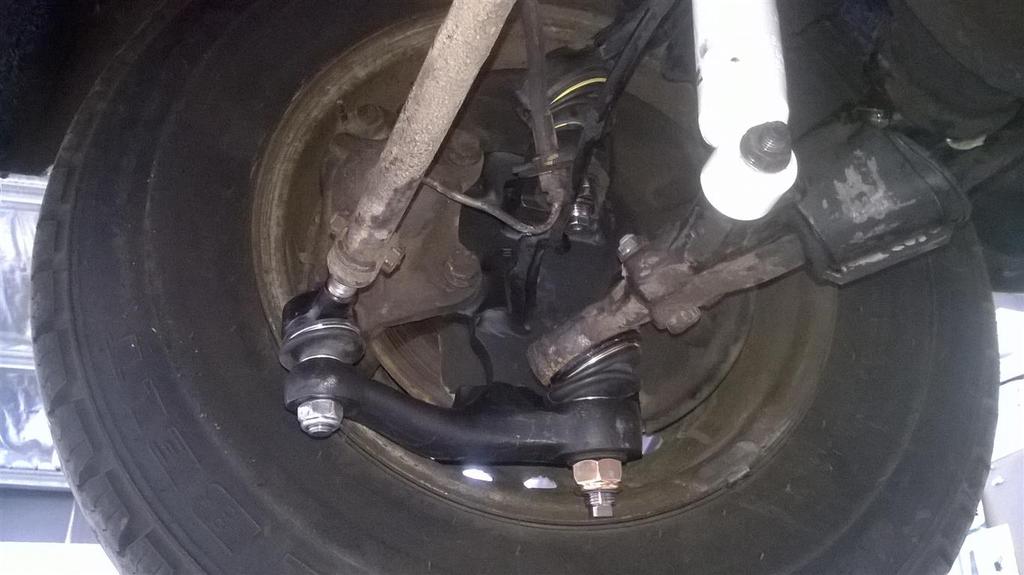
My ball joints were in dire need of replacement as were my wheel bearings. So, I got hold of a proper set of German ball joints and went about fitting them. Lets just say that this isnt a job for the faint hearted and not having a press leads to things being rather entertaining.
The bearings were simple, old out, go to SKF, get new bearings and seals, put new in, incl races.
As for the ball joints, well this took a lot more time than I thought.
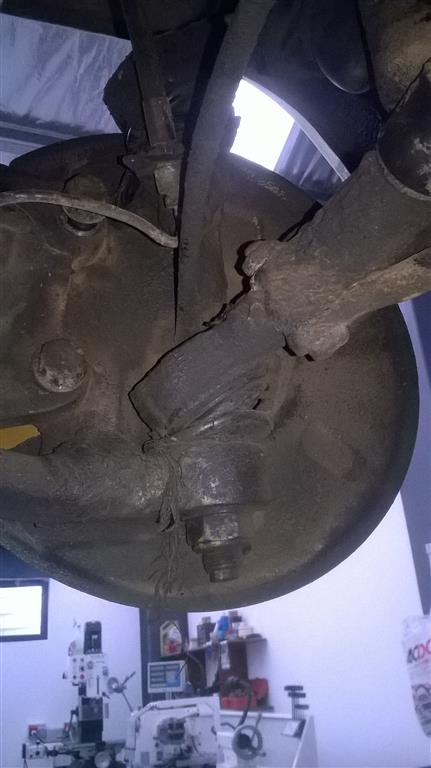
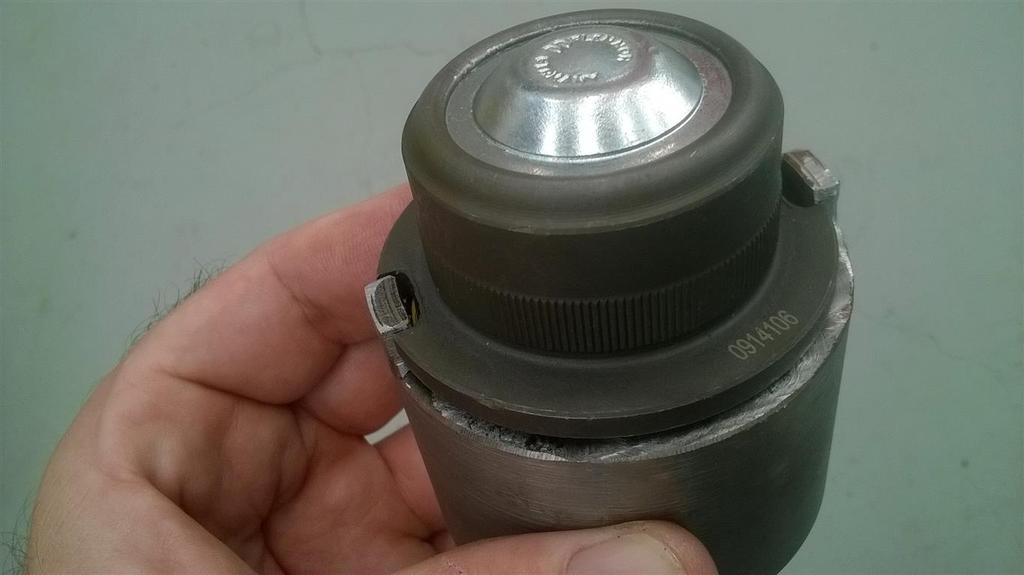
As can be seen below, the boots were shot and they had lived for quite a while with the torn boots.
As per the manual, if dirt gets past the boots into the socket, then you need new balljoints. Why? Well, the joint itself is supported by a special type of plastic or nylon. So, if sand gets in, then it tears up the plastic socket.
The old balljoints still had the VW stamp on them, so its possible that they were the originals.
So, how to go about it...
Obviously start with taking everything apart.
Then use a 4lb hammer and drift to pop them out.
OK, that didnt work.
Youtube
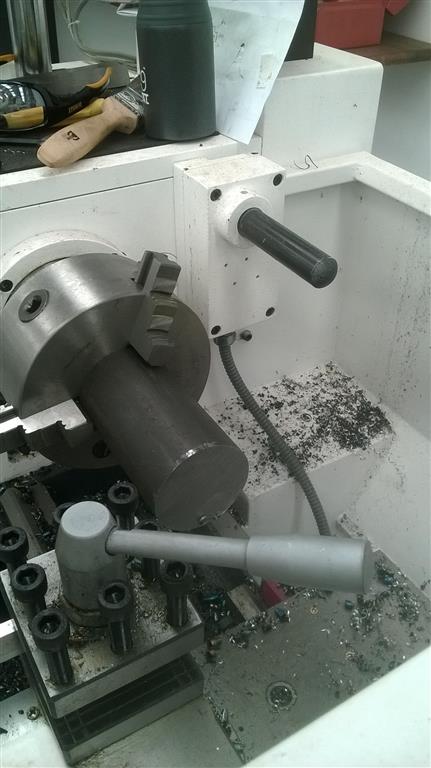
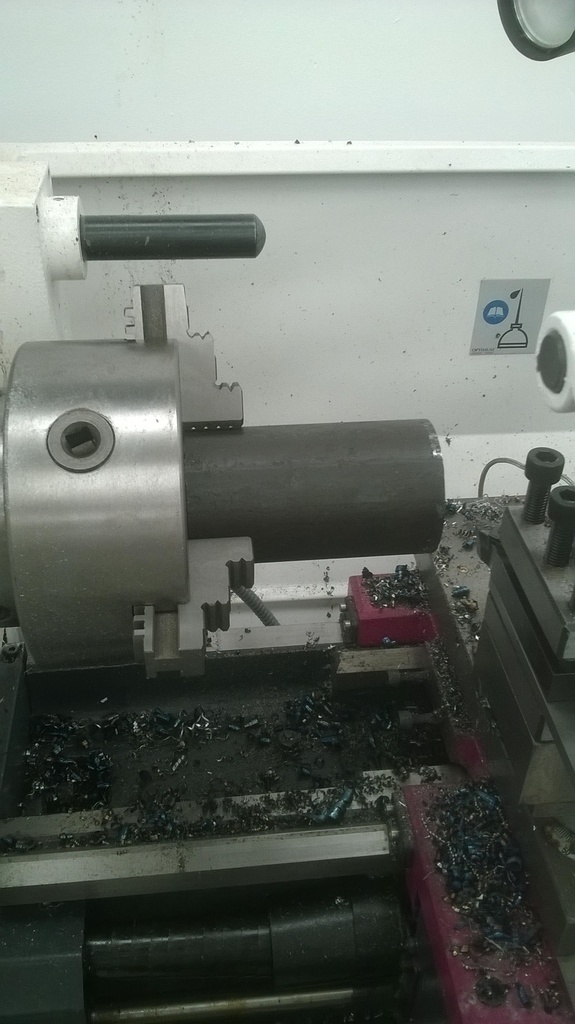
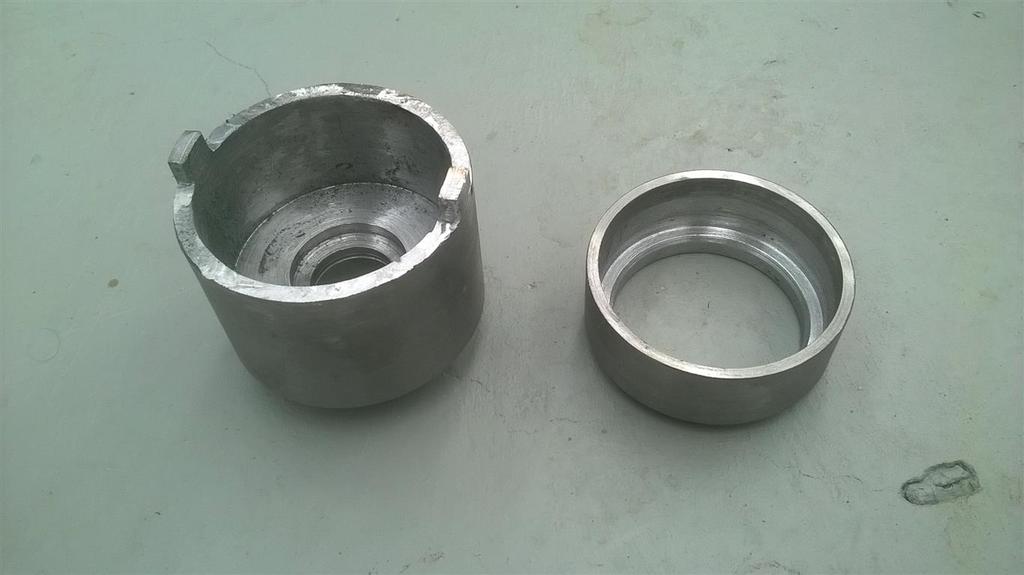
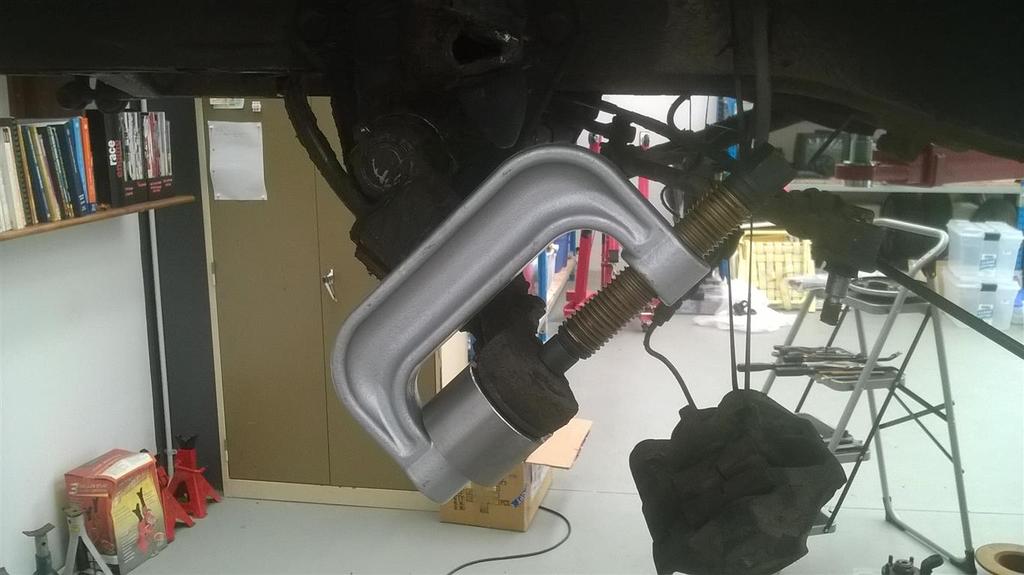
Get hold of a ball joint removal tool.
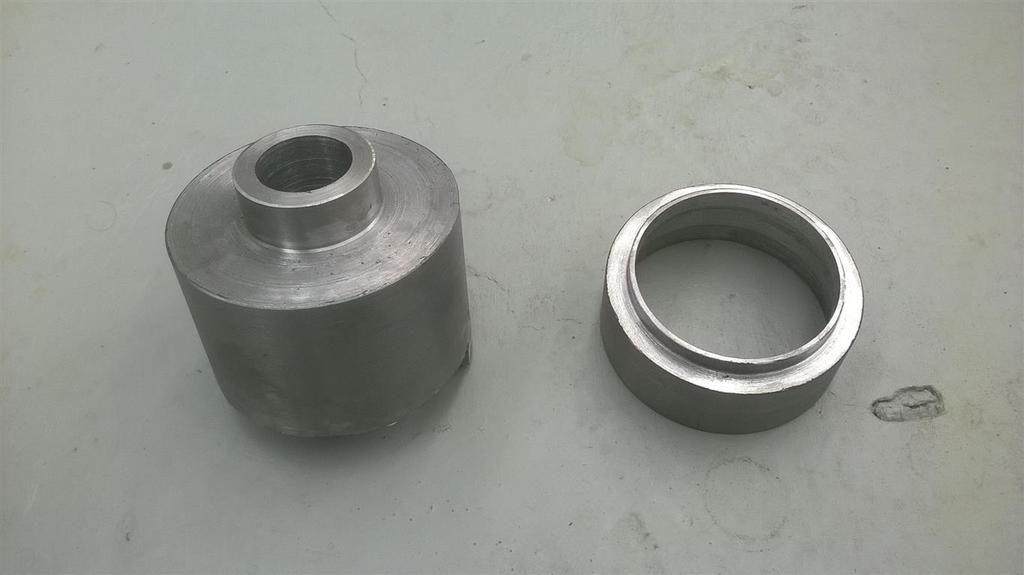
Set it up and find that none of the jigs work and discover that VW has a special tool that us used to press out the balljoint... so measure up the new balljoints, design and make the jig to take it out and another to press it back in...
start with
and end up with
OK, use ball joint removal tool.
Nope, I see it flexing too much - so add heat... nope, this doesnt work either. OK, keep the heat, press harder, surely it will pop off sooner or later - ok, maybe I should have made my jib a lot stronger - the tabs have now bent out of the way, I suppose 5mm thick isnt enough.
So now what?
I'll leave the rest up to your imagination. And no, I didnt take it to someone with a 30ton press, I did it all myself.
Putting it back together was a simple task however.
I do have to thank @fourier for the advice on how to take the anti-sway bar off the front end. Simple when you know how...
Step 1 - clean the damn thing properly.
Step 2 - bend aft tab of carrier down
Step 3 - knock tapered bottom part of carrier forward - whole carrier comes apart and anti-sway bar can be removed.
I am about to go through the same exercise. I have found this info which is a good warning of inferior ball joints on the market:
http://www.wagenswest.com/how_to/bus_va ... arison.php
_______
|©¯¯©|
|©¯¯©|
fig wrote: Isn't the favourite game of all humanity, "I'm right, you're wrong; let me fcuk you up!"
-
Tony Z
- Donor
- Posts: 14992
- Joined: Wed Sep 14, 2005 8:33 am
- What model do you have?: 2.3L 69; 1302; P/Van
- Location: Klipheuwel (near Durbanville), Cape Town or working at sea
- Has thanked: 192 times
- Been thanked: 488 times
Re: Tony Z has a Baywindow Panel Van
Thanks Didi
I found that a while back and have been searching for a good replacement ever since.
I have found stock OEM parts but the suppliers want me to order in quantities of $10 000 at a time...
I am still searching.
I found that a while back and have been searching for a good replacement ever since.
I have found stock OEM parts but the suppliers want me to order in quantities of $10 000 at a time...
I am still searching.
ANGRRR
http://www.aircooledvwsa.co.za/viewtopi ... 23&t=14775
1302S
http://www.aircooledvwsa.co.za/viewtopi ... 23&t=33521
Panel Van
http://www.aircooledvwsa.co.za/viewtopic.php?p=288723
http://www.aircooledvwsa.co.za/viewtopi ... 23&t=14775
1302S
http://www.aircooledvwsa.co.za/viewtopi ... 23&t=33521
Panel Van
http://www.aircooledvwsa.co.za/viewtopic.php?p=288723
vader wrote: The Force is strong with you young Sith Lord Z!
-
retrovan
- Donor
- Posts: 8717
- Joined: Mon Feb 07, 2011 8:51 pm
- What model do you have?: 52T1,68FB,72Bay,75FL
- Location: Eich! no, in Jefferys Bay
- Has thanked: 425 times
- Been thanked: 543 times
- Contact:
Re: Tony Z has a Baywindow Panel Van
I have drilled and taped in Grease gun nippills
I am sure if the open space is filled with grease, the the movement will be nil and the ball joint last longer.
Will let you know as I put on miles.
Herman
I am sure if the open space is filled with grease, the the movement will be nil and the ball joint last longer.
Will let you know as I put on miles.
Herman
1968 Fastback 2Lt.type4
1972 Low Light Bay Panel Van 2Lt type 4
1975 Fleetline Panel Van 1914cc
2020 MeFusco Beetle "Bakkie" 2Lt type 4
1972 FT Hahn SP 1776 cc
1972 Low Light Bay Panel Van 2Lt type 4
1975 Fleetline Panel Van 1914cc
2020 MeFusco Beetle "Bakkie" 2Lt type 4
1972 FT Hahn SP 1776 cc
-
Tony Z
- Donor
- Posts: 14992
- Joined: Wed Sep 14, 2005 8:33 am
- What model do you have?: 2.3L 69; 1302; P/Van
- Location: Klipheuwel (near Durbanville), Cape Town or working at sea
- Has thanked: 192 times
- Been thanked: 488 times
Re: Tony Z has a Baywindow Panel Van
I really need to take pictures of the bus and engine bay sometime, maybe then I'll give a little update.
I took the bus in a for a little cleanup today - I had the outside washed. Its the first wash since before the trip to Bloemfontein in 2016.
Then started playing with a few small things I've been wanting to do for a very long time....
before

After

What do you guys think?
I took the bus in a for a little cleanup today - I had the outside washed. Its the first wash since before the trip to Bloemfontein in 2016.
Then started playing with a few small things I've been wanting to do for a very long time....
before
After
What do you guys think?
ANGRRR
http://www.aircooledvwsa.co.za/viewtopi ... 23&t=14775
1302S
http://www.aircooledvwsa.co.za/viewtopi ... 23&t=33521
Panel Van
http://www.aircooledvwsa.co.za/viewtopic.php?p=288723
http://www.aircooledvwsa.co.za/viewtopi ... 23&t=14775
1302S
http://www.aircooledvwsa.co.za/viewtopi ... 23&t=33521
Panel Van
http://www.aircooledvwsa.co.za/viewtopic.php?p=288723
vader wrote: The Force is strong with you young Sith Lord Z!