Page 17 of 27
Re: Fuel injection rebuild
Posted: Wed Sep 11, 2019 9:00 pm
by fourier
Simmy wrote: Wed Sep 11, 2019 4:40 pm
I want to make the cooling system bullet proof, hence the time spent on those details.
I share your goal in trying to get the cooling system functioning as well as possible...and that does not just mean cooling.
With my latest build, I've set out to make the stock cooling system as good as I can get it. I've spent a lot of time finding good OEM tin, as the aftermarket parts simply don't fit properly. The engine has every piece of sheet metal, and functional thermostatic controlled flaps, as it did when it left the factory. I tested the thermostat before installing it, and added an oil temperature warning switch, just for insurance against a failed thermostat.
The engine has done just over 200km (early days, I know), but I have yet to see the thermostat open fully. Although free to operate, the thermostat does not need to open fully, as the engine runs cool, even with higher compression ratio. Good to know there is some cooling in reserve...
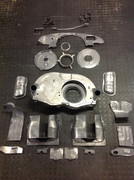
A few pieces cleaned, before paint...
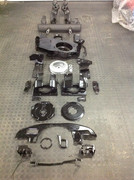
Painted
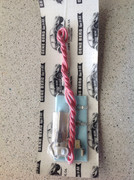
Oil temperature warning switch
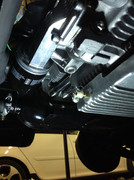
Switch installed
Re: Fuel injection rebuild
Posted: Thu Sep 12, 2019 3:46 pm
by acpaterson
My OCD wouldn't be able to deal with those crooked pea-shooters!
Re: Fuel injection rebuild
Posted: Fri Sep 13, 2019 3:19 pm
by Ricoffy
Looks very good!
Re: Fuel injection rebuild
Posted: Fri Sep 13, 2019 3:48 pm
by Simmy
fourier wrote: Wed Sep 11, 2019 9:00 pm
Simmy wrote: Wed Sep 11, 2019 4:40 pm
I want to make the cooling system bullet proof, hence the time spent on those details.
I've spent a lot of time finding good OEM tin, as the aftermarket parts simply don't fit properly. The engine has every piece of sheet metal, and functional thermostatic controlled flaps, as it did when it left the factory
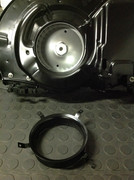
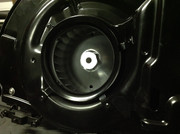
Thankfully I have all of the same tin, even if it isnt in as nice a condition... except for the venturi ring. Thinking about it, I dont think the shroud actually has holes to even fit it? Was this available for specific years? Perhaps dropped in more recent models?
In the anbsence of it, I am just going to seal off the cooling system holes/gaps as best I can. U-channel rubber seems to do a reasonable job of it, but will experiment as I go.
acpaterson wrote: Thu Sep 12, 2019 3:46 pm
My OCD wouldn't be able to deal with those crooked pea-shooters!
I would like to think thats just an optical illusion... and besides... its nothing a big hammer couldnt fix!

Re: Fuel injection rebuild
Posted: Fri Sep 13, 2019 6:23 pm
by Wentzel
I bought an engine long ago that was sealed up with silicon between plates, casing and gaps. Not always pretty but can be done neatly and I like to believe it helps quite a bit.
Re: Fuel injection rebuild
Posted: Fri Sep 13, 2019 9:20 pm
by fourier
Well spotted! The venturi ring is an addition, to help improve the efficiency of the stock fan. I've only ever seen two late model engines that had them fitted from the factory. They were spot welded to the doghouse shroud, so no holes present. I started doing research on them, and eventually imported a few from the States for my engines. They pop rivet in place, and quite an easy install.
Good plan to seal off all the gaps as you've suggested. Don't forget the Hoover bit, and a good seal between the oil cooler and dog house. Every bit of air, going in the right direction, helps.
Al, your OCD can take a rest on this one...it's just an illusion

Re: Fuel injection rebuild
Posted: Wed Sep 18, 2019 5:09 pm
by Simmy
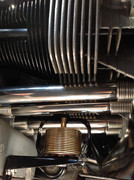
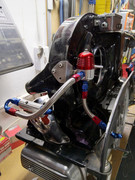
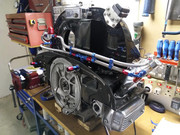
Nearly done with tinware. Fuel lines trial fitted - I really like these AN fittings!
Now I need to find a powder coated. Can anyone recommend someone in the JHB area that won't bend or blast the #*£@ out of the parts?
Re: Fuel injection rebuild
Posted: Thu Sep 19, 2019 7:32 am
by Tony Z
that really is looking pretty!!!
just make sure you can get to those bulkhead fittings once the engine is installed, with the exhaust still fitted. It'd be a shame for you to go through all that effort and then have to remove the exhaust before you can disconnect the fuel lines.
You need a 36hp doghouse shroud to tidy up the final look
Re: Fuel injection rebuild
Posted: Thu Sep 19, 2019 10:04 am
by Wentzel
That looks great. How was the pricing of the fittings? I was thinking of doing something similar, should last a long time without any fuel leaks.
Re: Fuel injection rebuild
Posted: Thu Sep 19, 2019 10:58 am
by Simmy
Thanks!
As far as I can tell, I can reach the fittings. The J-tubes wont obstruct much, and it looks like I can get around the starter and clutch lever.
The total came to about R4k. If you can stick to straight nipple connectors then costs can be contained. The elbows ramp up the price rapidly, as does the quantity of hose (R550 per meter). They offer pushlock fittings which they swear by, but then you use normal rubber hose.
Re: Fuel injection rebuild
Posted: Thu Sep 19, 2019 1:03 pm
by Buged
Hi simmy
Regarding the fuel lines and fittings,
Could you drop me a PM on the supplier details please?
Thanks.
Rick
Re: Fuel injection rebuild
Posted: Thu Sep 19, 2019 3:16 pm
by Wentzel
Thanks was expecting a price like that. I will see which way I go when I get there.
Re: Fuel injection rebuild
Posted: Fri Sep 20, 2019 9:36 am
by Simmy
Wentzel wrote: Thu Sep 19, 2019 3:16 pm
Thanks was expecting a price like that. I will see which way I go when I get there.
I havent had great experiences with fuel lines in the past, so I am going overkill. Maybe running hard lines is an option? It gives a really clean look and is just as safe, but will be cheaper than hose. You can also get away from using the elbow fittings. It might just be more difficult to get all fo the lines bent and routed in some instances.
Re: Fuel injection rebuild
Posted: Fri Sep 20, 2019 10:30 am
by Riaan.N
Looks very nice!

What breather box do you have there and any specific reason for choosing it?
Re: Fuel injection rebuild
Posted: Fri Sep 20, 2019 11:50 am
by Simmy
Its a Scat breather and I will be venting to it from the oil filler and a secondary port I tapped into the fly-wheel side of the case. I am not overwhelmed by it, but I bought it a while back before I knew about case ventilation and would now prefer something different, but will stick with it for now. Later will make a larger unit which links to the induction system to evacuate the case more efficiently.