
Fuel injection rebuild
-
Simmy
- Oil Pump
- Posts: 220
- Joined: Thu Mar 30, 2017 9:07 pm
- What model do you have?: 1978 Beetle
- Location: Johannesburg
- Has thanked: 5 times
- Been thanked: 5 times

Re: Fuel injection rebuild
The replacement pushrod arrived in the mail today! (Despite the delay, it was actually pretty painless)
Already cut and waiting with the others!
Already cut and waiting with the others!
-
Simmy
- Oil Pump
- Posts: 220
- Joined: Thu Mar 30, 2017 9:07 pm
- What model do you have?: 1978 Beetle
- Location: Johannesburg
- Has thanked: 5 times
- Been thanked: 5 times
Re: Fuel injection rebuild
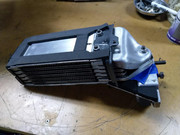
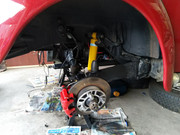
Whilst waiting for my exhaust and some powder coating done, the oil cooler has been cleaned and prepped. Also decided to tackle the gearbox this weekend, so started with draining the oil and then cleaning.
Oil cooler good to go:
Working around the suspension and gearbox will now be a much more pleasant task.
Two questions though... The Bentley manual says there are two magnetic plugs to pull for drain, but I only see one? Is the other the filler?
And when replacing the boots, the manuals indicate orienting the split horizontally, but most people seem to incline it a little. Any reason for the deviation?
-
retrovan

- Donor

- Posts: 8710
- Joined: Mon Feb 07, 2011 8:51 pm
- What model do you have?: 52T1,68FB,72Bay,75FL
- Location: Eich! no, in Jefferys Bay
- Has thanked: 421 times
- Been thanked: 541 times
- Contact:

Re: Fuel injection rebuild
Think some box's have an for and an aft plugs, the filler is on the side halfway up / or halfway down depending how you look at it.
The reason you place it at 45 Deg angle from the top facing back, is that if not properly sealed, the oil can not run out and the water splashing from the road will not be forced in.
Herman
The reason you place it at 45 Deg angle from the top facing back, is that if not properly sealed, the oil can not run out and the water splashing from the road will not be forced in.
Herman
1952 Split Beetle 1835cc
1968 Fastback 2Lt.type4
1972 Low Light Bay Panel Van 2Lt type 4
1975 Fleetline Panel Van 1914cc
2020 MeFusco Beetle Truck 2Lt type 4
1972 FT Hahn SP 1776 cc
1968 Fastback 2Lt.type4
1972 Low Light Bay Panel Van 2Lt type 4
1975 Fleetline Panel Van 1914cc
2020 MeFusco Beetle Truck 2Lt type 4
1972 FT Hahn SP 1776 cc
-
Simmy
- Oil Pump
- Posts: 220
- Joined: Thu Mar 30, 2017 9:07 pm
- What model do you have?: 1978 Beetle
- Location: Johannesburg
- Has thanked: 5 times
- Been thanked: 5 times
Re: Fuel injection rebuild
THanks for the info. I am assuming that the boots can fill to above the mid-point with oil, hence people incline them at 45deg instead? Just seems to me that horizontal places the least amount of stress on the boot, which should allow them to last longer?retrovan wrote: Sun Oct 06, 2019 9:20 pm Think some box's have an for and an aft plugs, the filler is on the side halfway up / or halfway down depending how you look at it.
The reason you place it at 45 Deg angle from the top facing back, is that if not properly sealed, the oil can not run out and the water splashing from the road will not be forced in.
Herman
-
Tony Z

- Donor
- Posts: 15010
- Joined: Wed Sep 14, 2005 8:33 am
- What model do you have?: 2.3L 69; 1302; P/Van
- Location: Klipheuwel (near Durbanville), Cape Town or working at sea
- Has thanked: 192 times
- Been thanked: 488 times
Re: Fuel injection rebuild
put them horizontal and make sure they dont leak... thats what I do
use sealant on the halves
use sealant on the halves
ANGRRR
http://www.aircooledvwsa.co.za/viewtopi ... 23&t=14775
1302S
http://www.aircooledvwsa.co.za/viewtopi ... 23&t=33521
Panel Van
http://www.aircooledvwsa.co.za/viewtopic.php?p=288723
http://www.aircooledvwsa.co.za/viewtopi ... 23&t=14775
1302S
http://www.aircooledvwsa.co.za/viewtopi ... 23&t=33521
Panel Van
http://www.aircooledvwsa.co.za/viewtopic.php?p=288723
vader wrote: The Force is strong with you young Sith Lord Z!
-
AlanH

- Crankshaft
- Posts: 765
- Joined: Thu Jan 17, 2013 7:20 am
- What model do you have?: '70 Westy
- Location: Pretoria
- Has thanked: 128 times
- Been thanked: 86 times

Re: Fuel injection rebuild
And don't overtighten the clamps. If you tighten them too much it will leak.
Wanted parts:
Left sunvisor
Sink faucet
Exhaust to swap for Beetle exhaust
Left sunvisor
Sink faucet
Exhaust to swap for Beetle exhaust
-
Simmy
- Oil Pump
- Posts: 220
- Joined: Thu Mar 30, 2017 9:07 pm
- What model do you have?: 1978 Beetle
- Location: Johannesburg
- Has thanked: 5 times
- Been thanked: 5 times
Re: Fuel injection rebuild
Got a bit distracted last week, but got my powder coated parts back. They bent a lot of it in the process, but I have largely rectified it. Will post pics this evening.
Got the boots off and clean it up a little more, but the kit I have is missing a set of the small clamps. Will need to get a set of stainless ones during the week.
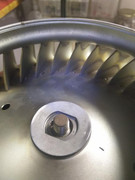
Otherwise, all the fuel lines are now finished, and the alternator is prepped. Any feelings on the amount that just be threaded in? In order to get the 2mm clearance behind the impeller, I have shimmed it rather high. And the. With the spring washer there is only about 6mm of thread engaged with blue loctite.
Got the boots off and clean it up a little more, but the kit I have is missing a set of the small clamps. Will need to get a set of stainless ones during the week.
Otherwise, all the fuel lines are now finished, and the alternator is prepped. Any feelings on the amount that just be threaded in? In order to get the 2mm clearance behind the impeller, I have shimmed it rather high. And the. With the spring washer there is only about 6mm of thread engaged with blue loctite.
-
Tony Z
- Donor
- Posts: 15010
- Joined: Wed Sep 14, 2005 8:33 am
- What model do you have?: 2.3L 69; 1302; P/Van
- Location: Klipheuwel (near Durbanville), Cape Town or working at sea
- Has thanked: 192 times
- Been thanked: 488 times
Re: Fuel injection rebuild
mount it on the fanhousing and adjust accordingly. You want the fan as far forward (towards the driver) as possible, without it rubbing.
ANGRRR
http://www.aircooledvwsa.co.za/viewtopi ... 23&t=14775
1302S
http://www.aircooledvwsa.co.za/viewtopi ... 23&t=33521
Panel Van
http://www.aircooledvwsa.co.za/viewtopic.php?p=288723
http://www.aircooledvwsa.co.za/viewtopi ... 23&t=14775
1302S
http://www.aircooledvwsa.co.za/viewtopi ... 23&t=33521
Panel Van
http://www.aircooledvwsa.co.za/viewtopic.php?p=288723
vader wrote: The Force is strong with you young Sith Lord Z!
-
Simmy
- Oil Pump
- Posts: 220
- Joined: Thu Mar 30, 2017 9:07 pm
- What model do you have?: 1978 Beetle
- Location: Johannesburg
- Has thanked: 5 times
- Been thanked: 5 times
Re: Fuel injection rebuild
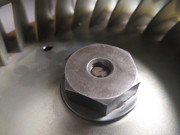
Thanks Tony. I decided to ditch the spring washer which will give me some room to maneuver. Red loctite will serve as it's replacementTony Z wrote: Mon Oct 14, 2019 12:12 pm mount it on the fanhousing and adjust accordingly. You want the fan as far forward (towards the driver) as possible, without it rubbing.
-
Simmy
- Oil Pump
- Posts: 220
- Joined: Thu Mar 30, 2017 9:07 pm
- What model do you have?: 1978 Beetle
- Location: Johannesburg
- Has thanked: 5 times
- Been thanked: 5 times
Re: Fuel injection rebuild
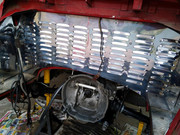
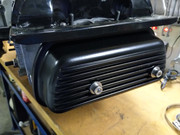
Some pics as promised...
... of the coated valve covers. Matt black for heat transfer, as opposed to polished silver before.
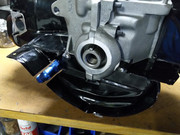
Mock up of the front tin with fuel fittings. I feel a little more clearance around the louvred trim is necessary, but at least it all fits in.

And the front tin with the cut out for the oil filter return. Unfortunately it creates a bit of a gap in the tin, but it will have to do.
New Jtubes will hopefully come late this week and then I can finalise the mock-up process and move on to cleaning and final assembly.
... of the coated valve covers. Matt black for heat transfer, as opposed to polished silver before.
Mock up of the front tin with fuel fittings. I feel a little more clearance around the louvred trim is necessary, but at least it all fits in.
And the front tin with the cut out for the oil filter return. Unfortunately it creates a bit of a gap in the tin, but it will have to do.
New Jtubes will hopefully come late this week and then I can finalise the mock-up process and move on to cleaning and final assembly.
-
Ricoffy
- Oil Stain
- Posts: 113
- Joined: Fri Jul 12, 2019 11:06 am
- What model do you have?: 1600 off-road thing
- Location: Ovambo Land
- Has thanked: 34 times
- Been thanked: 5 times
Re: Fuel injection rebuild
Looks damn good Simmy!
Knowledge is knowing a tomato is a fruit.
Wisdom is knowing not to use it in a fruit salad...
Wisdom is knowing not to use it in a fruit salad...
-
Riaan.N

- Oil Seal
- Posts: 423
- Joined: Mon Jul 13, 2015 1:23 pm
- What model do you have?: 1975 1600 TP Beetle
- Location: Pretoria
- Has thanked: 3 times
- Been thanked: 38 times
Re: Fuel injection rebuild
Maybe you put some of that u-shaped rubber on the tin?Simmy wrote: And the front tin with the cut out for the oil filter return. Unfortunately it creates a bit of a gap in the tin, but it will have to do.

-
Simmy
- Oil Pump
- Posts: 220
- Joined: Thu Mar 30, 2017 9:07 pm
- What model do you have?: 1978 Beetle
- Location: Johannesburg
- Has thanked: 5 times
- Been thanked: 5 times
Re: Fuel injection rebuild
That's the plan, but will only fill some of it. I know it's pedantic, but hey... Unfortunately I am not much of a welder, so closing it up with sheet metal was never going to happen.