Thanks guys, I really do appreciate the feedback. Not having a lot of experience with this means I am working on theory and speculation a lot of the time.
I have been on and off on the ceramic - most people say its not worth it, but the theory of an oil/aircooled engine says it really should. That said I am not making this an all-out performance dragster, so the ceramic is to prevent heat transfer to the heads, and avoid some detonation. I will call PowerKote later to see what they can offer.
Tony Z wrote: Tue Oct 29, 2019 1:29 pm
matt black helps, but paint is an insulator. On steel it works as it transfers heat better than rust, but on aly I am not so sure.
I completely agree, but I did my heat transfer calculation with and without paint and I believe it still makes beyond 0.5mm of paint (it was a rough calculation, and i seem to have lost it somewhere along the line). This is less than half of that, so the emissivity benefit far outweighs the conductive resistance of the paint.
retrovan wrote: Tue Oct 29, 2019 2:43 pm
The more a aircooled engine is modified, the more help it needs to cool.
Sand blasted ally is the best as you have increased the surface area by near double, do not polish it,
Matt black or sandpaper finish is better the smooth black paint on steel.
The more ceramic coating you can do internally the better.
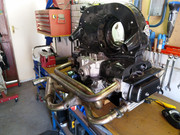
Heat killed my 1st modified engine, then I studied the topic,
and now understand how critical cooling and controlled running in of a modified engine is.
Have assisted my 1915 cc motor with max cooling during the running in period, and monitored the rev's as well as oil temp.
I have tried to go through Bob Hoovers Sermons, and he stresses this all the time, so I buy into what you are both saying.
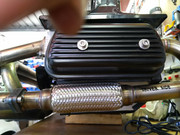
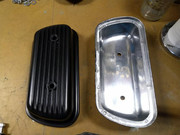
The polish on the inside of the covers is to avoid oil "clinging" to a rough surface. This it my working argument: The thin oil layer that sits there also acts as a form of insulator, and blocks heat transfer. The thinner it is, the less resistance it offers, which means you can get more benefit from the convective heat transfer that occurs. (If anyone is interested, read up on boundary layers and heat transfer)