Page 4 of 5
Re: My DIY farm buggy
Posted: Mon Sep 16, 2019 7:14 am
by Ricoffy
Re: My DIY farm buggy
Posted: Mon Sep 16, 2019 7:15 am
by Ricoffy
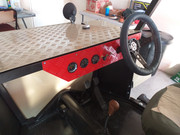
Only three gauges: oil pressure, revs and fuel.
Three switches: Lights (bright and dim), ignition, start/stop button and one dummy switch.
Re: My DIY farm buggy
Posted: Wed Sep 18, 2019 6:24 pm
by Haans
Ricoffy,........nice job!......you need to put SPOTLights on,.....can tell you know that will be next !,

".......so out comes the relay and wiring and another switch!
Don't forget the spotlight for reversing at night,....looking for the koedoe you shot!!

Haans
Re: My DIY farm buggy
Posted: Mon Sep 23, 2019 11:45 am
by Ricoffy
Resolved the flat spot and sputter by adjusting the timing. She purrs...
A walkaround:
https://www.youtube.com/watch?v=jk_xe8W7VWg
Re: My DIY farm buggy
Posted: Wed Sep 25, 2019 8:21 am
by Haans
That's how it's done !!!!!
Enjoy it!!


Haans
Re: My DIY farm buggy
Posted: Wed Sep 25, 2019 8:41 am
by Ricoffy
Haans wrote: Wed Sep 25, 2019 8:21 am
That's how it's done !!!!!
Enjoy it!!
Haans
Its nothing compared to the work you are doing on that Ghia of yours, but thank you!
Re: My DIY farm buggy
Posted: Thu Sep 26, 2019 8:34 am
by Haans
Tell you,.....to rebuild on old fart like Haans is a bliksem, Something you remove!......do not think it will fit back in a couple of months,.....these cars were vuilt by hand!,....I now believe that story of never buy a car vuilt on a friday!!, Haans must have been built on a public holiday!!
I would much rather build from scratch,....make it fit the way you want it,.....kudus to you for having the vision of what you want.
Now is the time for you to get an old job and hone/ "improve" your patience,.......because that's what I learnt!!!, And don't forget a missus with a fairly open purse!!


Regards Haans
Re: My DIY farm buggy
Posted: Thu Sep 26, 2019 8:34 am
by Haans
Tell you,.....to rebuild on old fart like Haans is a bliksem, Something you remove!......do not think it will fit back in a couple of months,.....these cars were vuilt by hand!,....I now believe that story of never buy a car vuilt on a friday!!, Haans must have been built on a public holiday!!
I would much rather build from scratch,....make it fit the way you want it,.....kudus to you for having the vision of what you want.
Now is the time for you to get an old job and hone/ "improve" your patience,.......because that's what I learnt!!!, And don't forget a missus with a fairly open purse!!
Regards Haans
Re: My DIY farm buggy
Posted: Tue Oct 08, 2019 9:43 am
by Ricoffy
Another setback.
Took it for a drive yesterday and sparkplug no 4 blew out. I must have stripped it the last time I replaced it.
"met geweld kan jy jou vinger in jou hol af breek" - my father's words keep echoing in my mind.
I've heard that helicoils aren't that good, so I am taking it to an engineering shop tomorrow to have a timesert fitted. So tonight I have to remove the loadbin and remove the head.
Till Friday, time seems to be against me.
Re: My DIY farm buggy
Posted: Tue Oct 08, 2019 9:55 am
by retrovan
Have you turned it in all the way before.
Could be that it was only in a few threads and you forgot to turn it in all the way.
If so you can cut wedges out of an old plug and use that to repair the threads, and refit the plug without removing the head.
Just start motor without that plug before fitting it just to blow out any gunk that went in.
Hope this saves you having to remove the head.
Herman
Re: My DIY farm buggy
Posted: Tue Oct 08, 2019 10:00 am
by Ricoffy
retrovan wrote: Tue Oct 08, 2019 9:55 am
Have you turned it in all the way before.
Could be that it was only in a few threads and you forgot to turn it in all the way.
If so you can cut wedges out of an old plug and use that to repair the threads, and refit the plug without removing the head.
Just start motor without that plug before fitting it just to blow out any gunk that went in.
Hope this saves you having to remove the head.
Herman
Thanks Herman,
After the engine cooled down, I tried to thread an old sparkplug back in again and it seems only the first few threads are damaged - I cant get the sparkplug to reach the back threads.
Perhaps cutting wedges into the sparkplug may just help. If it doesn't, then I have nothing to lose - it will then in any case have to be retapped. Should I place grease on the plug to catch any filings or just plug the hole with a piece of cloth?
Re: My DIY farm buggy
Posted: Tue Oct 08, 2019 10:04 am
by Ricoffy
One more question: The thread on the plug seems a bit short to cut wedges with a grinder or hack saw blade. Is it fine if I buy a plug (same diameter) with a longer thread and try tapping it that way?
Re: My DIY farm buggy
Posted: Tue Oct 08, 2019 12:32 pm
by Tony Z
Ricoffy wrote: Tue Oct 08, 2019 10:04 am
One more question: The thread on the plug seems a bit short to cut wedges with a grinder or hack saw blade. Is it fine if I buy a plug (same diameter) with a longer thread and try tapping it that way?
that'll be fine as long as it is the same diameter and thread, just make sure you dont run the engine with that plug in it.
use the cut plug to tap the threads and then put the stock plug (or a new one) back in before you start the engine
Re: My DIY farm buggy
Posted: Tue Oct 08, 2019 8:54 pm
by retrovan
Ricoffy wrote: Tue Oct 08, 2019 10:00 am
retrovan wrote: Tue Oct 08, 2019 9:55 am
Have you turned it in all the way before.
Could be that it was only in a few threads and you forgot to turn it in all the way.
If so you can cut wedges out of an old plug and use that to repair the threads, and refit the plug without removing the head.
Just start motor without that plug before fitting it just to blow out any gunk that went in.
Hope this saves you having to remove the head.
Herman
Thanks Herman,
After the engine cooled down, I tried to thread an old sparkplug back in again and it seems only the first few threads are damaged - I cant get the sparkplug to reach the back threads.
Perhaps cutting wedges into the sparkplug may just help. If it doesn't, then I have nothing to lose - it will then in any case have to be retapped. Should I place grease on the plug to catch any filings or just plug the hole with a piece of cloth?
The jury is still out on that one.....
If you do not use any oil or grease, the shavings will be dry and will fly out if you start the engine without that plug in.
If you use grease the shavings MAY stick to the grease, but if they fall in, they will NOT come flying out covered in grease, when you start the engine.
I do not use anything, and all the bits fly out. Just remove the lead from the dizzy cap.
I have run an VW aircooled engine without a plug for 85 Km, without any damage.
You will not damage the engine by running without a plug. In the old days with the carbon SASOL,
we "de-coked" the engine that way without having to strip it.
Think you will save yourself a head removal.
Herman
Re: My DIY farm buggy
Posted: Tue Oct 08, 2019 8:59 pm
by retrovan
Ricoffy wrote: Tue Oct 08, 2019 10:04 am
One more question: The thread on the plug seems a bit short to cut wedges with a grinder or hack saw blade. Is it fine if I buy a plug (same diameter) with a longer thread and try tapping it that way?
That will work the best.
just small turns in, small turns out, little bit in, little bit out, take your time, do not force it.
When ready to fit your new plug, put some nical slip or copper slip on just to stop it from locking up over time.
Herman

 ".......so out comes the relay and wiring and another switch!


