Page 5 of 27
Re: Fuel injection rebuild
Posted: Mon Apr 23, 2018 6:15 pm
by Tony Z
headwork looks good.
oil pump - I use Schadeck where I can. Out of principle I wouldnt touch the EMPI unit. Use 26mm.
Think twice about lightening your flywheel to 12lb. You might like it, you might not.
My 2332 has a 14lb flywheel and I find it too light for street driving. Its easy to drive, but when coming off the gas in second, the car nose dives a bit too aggressively. But this might be the compression too (10:1). Thats my opinion anyway
Re: Fuel injection rebuild
Posted: Mon Apr 23, 2018 7:52 pm
by Simmy
Thanks for the help with the pump. Will try and get it before the long weekend.
I was thinking 14 and then it sounded a little too conservative, so thought 12 was ok. On the compression, I was thinking about aiming for 8.0-8.5 since I want the option to turbo later, so that should also help with the off-throttle response.
Re: Fuel injection rebuild
Posted: Wed Apr 25, 2018 1:09 pm
by Wentzel
Are you using the std crank? Can't remember what cam you are using and what ref range you are looking at.
Re: Fuel injection rebuild
Posted: Wed Apr 25, 2018 1:36 pm
by Simmy
STD crank, just counter weighted.
Using the same 110 as you are currently. As you and Tony suggested, it will work nicely off boost for most street driving and adequately when on boost.
I plan on limiting it to 6k at most.
Re: Fuel injection rebuild
Posted: Fri Apr 27, 2018 8:59 pm
by Simmy
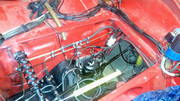
Finally got to actually finishing something on this project...
New 20mm master cylinder, rerouted the reservoir line and got the wiring done to the pump. At least the car can stop now... and the tank can go back in once I have cleaned out the dregs of petrol left in there.
Re: Fuel injection rebuild
Posted: Sun Apr 29, 2018 1:14 pm
by Wentzel
Looking good.
Anything you do now is something you don't have to do later. I was told this recently by someone on the forum too.
Re: Fuel injection rebuild
Posted: Sun Apr 29, 2018 2:50 pm
by Tony Z
Wentzel wrote: ↑Sun Apr 29, 2018 1:14 pm I was told this recently by someone on the forum too.
more than once....
Re: Fuel injection rebuild
Posted: Mon Apr 30, 2018 9:40 am
by Simmy
I know what you mean... just got to keep on plugging away.
I will see if I can finish off the front end wiring of the fuel pump and fuel cut off system today. Maybe lap the valves and Cc the heads tomorrow... just to make sure my clean up didn't change things excessively.
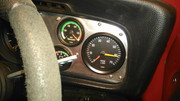
Got the new tach fitted and wired though. The original tach didn't work all that well at low RPM, and who wants a 4500RPM redline anyway??!?
Re: Fuel injection rebuild
Posted: Wed May 02, 2018 7:06 pm
by Simmy
So.. blonde moment... you need spark plugs to cc the chambers... will pick some up this week.
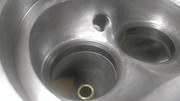
Question on the lapping though. I did the first set of valves with loctite grinding compound, which gives the characteristic shaded band I have seen in photos. But it just feels too course. So I finished that side and did the other side exclusively with autosol metal polish. This scores both valve and seat less, but both sides are liquid tight, even with very light retaining springs. Is it necessary to grind and then polish? Just not sure if you want a sharp or slightly flattened contact patch?
Grinding compound left, polishing compound right
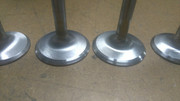
Grinding compound
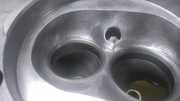
Polishing compound only. You can see a sharp edge cut into the seat fairly clearly.
Re: Fuel injection rebuild
Posted: Wed May 02, 2018 7:23 pm
by Tony Z
just use fine grinding compound. Polishing after grinding is wasting your time.
Re: Fuel injection rebuild
Posted: Mon May 14, 2018 7:41 am
by Simmy
This weekend's update!
The heads are now as good as done... CC'd to 56cc each. Should give a CR of 8.57 if I set the deck height to 0.4mm. My feeling is this is about as far as I can reasonably go with a 110 cam without risking detonation.
Also reshimed the rocker arms again... turns out I had the "C" clamps/brackets the wrong way around. Also found a tip in this assembly manual that said you should offset the rockers such that they allow the valve to rotate slightly as the face drags along the valve head. Not sure how much difference it makes, but nice to know beforehand.
http://www.aeroconversions.com/support/ ... Manual.pdf
Now just waiting on the case, crank and fly...
Re: Fuel injection rebuild
Posted: Mon May 14, 2018 4:35 pm
by Wentzel
I think 0.4mm deck is very small don't you mean 1.4mm?
Re: Fuel injection rebuild
Posted: Mon May 14, 2018 5:17 pm
by Simmy
You are right Wentzel. I think I got mixed up between the metric and imperial measures... At 1.0mm I get an 8.1 CR, which is lower than I would like for NA, but I guess would be fine for a low boost turbo.
Re: Fuel injection rebuild
Posted: Mon May 14, 2018 6:12 pm
by Wentzel
1mm may still not be enough. There is a post by Tony Z on deck height you may want to look at with a lot of good info.
From what I found the ideal deck is between 1.3 and 1.5mm going less is possible but may cause issues with pistons and heads or valves kissing. I'm sure Tony will be able to give more info we recently spoke about it also.
Re: Fuel injection rebuild
Posted: Mon May 14, 2018 7:17 pm
by Tony Z
The topic Wentzel was talking about is here
viewtopic.php?f=4&t=5831
As for your deckheight - do you have a lip around the combustion chamber or are the decks flat? I cant remember, but pretty sure its flat.
I aim to have a deckheight around 1.3 to 1.4mm with "normal" builds. Yours would fall into this category. In reality, anything from 1mm to 1.5mm is where you want to aim, but the tighter it is, the more chance you have of hitting the head with the piston when revving as things stretch. Yes, the rods will stretch at high rpm, but they'll remain within their elastic range and not be damaged, unless you physically go past their limits, which is unlikely in your case.