Hot Wheels 2 - Pine's new Buggy build thread
-
Tony Z

- Donor

- Posts: 14992
- Joined: Wed Sep 14, 2005 8:33 am
- What model do you have?: 2.3L 69; 1302; P/Van
- Location: Klipheuwel (near Durbanville), Cape Town or working at sea
- Has thanked: 192 times
- Been thanked: 488 times

Re: Hot Wheels 2 - Pine's new Buggy build thread
Get a smaller battery and change the box accordingly
ANGRRR
http://www.aircooledvwsa.co.za/viewtopi ... 23&t=14775
1302S
http://www.aircooledvwsa.co.za/viewtopi ... 23&t=33521
Panel Van
http://www.aircooledvwsa.co.za/viewtopic.php?p=288723
http://www.aircooledvwsa.co.za/viewtopi ... 23&t=14775
1302S
http://www.aircooledvwsa.co.za/viewtopi ... 23&t=33521
Panel Van
http://www.aircooledvwsa.co.za/viewtopic.php?p=288723
vader wrote: The Force is strong with you young Sith Lord Z!
-
ZeroAxe
- Drive Train
- Posts: 3004
- Joined: Tue Feb 21, 2006 12:07 am
- What model do you have?: FUmobile
- Location: It doesn't matter.
- Been thanked: 1 time
Re: Hot Wheels 2 - Pine's new Buggy build thread
How about moving the battery to the other side? 
VW Enthusiast


-
Farhaad

- Fuel Injection
- Posts: 2114
- Joined: Sat Jun 27, 2009 10:52 pm
- What model do you have?: memories
- Location: cape town
- Been thanked: 2 times
Re: Hot Wheels 2 - Pine's new Buggy build thread
this might not be a good idea, but how about in a compartment of its own in the front. not sure how acess to the tank works. like were a beetles spare wheel would be
-
Hloni
- Exhaust Pipe
- Posts: 1538
- Joined: Tue May 27, 2008 4:30 pm
- What model do you have?: It was a '75.
- Location: Sharonlea, Randburg
- Has thanked: 14 times
- Been thanked: 11 times
Re: Hot Wheels 2 - Pine's new Buggy build thread
Why not, could one not turn the hole 90 deg if it was square?Tony Z wrote:its a good thing the hole for the battery isnt square...BUGGOFF wrote:thats a great idea tony. cut a square hole out and turn it 90°.
"Volkswagen customers want a relationship with their cars. Names like The Thing, Beetle, Fox, and Rabbit support this" - Kerri Martin

-
BUGGOFF

- Pushrod
- Posts: 923
- Joined: Sun Mar 30, 2008 9:21 pm
- What model do you have?: Dc,Eagle,BugeyeBaja
- Location: Johannesburg
- Been thanked: 1 time
Re: Hot Wheels 2 - Pine's new Buggy build thread
If the battery hole was square, then whats the point of turning it. sorry pine, hijack over.
-
Pine
- ACVWSA Junkie
- Posts: 15037
- Joined: Sun Sep 18, 2005 5:54 pm
- What model do you have?: Oil on the driveway
- Location: Wilderness
- Has thanked: 235 times
- Been thanked: 234 times
- Contact:

Re: Hot Wheels 2 - Pine's new Buggy build thread
Update Sat, 1 May 2009
So I didn't go to Potch today After doing more than 1000km for work the past week (excluding the public holiday), I was just too tired to drive through yesterday, or this morning. Also didn't get to giving the Khaki Cruiser a good wash and polish, as I wanted to do for the show. (To be honest, late last year I was kinda confident that HW2 would be completed for Potch, but I think we all know by now that target dates for ACVW projects are as unreliable as the annual Crime Stats released by the Police... )
When I woke this morning, it was raining, and it was overcast for the greater part of the day. I went to the spares shop this morning to get some bulbs for the gauges and the park lights, and when I got back I decided to check the battery tray IRS issue, as discussed earlier.
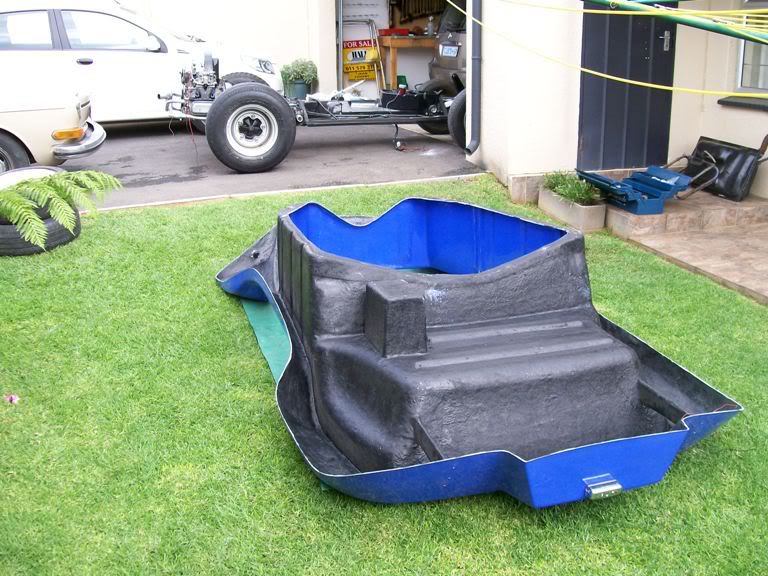
I loosened the traling arms, removed the bump stops, and lowered the rear all the way, to simulate the extreme upwards travel of the trailing arm, and saw that the battery tray would indeed be seriously in the way with the slightest movement of the rear suspension. I then proceeded to take the body off the pan, and turn it over on the lawn, to closely inspect the battery tray.
Shortening it would be a walk in the park, I am just figuring out how to seal the bottom again, and how to manufacture some kind of brace for strengthening as the battery - even though small, has some serious weight.
I then removed the spring plates (again), after putting them under tension again with the spring compressors. When I installed them last year, I made the suspension WAY too hard, in fact it was so hard that it was not even possible for me to push the rear down, not even the slightest bit. When I towed HW2 on the A-frame (engine fitted), I noticed in my rearview mirror that the suspension was so hard that the rear bounced up and down with the slightest bump in the road!
I dry-fitted the trailing arms again on another setting, and I am quite happy with the result. The suspension might be too soft now, but I will make the final desicion once I am able to actually drive the buggy around the block. On the positive side, the rear end is a lot lower now, making HW2 looking a bit less like an aggressive sand crab on the beach. Because of the weather, I couldn't take clear pics, but the stance is almost exactly the same as a pic of a certain yellow buggy I will post in the SEAT COVERS section (are we still allowed to use this smiley, Tony? )
)
With the Type 3 indicators I had, and wanted to use, actually going to a Type 3, I have (finally) found in the week a pair of my ultimate indicator lenses for the buggy - NOS, nogal! (Seek and ye shall find. Cry when you pay, though ) The Lucas L488 is a British indicator unit with an amber glass lens and chrome trim, used on a variety of cars, like the Austin-Healey 100, early Land-Rover, Morris Minor Traveler, Triumph TR2, Austin, Aston Martin, Morris Minor, and many others. They are also very popular with the Cobra crowd. Will post pics of them fitted tomorrow!

Here the same indicators can be seen on a GT40 - hope Jeremy Clarkson likes my buggy more!

HW1 had Land-Rover indicators, and I almost bought another set but they are in my opinion a bit too big, and I don't like the pointed tips (they point 'upward' at the angle they sit on), and they don't have a shiny chrome trim!
Early Beetle fender indicators (like the pic below, but I would have chosen the 'cigar' type) were also a serious option, but the problem is that the wires come out directly above the buggy front wheels... and I didn't like the idea.

Hope the weather is good tomorrow! Got a few things to do outside - the problem is that as the project progresses, the sequence of what to do next, becomes more strict. Need to have the floors cut and install it, mount the seats, mount the body, roll bar and then connect the steering shaft next.... in the meanwhile still in the process of sorting out the wiring!
Stay tuned...
So I didn't go to Potch today
When I woke this morning, it was raining, and it was overcast for the greater part of the day. I went to the spares shop this morning to get some bulbs for the gauges and the park lights, and when I got back I decided to check the battery tray IRS issue, as discussed earlier.
I loosened the traling arms, removed the bump stops, and lowered the rear all the way, to simulate the extreme upwards travel of the trailing arm, and saw that the battery tray would indeed be seriously in the way with the slightest movement of the rear suspension. I then proceeded to take the body off the pan, and turn it over on the lawn, to closely inspect the battery tray.
Shortening it would be a walk in the park, I am just figuring out how to seal the bottom again, and how to manufacture some kind of brace for strengthening as the battery - even though small, has some serious weight.
I then removed the spring plates (again), after putting them under tension again with the spring compressors. When I installed them last year, I made the suspension WAY too hard, in fact it was so hard that it was not even possible for me to push the rear down, not even the slightest bit. When I towed HW2 on the A-frame (engine fitted), I noticed in my rearview mirror that the suspension was so hard that the rear bounced up and down with the slightest bump in the road!
I dry-fitted the trailing arms again on another setting, and I am quite happy with the result. The suspension might be too soft now, but I will make the final desicion once I am able to actually drive the buggy around the block. On the positive side, the rear end is a lot lower now, making HW2 looking a bit less like an aggressive sand crab on the beach. Because of the weather, I couldn't take clear pics, but the stance is almost exactly the same as a pic of a certain yellow buggy I will post in the SEAT COVERS section (are we still allowed to use this smiley, Tony?
With the Type 3 indicators I had, and wanted to use, actually going to a Type 3, I have (finally) found in the week a pair of my ultimate indicator lenses for the buggy - NOS, nogal! (Seek and ye shall find. Cry when you pay, though
Here the same indicators can be seen on a GT40 - hope Jeremy Clarkson likes my buggy more!
HW1 had Land-Rover indicators, and I almost bought another set but they are in my opinion a bit too big, and I don't like the pointed tips (they point 'upward' at the angle they sit on), and they don't have a shiny chrome trim!
Early Beetle fender indicators (like the pic below, but I would have chosen the 'cigar' type) were also a serious option, but the problem is that the wires come out directly above the buggy front wheels... and I didn't like the idea.
Hope the weather is good tomorrow! Got a few things to do outside - the problem is that as the project progresses, the sequence of what to do next, becomes more strict. Need to have the floors cut and install it, mount the seats, mount the body, roll bar and then connect the steering shaft next.... in the meanwhile still in the process of sorting out the wiring!
Stay tuned...
-
Ron&Gill

- Full-time Bug Nutter
- Posts: 4054
- Joined: Fri Aug 29, 2008 4:16 am
- What model do you have?: Type 1, 21b, 34, 316
- Location: St Lucia KZN/Cameron LA
- Has thanked: 1 time
- Been thanked: 21 times
Re: Hot Wheels 2 - Pine's new Buggy build thread
Beetle fender indicators: I modified mine such that the bulb lies flat in the indicator so that the "turret" isn't there anymore and the whole unit sits flush on top of the fender. Although the wires still come through the fenders immediately above the front wheel, the wheel doesn't touch it unless you completely bottom it out, which I've not managed on Rumours. I'll post a drawing of the mod...
The earth wire I attached is on the inside of the indicator, so you can see the centre hole is very small and the wires can flex a tight 90deg towards the outside rim of the fenders so they are not in the way of the tyres.
You do not have the required permissions to view the files attached to this post.
Last edited by Ron&Gill on Sun May 02, 2010 7:43 am, edited 1 time in total.
1964 T34 - The Razor: viewtopic.php?f=23&t=10290
1956 T2 1b - Gill's bus: viewtopic.php?f=23&t=10948
1967 T316 - viewtopic.php?f=23&t=10931 & viewtopic.php?f=23&t=15977
2000 beach buggy - viewtopic.php?f=23&t=10915
1956 T2 1b - Gill's bus: viewtopic.php?f=23&t=10948
1967 T316 - viewtopic.php?f=23&t=10931 & viewtopic.php?f=23&t=15977
2000 beach buggy - viewtopic.php?f=23&t=10915
-
hitlers revenge

- ACVWSA Junkie
- Posts: 6486
- Joined: Wed Jan 18, 2006 11:38 pm
- What model do you have?: buggy
- Location: back in the 'Fell
- Been thanked: 36 times

Re: Hot Wheels 2 - Pine's new Buggy build thread
Pine you sly fox, you did'nt tell s it was finished 
http://www.youtube.com/watch?v=FIVHbCxN ... re=related
http://www.youtube.com/watch?v=FIVHbCxN ... re=related
Why do we celebrate the guy that invented the wheel??
Surely we must celebrate the guy tat invented the other three
Surely we must celebrate the guy tat invented the other three
-
Pine
- ACVWSA Junkie
- Posts: 15037
- Joined: Sun Sep 18, 2005 5:54 pm
- What model do you have?: Oil on the driveway
- Location: Wilderness
- Has thanked: 235 times
- Been thanked: 234 times
- Contact:
Re: Hot Wheels 2 - Pine's new Buggy build thread
Thanks for the pic and the writeup Ron, that is quite an ingenious patent (are you some kind of engineer, or what?  )
)
I like the idea, but I am still using the Lucas lamps - I think they came over my way on purpose.
I like the idea, but I am still using the Lucas lamps - I think they came over my way on purpose.
Eish H_R.... if onlyhitlers revenge wrote:Pine you sly fox, you did'nt tell s it was finished
-
Ron&Gill
- Full-time Bug Nutter
- Posts: 4054
- Joined: Fri Aug 29, 2008 4:16 am
- What model do you have?: Type 1, 21b, 34, 316
- Location: St Lucia KZN/Cameron LA
- Has thanked: 1 time
- Been thanked: 21 times
Re: Hot Wheels 2 - Pine's new Buggy build thread
You're welcome. I also like your button indicators, they are nice, but I like to put some Beetle back on a buggy. I see that is your intent with the rear lights. I also did the rears on Rumours like that. I had the pedestals chromed. Looks cool. Rumours needed some bling, really.
1964 T34 - The Razor: viewtopic.php?f=23&t=10290
1956 T2 1b - Gill's bus: viewtopic.php?f=23&t=10948
1967 T316 - viewtopic.php?f=23&t=10931 & viewtopic.php?f=23&t=15977
2000 beach buggy - viewtopic.php?f=23&t=10915
1956 T2 1b - Gill's bus: viewtopic.php?f=23&t=10948
1967 T316 - viewtopic.php?f=23&t=10931 & viewtopic.php?f=23&t=15977
2000 beach buggy - viewtopic.php?f=23&t=10915
-
Pine
- ACVWSA Junkie
- Posts: 15037
- Joined: Sun Sep 18, 2005 5:54 pm
- What model do you have?: Oil on the driveway
- Location: Wilderness
- Has thanked: 235 times
- Been thanked: 234 times
- Contact:
Re: Hot Wheels 2 - Pine's new Buggy build thread
Great minds think alike
The chromed pedestals like those on HW1 will also be fitted to HW2
The chromed pedestals like those on HW1 will also be fitted to HW2
You do not have the required permissions to view the files attached to this post.
-
Dutch_Diver

- Full-time Bug Nutter
- Posts: 4028
- Joined: Tue Nov 20, 2007 8:52 am
- What model do you have?: 64 bus & 63 Bug
- Facebook: www.facebook.com/people/Frank-Van-Hoof/576686903
- Location: St Ives, Dorset, UK
- Been thanked: 10 times
- Contact:
Re: Hot Wheels 2 - Pine's new Buggy build thread
And the warning lights are in the post! 
"MO" - 1965 Splitscreen bus --> http://www.aircooledvwsa.co.za/viewtopi ... =37&t=9305" onclick="window.open(this.href);return false;
"BOBBIE" - 1963 Beetle --> http://www.aircooledvwsa.co.za/viewtopi ... 23&t=11338" onclick="window.open(this.href);return false;
"BOBBIE" - 1963 Beetle --> http://www.aircooledvwsa.co.za/viewtopi ... 23&t=11338" onclick="window.open(this.href);return false;
-
Chris
- ACVWSA Junkie
- Posts: 11732
- Joined: Sun Jun 10, 2007 11:02 pm
- What model do you have?: Beach Buggy
- Location: Port Elizabeth
- Been thanked: 1 time
Re: Hot Wheels 2 - Pine's new Buggy build thread
I like those lights.
Damn,I'm good!
Beach Buggy (Running and now Aircooled!)
VW TDi DC
Jetta V TDi
Beach Buggy (Running and now Aircooled!)
VW TDi DC
Jetta V TDi
-
Pine
- ACVWSA Junkie
- Posts: 15037
- Joined: Sun Sep 18, 2005 5:54 pm
- What model do you have?: Oil on the driveway
- Location: Wilderness
- Has thanked: 235 times
- Been thanked: 234 times
- Contact:
Re: Hot Wheels 2 - Pine's new Buggy build thread
The Lucas indicators are fitted and I am 100% happy with the result  Had to take some careful measurements to get it right, and even both sides - but they are perfect. As said earlier, I am sticking strictly to the VW colours for the wiring - so it is black/white wire for the left indicator, and green/black for the right. Earth wire is brown, as obviously there is no body earth with the fibreglass shell.

Of course I simply HAD to put power on them, to see 'if they work' They are quite bright, so I hope there where be no confusion as to which way I am turning. The buggy is also getting a VW hazard switch, from an EarlyBay as well as the headlights switch.

Started trimming the battery box, and as you can see in the pic above, the buggy is sitting quite low on its rear wheels at the moment, but I guess I'll adjust the spring plates one outer click stiffer before final tightening.
Of course I simply HAD to put power on them, to see 'if they work'
Started trimming the battery box, and as you can see in the pic above, the buggy is sitting quite low on its rear wheels at the moment, but I guess I'll adjust the spring plates one outer click stiffer before final tightening.