i definitely do not have those.
thanks Tony Z
Betty the Oval - Donovan D - ex-MINCE
-
MINCE

- Transmission
- Posts: 2432
- Joined: Tue Dec 12, 2006 11:15 am
- What model do you have?: Without Vehicle
- Facebook: http://www.facebook.com/pereira.artur?ref=profile
- Location: Kirstenhof, Cape Town
- Has thanked: 4 times
- Been thanked: 8 times
- Contact:
Re: Betty the Oval - MINCE
"Great things are not accomplished by those who yield to trends and fads and popular opinion." Jack Kerouac
-
Ron&Gill

- Full-time Bug Nutter
- Posts: 4054
- Joined: Fri Aug 29, 2008 4:16 am
- What model do you have?: Type 1, 21b, 34, 316
- Location: St Lucia KZN/Cameron LA
- Has thanked: 1 time
- Been thanked: 21 times

Re: Betty the Oval - MINCE
fuk-mi... another tab... I forgot a tab... 
1964 T34 - The Razor: viewtopic.php?f=23&t=10290
1956 T2 1b - Gill's bus: viewtopic.php?f=23&t=10948
1967 T316 - viewtopic.php?f=23&t=10931 & viewtopic.php?f=23&t=15977
2000 beach buggy - viewtopic.php?f=23&t=10915
1956 T2 1b - Gill's bus: viewtopic.php?f=23&t=10948
1967 T316 - viewtopic.php?f=23&t=10931 & viewtopic.php?f=23&t=15977
2000 beach buggy - viewtopic.php?f=23&t=10915
-
MINCE
- Transmission
- Posts: 2432
- Joined: Tue Dec 12, 2006 11:15 am
- What model do you have?: Without Vehicle
- Facebook: http://www.facebook.com/pereira.artur?ref=profile
- Location: Kirstenhof, Cape Town
- Has thanked: 4 times
- Been thanked: 8 times
- Contact:
Re: Betty the Oval - MINCE
I have been trawling the interwebz for images or diagrams of the full assembly. No luck.
"Great things are not accomplished by those who yield to trends and fads and popular opinion." Jack Kerouac
-
hitlers revenge

- ACVWSA Junkie
- Posts: 6486
- Joined: Wed Jan 18, 2006 11:38 pm
- What model do you have?: buggy
- Location: back in the 'Fell
- Been thanked: 36 times

Re: Betty the Oval - MINCE
You should have a big fat washer in between the bearing and the first nut.
You then tighten the first nut as tight as possible. Then you release the nut a tad so that you can slightly move the fat washer. Once you have this, you put on the second nut. While holding the first nut, you tightn the second . Make sure you still have the same play on the big washer once all it tight.
Remember one side is left hand thread.
This is for late model hubs. I'm sure you should have an earlier design if your hubs are the correct vintage.
The other thing to take note of is the outer bearing sizes. You get 2 different size stub axles. One is 20mm dia. and the other is 22 or 25mm dia. Therefore you inner race dia will be different. Also make sure both hubs and axle stubs are the same before buying your bearings
my 5c.
Why do we celebrate the guy that invented the wheel??
Surely we must celebrate the guy tat invented the other three
Surely we must celebrate the guy tat invented the other three
-
Bushpig
- Crankshaft
- Posts: 707
- Joined: Thu Mar 04, 2010 8:37 am
- What model do you have?: 1956, 1957 and 70's
- Location: Auckland, New Zealand
- Has thanked: 1 time
- Been thanked: 5 times
Re: Betty the Oval - MINCE
Mince, I agree with HR also make sure that the bearings are of the same type Ball or Roller bearing. They should be the same inner and outer. The thick washer should be able to be moved slightly. Stick a fat flat headed screwdriver next to the washer and twist against the inner side of the hub. It should move a little.
When you put the end caps on fill with some grease and you may not want to push the passenger side cap on too tight since it will have to be removed again when you thread through the accelerator cable once the body is on.
When we meet up again I can give you an electronic version of the 56 VW Workshop Mannual for reference. What I also do is look on a parts site and they usually give the diagram of the whole section. I use http://www.wolfsburgwest.com then you can see the sequence.
Hope this helps give me a shout.
-
MINCE
- Transmission
- Posts: 2432
- Joined: Tue Dec 12, 2006 11:15 am
- What model do you have?: Without Vehicle
- Facebook: http://www.facebook.com/pereira.artur?ref=profile
- Location: Kirstenhof, Cape Town
- Has thanked: 4 times
- Been thanked: 8 times
- Contact:
Re: Betty the Oval - MINCE
the bearing that were in the hubs were already in place when I took them off. And they are still nice. Degreased everything, the regreased and put back in. but All I have done is just put in the one washer then the nut on that and tightened so that the drum doesn't 'wobble' or anything. not properly fittet yet because i still want the other washers and plates and stuff.
thank for your input guys.
Bruce, see you soon buddy
thank for your input guys.
Bruce, see you soon buddy
"Great things are not accomplished by those who yield to trends and fads and popular opinion." Jack Kerouac
-
MINCE
- Transmission
- Posts: 2432
- Joined: Tue Dec 12, 2006 11:15 am
- What model do you have?: Without Vehicle
- Facebook: http://www.facebook.com/pereira.artur?ref=profile
- Location: Kirstenhof, Cape Town
- Has thanked: 4 times
- Been thanked: 8 times
- Contact:
Re: Betty the Oval - MINCE
Hey guys. Update: Today i had to rush to collect the second bug which I got from Jbug

Let me just say that this one is in a FAR worse state than Betty. So Betty has won the race to be the one restored. But the parts is really what I need. Which is a bonus, and if I were to by the parts that I have now, probably would spend more than what I got the whole thing for. So, ya. The 4 tab bonnet is even in a pretty decent condition, so I will also use that instead of my current one whicg doesn't have the 4 tabs.
Tomorrow, I have the day off. I will be taking stuff apart to use on Betty. I will need someone with welding skills to help on Betty's chassis for me, as I can't weld for sheeeit.
Also, someone who has a welder.
Once I have raped and pilliaged the parts of this one, i shall put it into storage untill either Jbug buys it back from me, or someone else buys off me. Right now, money is king I am afraid.
Will update after the weekend on more that I get up to.
Thanks Jbug. May not sound like you helped me, but you did. In a BIG way
"Great things are not accomplished by those who yield to trends and fads and popular opinion." Jack Kerouac
-
MINCE
- Transmission
- Posts: 2432
- Joined: Tue Dec 12, 2006 11:15 am
- What model do you have?: Without Vehicle
- Facebook: http://www.facebook.com/pereira.artur?ref=profile
- Location: Kirstenhof, Cape Town
- Has thanked: 4 times
- Been thanked: 8 times
- Contact:
Re: Betty the Oval - MINCE
wow, I just checked the weather. Forcast for tomorrow is 65kph winds and cold weather and rain.
has to happen on the day i have to be outside! grrrrrrr
has to happen on the day i have to be outside! grrrrrrr
"Great things are not accomplished by those who yield to trends and fads and popular opinion." Jack Kerouac
-
MINCE
- Transmission
- Posts: 2432
- Joined: Tue Dec 12, 2006 11:15 am
- What model do you have?: Without Vehicle
- Facebook: http://www.facebook.com/pereira.artur?ref=profile
- Location: Kirstenhof, Cape Town
- Has thanked: 4 times
- Been thanked: 8 times
- Contact:
UPDATE! Some progress!
Well, I have finally been able to make real progress on my Oval build.
Friday and Saturday involved me getting very dirty with removing parts that I need off the donor car, and today involved me just tidying up. Space has become an issue since moving (finally) Betty's body into the garage.
This is what I basically did:
Front end (sans shocks and speedo cable and fitting of wheels) is complete. Got all the washers, nuts and plates. Joy.
Got the correct gearlever stick now.
Got the full pedal assembly (have to refit though after cleaning off all the rust and painting)
Got all 4 correct drums now (only took one off the donor car)
Got my brake fluid tank (this needs restoring, loads of surface rust. Will investigate how it is supposed to be done to prevent the brake fluid from eating paint)
Got me the speedo connected to an ignition, light/wiper switch (have to figure that out), fuse box, and 2 regulators by the looks of things. Speedo is a bit tatty. But I also scored an 80mph speedo from a neighbour which is in perfect condition!
Got a later engine lid to repair my damaged 'W' engine lid
Got me a 6V starter (have to test it)
Gots me a 4-tab bonnet (very crusty, but I am thinking of rocking this bonnet as is once the car is done. after sanding the rust off and giving a clear coat. Will see.)
got loads of other bits that is too much to mention. Beside the gearlever and front hubs, I didn't fit anything. But knowing what I have got means that I can finally work to finish the chassis and to get the engine running. Super chuffed! Still loads missing but at least they are not stopping me from continuing.
I took some pictures which will follow this post which just indicate a few interesting differences in 'spec' of the two cars and one incident the donor car went through some time in its life.
Once I am done with the pilliaging, I am sure Bushpig will be giving me a call
"Great things are not accomplished by those who yield to trends and fads and popular opinion." Jack Kerouac
-
MINCE
- Transmission
- Posts: 2432
- Joined: Tue Dec 12, 2006 11:15 am
- What model do you have?: Without Vehicle
- Facebook: http://www.facebook.com/pereira.artur?ref=profile
- Location: Kirstenhof, Cape Town
- Has thanked: 4 times
- Been thanked: 8 times
- Contact:
Re: Betty the Oval - MINCE
Just a side note, it only hit me on Saturday what i am doing. I remember joining this site in 2006 with my '74 in tow, and then shortly selling it. I was constantly harping on about ovals, and even some forum members would give me heads up when one was made available. For so long I was unavailable to pursue this mission, and after all these years, i am working on one. And I am enjoying it! Never thought I would be enjoying anything ever again after what I went through in the past.
Just wanted to share that
Just wanted to share that
"Great things are not accomplished by those who yield to trends and fads and popular opinion." Jack Kerouac
-
MINCE
- Transmission
- Posts: 2432
- Joined: Tue Dec 12, 2006 11:15 am
- What model do you have?: Without Vehicle
- Facebook: http://www.facebook.com/pereira.artur?ref=profile
- Location: Kirstenhof, Cape Town
- Has thanked: 4 times
- Been thanked: 8 times
- Contact:
Photo comparisons
Okay, pictures time!
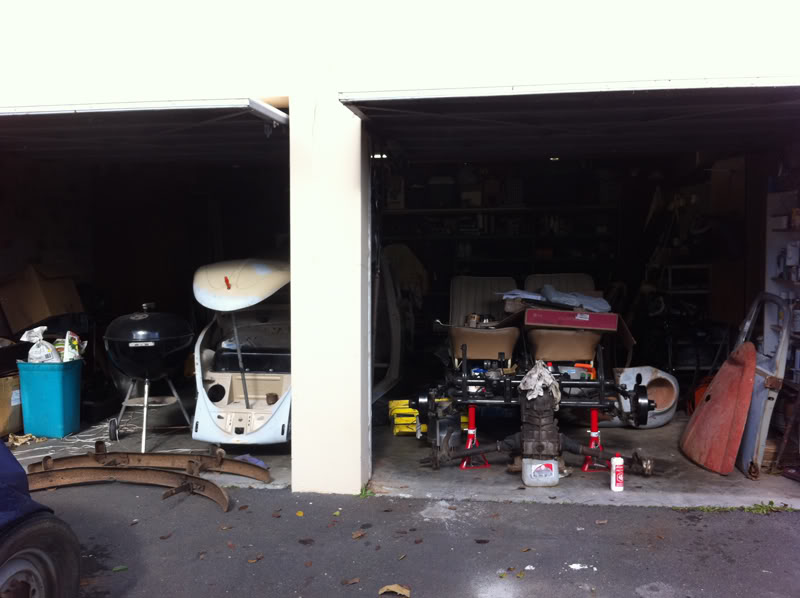
Body in the garage with the chassis. Finally! Had to clear the one half of the garage into storage. So much stuff.
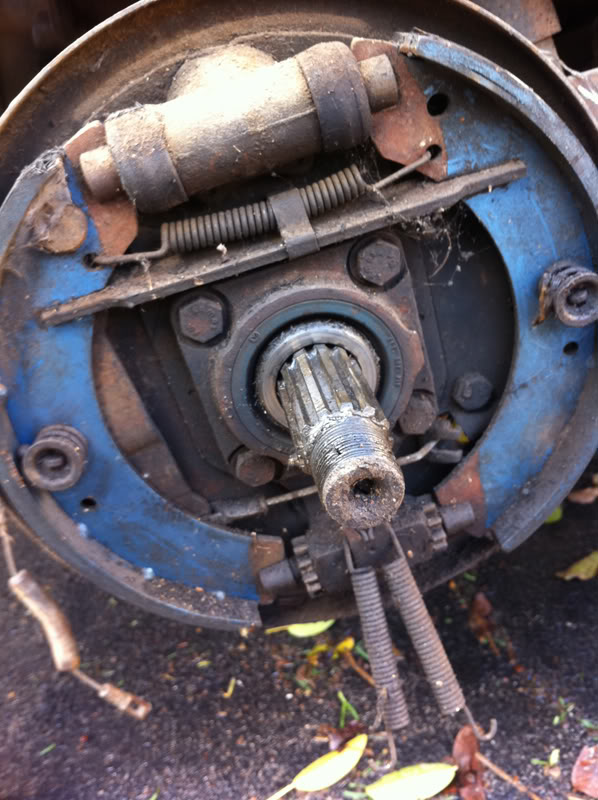
Right rear brakes from the donor. pretty good nick I would say. Shoes look unused.
Left rear brakes. Not so lucky on this side. Firstly, they were placed incorrectly. Rotated 90º the wrong way. Also could only get one show off, the damaged one was stuck in there. Looks like the wheel and drum fell off whilst traveling and it grind to a halt causing this intense flat side. Luckily, the backing plate is repairable.
Now, for some comparisons!!!
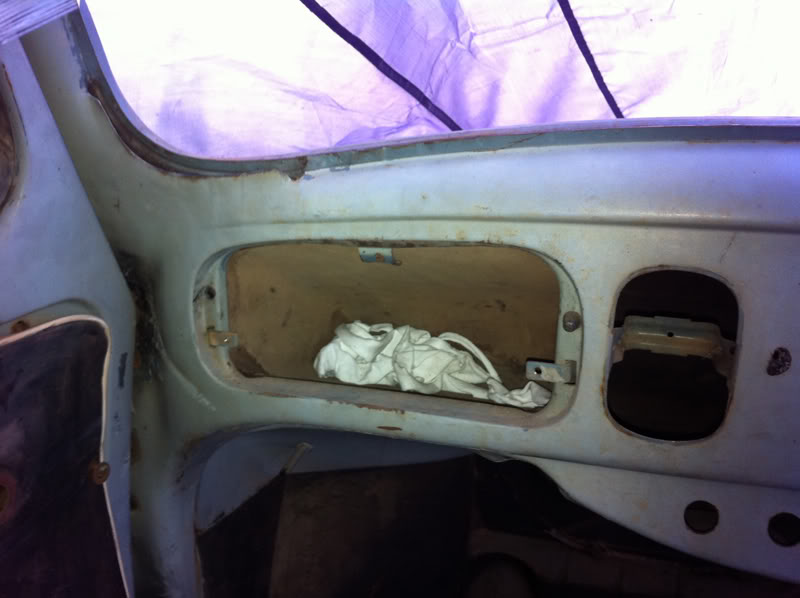
The area for the interior light switch on the donor has an indented part for it, where on Betty, there isn't.
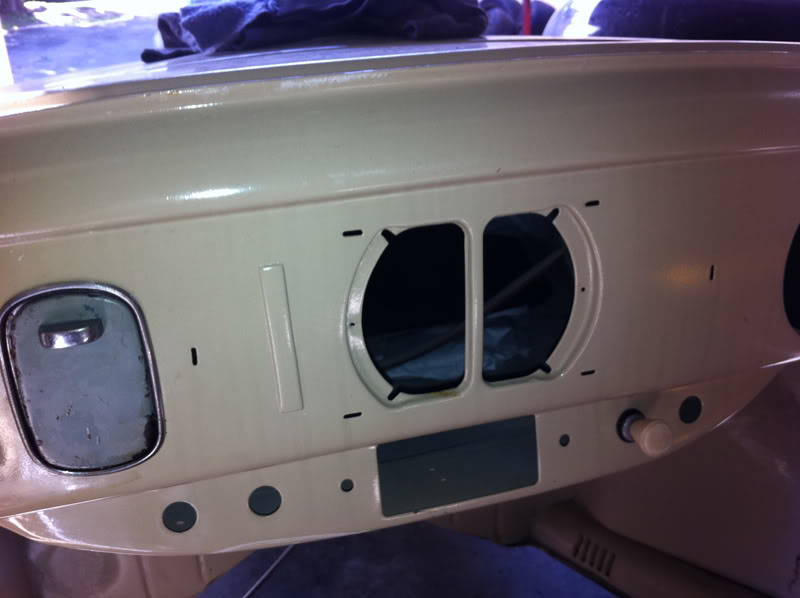
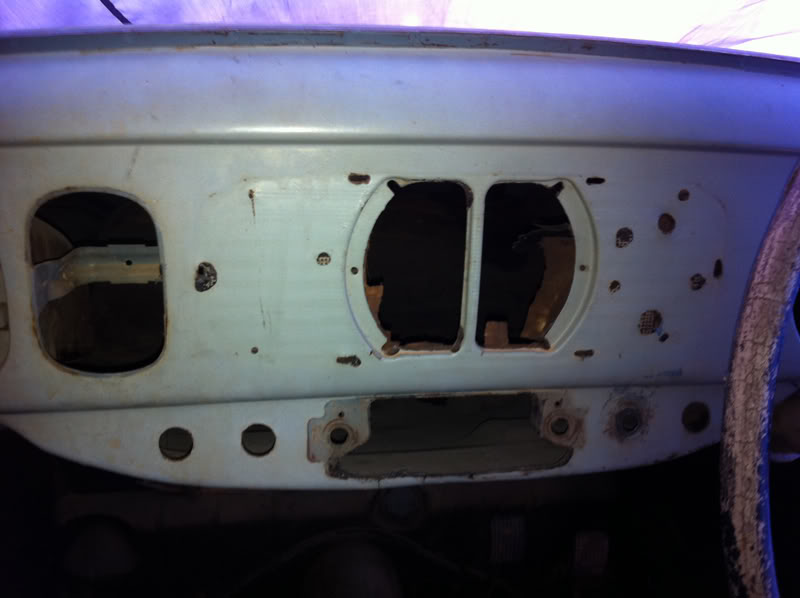
The dash, between the speaker housing and the ashtray has a raised section on Betty, but it doesn't on the donor.
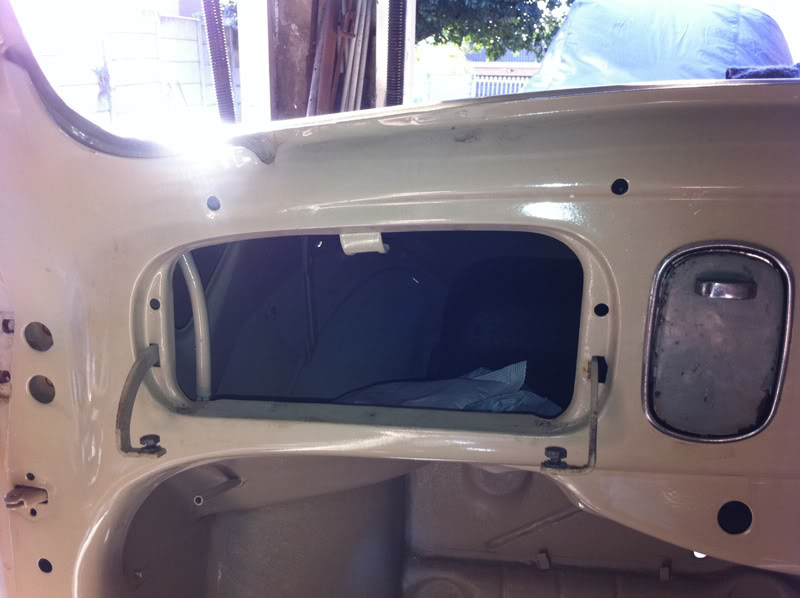
Above the glove box on Betty, there are holds for a handle. On the donor, there aren't any holes for this.
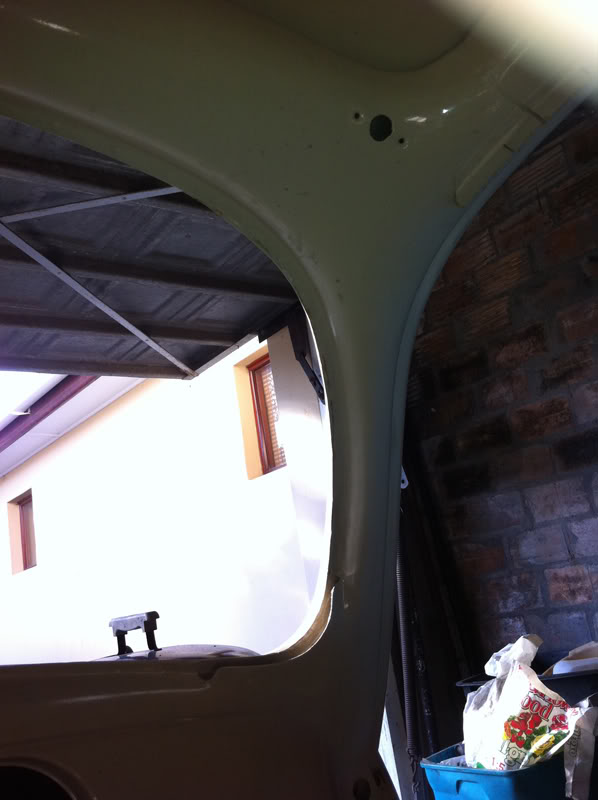

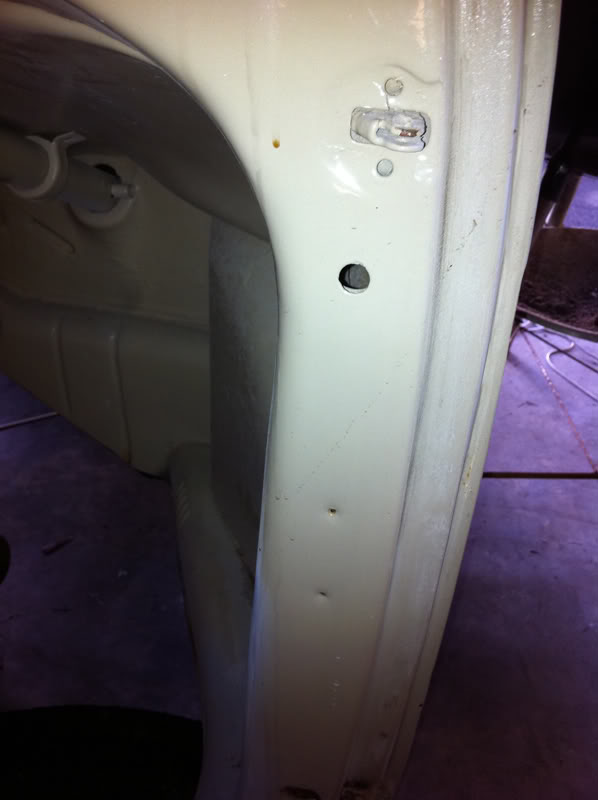
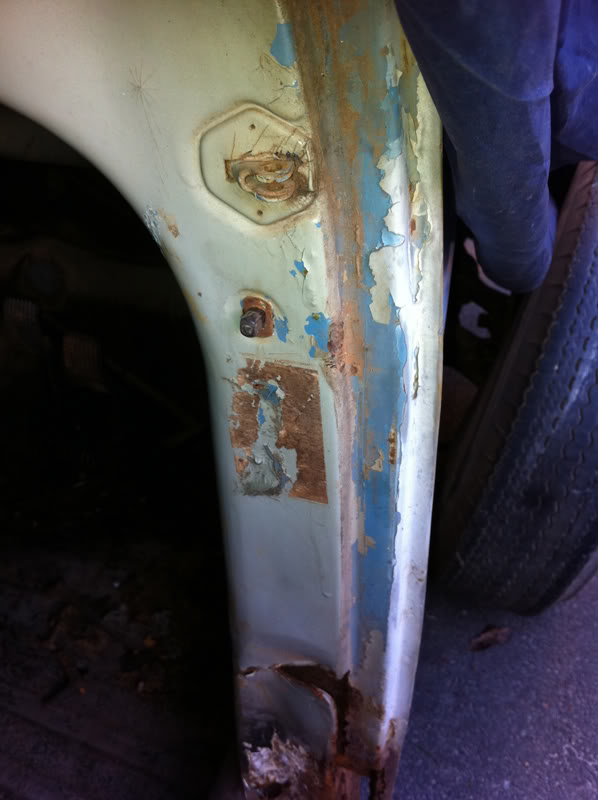
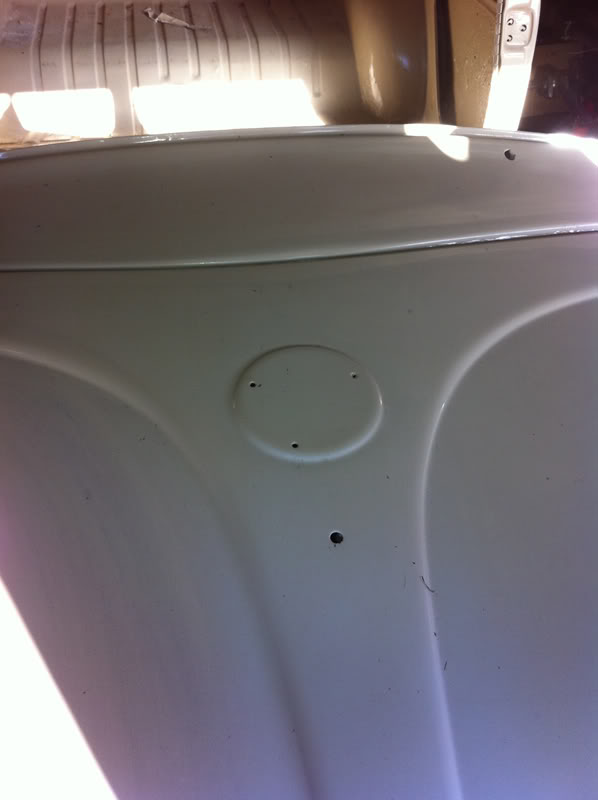
Interior top corner of the A-pillars. On both sides on Betty, there are mounting points for sun-visors. On the donor, there aren't any.
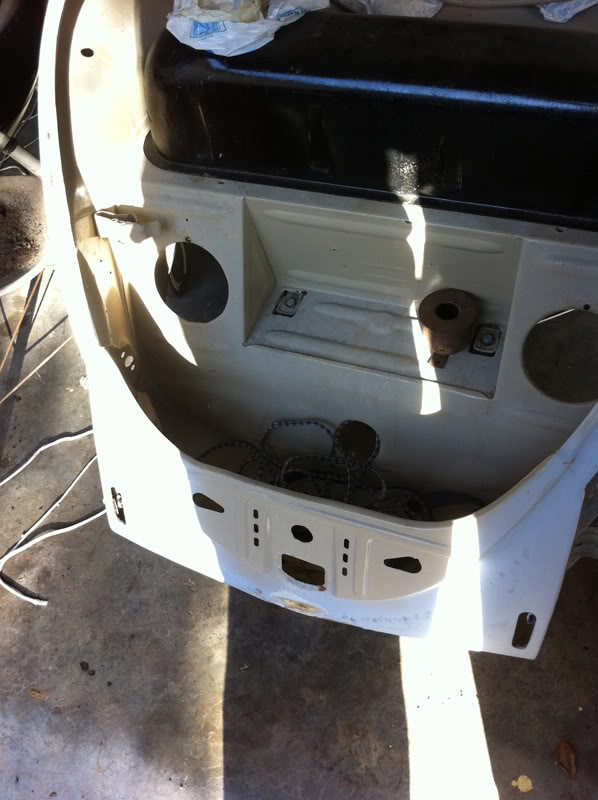
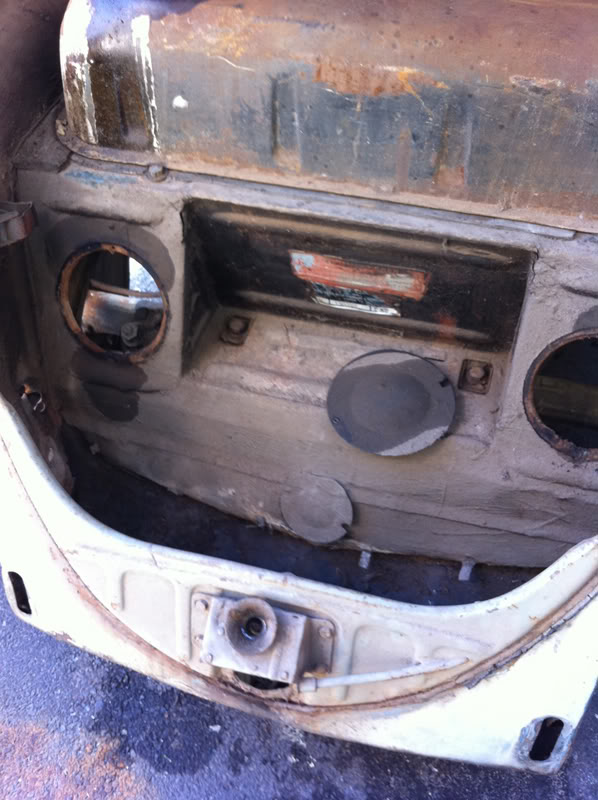
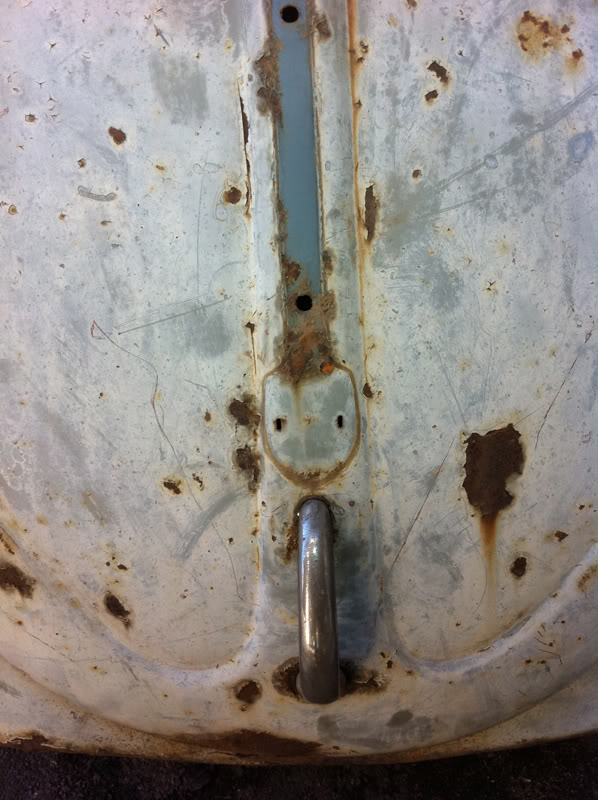
Betty looks to have a universal front apron panel where on the donor, it is all original. Also, you cannot really see in the picture, on the donor, the area for the brake fluid tank there is one hole to screw one side of the tank down, while the other side slots in a 'tab' thing. On Betty, there are 2 screw holes for the brake fluid tank. Universal repair panel too?
the bonnet. The one on Betty is a later model bonnet. Which I knew about. And on the donor, it has the 4-tab bonnet.
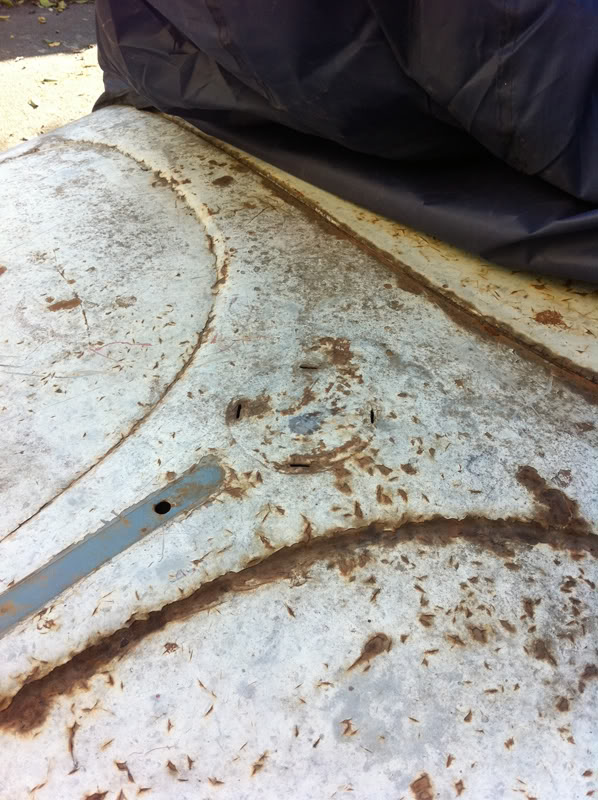
You can see the salt deposit and dirt all over the bonnet, after polishing that sh*t off, you can see the very faded Horizon Blue colour.
i am thinking of just sanding off the rust off this bonnet, doing some repair work to fill the rust holes, clear coating it, and rocking it on my finished car. That is if I end up painting my car Horizon Blue too, which i am starting to really love. But, let's wait till I get to that point because i am sure I will change my mind again.
Well, I hope to finish off what i need to do with the donor car by this weekend and then i can continue with what I need to do to finish the chassis. Fingers crossed
Body in the garage with the chassis. Finally! Had to clear the one half of the garage into storage. So much stuff.
Right rear brakes from the donor. pretty good nick I would say. Shoes look unused.
Left rear brakes. Not so lucky on this side. Firstly, they were placed incorrectly. Rotated 90º the wrong way. Also could only get one show off, the damaged one was stuck in there. Looks like the wheel and drum fell off whilst traveling and it grind to a halt causing this intense flat side. Luckily, the backing plate is repairable.
Now, for some comparisons!!!
The area for the interior light switch on the donor has an indented part for it, where on Betty, there isn't.
The dash, between the speaker housing and the ashtray has a raised section on Betty, but it doesn't on the donor.
Above the glove box on Betty, there are holds for a handle. On the donor, there aren't any holes for this.
Interior top corner of the A-pillars. On both sides on Betty, there are mounting points for sun-visors. On the donor, there aren't any.
Betty looks to have a universal front apron panel where on the donor, it is all original. Also, you cannot really see in the picture, on the donor, the area for the brake fluid tank there is one hole to screw one side of the tank down, while the other side slots in a 'tab' thing. On Betty, there are 2 screw holes for the brake fluid tank. Universal repair panel too?
the bonnet. The one on Betty is a later model bonnet. Which I knew about. And on the donor, it has the 4-tab bonnet.
You can see the salt deposit and dirt all over the bonnet, after polishing that sh*t off, you can see the very faded Horizon Blue colour.
i am thinking of just sanding off the rust off this bonnet, doing some repair work to fill the rust holes, clear coating it, and rocking it on my finished car. That is if I end up painting my car Horizon Blue too, which i am starting to really love. But, let's wait till I get to that point because i am sure I will change my mind again.
Well, I hope to finish off what i need to do with the donor car by this weekend and then i can continue with what I need to do to finish the chassis. Fingers crossed
"Great things are not accomplished by those who yield to trends and fads and popular opinion." Jack Kerouac
-
Donovan D

- Donor

- Posts: 2231
- Joined: Sun Jun 01, 2008 6:27 pm
- What model do you have?: 67 Panel
- Facebook: http://www.facebook.com/profile.php?id=536371512
- Location: Brackenfell
- Has thanked: 148 times
- Been thanked: 73 times

Re: Betty the Oval - MINCE
There is a lot of differences between those two.
Was all the holes on the donor closed, or is it suppose to be like that?
At least you know what you are doing and what you need. I think that blue is a great colour and giving that bonnet a light sand to reveal the blue and clear coating it is a great idea.
Was all the holes on the donor closed, or is it suppose to be like that?
At least you know what you are doing and what you need. I think that blue is a great colour and giving that bonnet a light sand to reveal the blue and clear coating it is a great idea.
---------- 67 Panelvan -----------
---------- 56 Oval ----------
---------- 56 Oval ----------
-
MINCE
- Transmission
- Posts: 2432
- Joined: Tue Dec 12, 2006 11:15 am
- What model do you have?: Without Vehicle
- Facebook: http://www.facebook.com/pereira.artur?ref=profile
- Location: Kirstenhof, Cape Town
- Has thanked: 4 times
- Been thanked: 8 times
- Contact:
Re: Betty the Oval - MINCE
on the donor, there are definitely no holes closed. Strange thing is, according to the chassis numbers, mine is supposed to be older!
Maybe Bushpig can help me figure out if mine is something like a 'deluxe' model or if it is (God forbid) a converted body!
i love the idea of having a nice painted car with a tatty bonnet.
Maybe Bushpig can help me figure out if mine is something like a 'deluxe' model or if it is (God forbid) a converted body!
i love the idea of having a nice painted car with a tatty bonnet.
"Great things are not accomplished by those who yield to trends and fads and popular opinion." Jack Kerouac
-
JBug
- Oil Cooler
- Posts: 330
- Joined: Tue Mar 18, 2008 2:44 pm
- What model do you have?: A few Bugs
- Location: Kwa Zulu Natal
Re: Betty the Oval - MINCE
Hey Art, glad you`re happy...even if just a lil bit.
I should`ve just sent you all the parts instead
Keep me posted with regards to whats left of the two.
Happy building guy!
I should`ve just sent you all the parts instead
Keep me posted with regards to whats left of the two.
Happy building guy!
Old Volkswagens never die, they just get lower.
-
Bushpig
- Crankshaft
- Posts: 707
- Joined: Thu Mar 04, 2010 8:37 am
- What model do you have?: 1956, 1957 and 70's
- Location: Auckland, New Zealand
- Has thanked: 1 time
- Been thanked: 5 times
Re: Betty the Oval - MINCE
Mince, nice pics. Please send me the chassis nos. and I will check up. Please cross check my comments but from what I know....
There are some interesting differences, and I will take the same picks of mine and we can get a consensus.
The glove box handle holes - some had the panic handle fitted as an extra, some did not. My glove box dosen't have the inside
The visor hole according to me is incorrect (I will check with chassis No.) The oval had a small oval mirror with one visor shaft coming out over the drivers head with a plastic see through visor. The holes only came around 62-63+
The door switch light indent should be there (will confirm)
The brake shoes look correct with the amount of mounting holes and the 3 spring system.
Speaker housing and ashtray difference I will check on mine. The rest of the dash is the same so I would assume both are correct. The chassis no may give a hint as to the age difference.
The brake fluid tank - the one with the 2 screws is correct and I think that the slide in with the one screw came later after 57. I have a new slot/one bolt tank if you need and can swop for the 2 bolt.You can also see that the 2 hole tank has a raised mounting plate on the bottom, which should sit on a felt washer, whilst the other does not. To convert the one with the one bolt should be easy enough if you have a good tank. In your case maybe get the better one and sleep easier since you could get crap coming out of the old. You could also referbish.
The front apron on the donor is correct with the 4 bolt bonnet catch and what suprises me is that the brake fluid tank is incorrect. I would think anyone replacing the area around the tank would have also replaced the apron. Go figure. Yours it seems that it had a front ding and the nose and bonnet were replaced. I would keep Betty's lid and just modify it to take the 4 slots for the badge. Her paint seems better prepared and no doubt already lines up when closed.
Thats about on my comments on what I have seen. I will look at mine (at work) on Wednesday and see what mine has. Thanks for the interesting bits I will do some more reading up. Just a question - does the seat runners on the floor pan on both look the same. Mine has a verticle metal strip that holds the seat return spring and the other forms a triangle?
Hope all this helps. Get back to me on the chassis nos.
There are some interesting differences, and I will take the same picks of mine and we can get a consensus.
The glove box handle holes - some had the panic handle fitted as an extra, some did not. My glove box dosen't have the
The visor hole according to me is incorrect (I will check with chassis No.) The oval had a small oval mirror with one visor shaft coming out over the drivers head with a plastic see through visor. The holes only came around 62-63+
The door switch light indent should be there (will confirm)
The brake shoes look correct with the amount of mounting holes and the 3 spring system.
Speaker housing and ashtray difference I will check on mine. The rest of the dash is the same so I would assume both are correct. The chassis no may give a hint as to the age difference.
The brake fluid tank - the one with the 2 screws is correct and I think that the slide in with the one screw came later after 57. I have a new slot/one bolt tank if you need and can swop for the 2 bolt.You can also see that the 2 hole tank has a raised mounting plate on the bottom, which should sit on a felt washer, whilst the other does not. To convert the one with the one bolt should be easy enough if you have a good tank. In your case maybe get the better one and sleep easier since you could get crap coming out of the old. You could also referbish.
The front apron on the donor is correct with the 4 bolt bonnet catch and what suprises me is that the brake fluid tank is incorrect. I would think anyone replacing the area around the tank would have also replaced the apron. Go figure. Yours it seems that it had a front ding and the nose and bonnet were replaced. I would keep Betty's lid and just modify it to take the 4 slots for the badge. Her paint seems better prepared and no doubt already lines up when closed.
Thats about on my comments on what I have seen. I will look at mine (at work) on Wednesday and see what mine has. Thanks for the interesting bits I will do some more reading up. Just a question - does the seat runners on the floor pan on both look the same. Mine has a verticle metal strip that holds the seat return spring and the other forms a triangle?
Hope all this helps. Get back to me on the chassis nos.