2.0 KCC 356 Speedster - www.356speedster.co.za
-
Firebird

- Oil Stain
- Posts: 155
- Joined: Wed Feb 27, 2008 11:45 pm
- What model do you have?: 356Speedster Replica
- Location: Gauteng
- Has thanked: 28 times
- Been thanked: 11 times
- Contact:

Re: 2.0 KCC 356 Porsche Speedster - Work on scissor roof sta
That's why Gary keeps his tame Industrial Designer around.
-
flatfourfan
- Full-time Bug Nutter
- Posts: 4195
- Joined: Tue Nov 08, 2005 12:06 pm
- What model do you have?: Speedster Replica
- Location: Pretoria
- Has thanked: 36 times
- Been thanked: 50 times
Re: 2.0 KCC 356 Porsche Speedster - Work on scissor roof sta
Well Alan, the front is all geometry. The version that I'm copying is a bit easier to replicate for the prototype than the original porsche unit is. After looking at the breakdown of everything, I'm pretty confident that I can replicate it with not too much hassles.
As for production........once the prototype is done and we've sorted out the bugs and there are bound to be some, we'll be laser cutting all the bars as well as the holes and having the bends done. Depending on price, I'd like to have everything blasted and powdercoated as well. The laser cutting and mass production is all Rogers baby.lol.
As for production........once the prototype is done and we've sorted out the bugs and there are bound to be some, we'll be laser cutting all the bars as well as the holes and having the bends done. Depending on price, I'd like to have everything blasted and powdercoated as well. The laser cutting and mass production is all Rogers baby.lol.
-
Bossie2004

- Oil Stain
- Posts: 178
- Joined: Tue Nov 29, 2011 3:30 pm
- What model do you have?: '74 Volla
- Location: Centurion
- Has thanked: 13 times
- Been thanked: 13 times
Re: 2.0 KCC 356 Porsche Speedster - Work on scissor roof sta
Great work Gary, your attention to detail is awesome, its going to be awesome once it is all done. 
- Marius V
Speedster Replica
Speedster Replica
-
flatfourfan
- Full-time Bug Nutter
- Posts: 4195
- Joined: Tue Nov 08, 2005 12:06 pm
- What model do you have?: Speedster Replica
- Location: Pretoria
- Has thanked: 36 times
- Been thanked: 50 times
Re: 2.0 KCC 356 Porsche Speedster - Work on scissor roof sta
attention to detail?................hell no man, I'm winging it at the moment. I just cut and trim as I see to make it as right as possible.
Productive weekend. I’m proud to say that the bulk of the work is now done. Well at least the brain stuff. Now it’s just grinding and a bit more welding.
First up……The base of the B-pillar bow. This is mounted off centre which allows the rear bow to be tucked in and to clear the rear of the car.


That little bit of pivot gives almost 5cm of extra clearance for the rear bow.
All the extra front bows prior to cleaning up and grinding and smoothing etc etc etc.

Test fitting of everything together. I still have to pick up some more M6 carriage bolts and domed washers on Friday, but for mock up, the big stuff will work.

A bit more adjustment with the vice grips and I managed to get it in even closer.

This picture shows you how much more it can be pulled into the B bow pillar.

I’m just waiting on my spacers to pull the bow out a bit more to get the B pillar bow straighter that will allow me to pull it even closer to the pillar, then the bent bar you can see at the top will then be bent less and will enable me to have a full width of about 2 cm for the whole folding mechanism.
Wanna see it in action, wanna see, wanna see?
B-pillar bow in this picture moved back a smidgen, which makes the bars look skew, but it’s straight.


Craptacular picture of the mounting tabs that will be welded to the frame.


So, how flat does it go you ask? Well the front bow connector bars are a good 3cm too long at this point as I thought that I’d give it some extra length first and wait until I have the new front bow made and fitted before I cut them off to their final length. Besides that, perfect.

SO how does the KCC roof fit on?

Almost perfect, I need to have the section extended a bit at the front, but it's nice and tight and doesn't look like a scout tent on top of a car.
Plan of action, well I’m going to be putting in a spacer with the B-Pillar that will pull it out a bit more, but also allow me to make the angle straighter with the upright and in turn will allow the scissor frame to pull up even closer than it is now. Once I have my carriage bolts on and trimmed, they won’t stick out at all. The idea behind the spacer is also to accommodate something for the guys out there that are going for an even more authentic looking car. More news on that later.
Productive weekend. I’m proud to say that the bulk of the work is now done. Well at least the brain stuff. Now it’s just grinding and a bit more welding.
First up……The base of the B-pillar bow. This is mounted off centre which allows the rear bow to be tucked in and to clear the rear of the car.
That little bit of pivot gives almost 5cm of extra clearance for the rear bow.
All the extra front bows prior to cleaning up and grinding and smoothing etc etc etc.
Test fitting of everything together. I still have to pick up some more M6 carriage bolts and domed washers on Friday, but for mock up, the big stuff will work.
A bit more adjustment with the vice grips and I managed to get it in even closer.
This picture shows you how much more it can be pulled into the B bow pillar.
I’m just waiting on my spacers to pull the bow out a bit more to get the B pillar bow straighter that will allow me to pull it even closer to the pillar, then the bent bar you can see at the top will then be bent less and will enable me to have a full width of about 2 cm for the whole folding mechanism.
Wanna see it in action, wanna see, wanna see?
B-pillar bow in this picture moved back a smidgen, which makes the bars look skew, but it’s straight.
Craptacular picture of the mounting tabs that will be welded to the frame.
So, how flat does it go you ask? Well the front bow connector bars are a good 3cm too long at this point as I thought that I’d give it some extra length first and wait until I have the new front bow made and fitted before I cut them off to their final length. Besides that, perfect.
SO how does the KCC roof fit on?
Almost perfect, I need to have the section extended a bit at the front, but it's nice and tight and doesn't look like a scout tent on top of a car.
Plan of action, well I’m going to be putting in a spacer with the B-Pillar that will pull it out a bit more, but also allow me to make the angle straighter with the upright and in turn will allow the scissor frame to pull up even closer than it is now. Once I have my carriage bolts on and trimmed, they won’t stick out at all. The idea behind the spacer is also to accommodate something for the guys out there that are going for an even more authentic looking car. More news on that later.
-
Firebird
- Oil Stain
- Posts: 155
- Joined: Wed Feb 27, 2008 11:45 pm
- What model do you have?: 356Speedster Replica
- Location: Gauteng
- Has thanked: 28 times
- Been thanked: 11 times
- Contact:
Re: 2.0 KCC 356 Porsche Speedster - Work on scissor roof sta
Very very very cool Gary!
You have done tons of work since I saw it on Friday. It looks great
You have done tons of work since I saw it on Friday. It looks great
-
flatfourfan
- Full-time Bug Nutter
- Posts: 4195
- Joined: Tue Nov 08, 2005 12:06 pm
- What model do you have?: Speedster Replica
- Location: Pretoria
- Has thanked: 36 times
- Been thanked: 50 times
Re: 2.0 KCC 356 Porsche Speedster - Work on scissor roof sta
Yeah dude, up till Friday I had done jack shit to be honest...........lol.
I forgot that I still have to do the scissor action for the rear bow, so I'm going to have to make a new lower bow with an extension that will allow the rear bow to be pulled up. I at least want the tabs welded on the frame so that I can remove the vice grips for once and for all.
I forgot that I still have to do the scissor action for the rear bow, so I'm going to have to make a new lower bow with an extension that will allow the rear bow to be pulled up. I at least want the tabs welded on the frame so that I can remove the vice grips for once and for all.
-
flatfourfan
- Full-time Bug Nutter
- Posts: 4195
- Joined: Tue Nov 08, 2005 12:06 pm
- What model do you have?: Speedster Replica
- Location: Pretoria
- Has thanked: 36 times
- Been thanked: 50 times
Re: 2.0 KCC 356 Porsche Speedster - Work on scissor roof sta
Another good weekend, albeit, I was only able to get 2-3 hours of work in as family commitments came first.
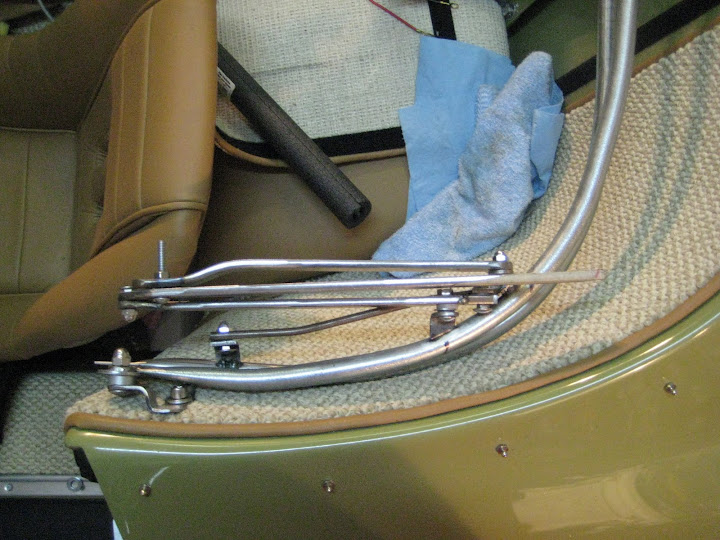
The last of the bars has now been installed. This is the bar that pulls the B-pillar inwards to the C-pillar that folds the whole roof up flat. As you can see the lower cross bar that runs accross the door has a bent down section extended that once it drops, pulls that point up, that in turn folds up the C-pillar bow...................gotta love geometry.

I also started slotting the bars for the carriage bolts as well as rounding the edges so that it all looks a lot better. I've had to notch the rear bar so that it would fold flat enough, the final design will trim this down even more to make it look a whole lot better.
Just to show that it does indeed fold up.


Smooth head carriage bolts make for a nice clean finish. On the other side is domed nuts to keep it all clean, all the hardware is now on, washers, nylon washer, domed nuts and carriage bolts. Just the hardware for the roof is about R100 buying from a wholesaler.

Gives you an idea of how much is going on in the folding scissor mechanism. 2 of the tabs still have to be welded on, but I've decided that I'm going to have them Co2 welded as the arc welder just creates too much heat and I'm scared that it's going to go straight through the pipe. I'll have this done on Friday afternoon, (both sides).
Showing you lot, how flat this thing goes. Still goes well under the rear deck, I also have to take into account the fact that with the roof on, it's going to be a bit thicker. Either way, I have a good 5cm to play with.


Next plan of action is to now finish off the final length of the C-pillar bar and for that the roof has to go on one last time to make sure that the C-pillar bar is above the rear window opening. I can then trim off all the bars and bolts and trim everything off. I'm hoping to have the whole lot in primer by Friday so that it looks way neater. But it's still kinda cool to see all the joints and in turn seeing how it all comes together. I should have the last of the other side bent and fitted by Wednesday and then just wait for Friday to Co2 all the tabs together.
I've also decided that this is prototype #1. I want to make another one with thicker bars 3mm to what will be 4.5mm, this will allow the carriage bolts to fit way better and also to make the whole frame way more rigid. This first frame however has taught me a lot about geometry and also the final length of what all the bars should be. The one thing that will now change is the thickness of the folding up unit. I reckon that I can shave off another 10-20mm by spending more time with bending the bars and getting them to work even closer than where they are now. I also want to change the bow a bit as I've been stuck on trying to make this frame work for a replicars roof, where in fact, the roof isn't right and it can be way better. The bar will be made to tuck up closer to the body of the car and will allow more of a straight surface to mount the pivot points on.
I already have all the steel for proto2 and once this one is done to the point of where I'm happy with it, I'll then speak to my tame Industrial Designer about working on a working pre-production laser cut unit.
The last of the bars has now been installed. This is the bar that pulls the B-pillar inwards to the C-pillar that folds the whole roof up flat. As you can see the lower cross bar that runs accross the door has a bent down section extended that once it drops, pulls that point up, that in turn folds up the C-pillar bow...................gotta love geometry.
I also started slotting the bars for the carriage bolts as well as rounding the edges so that it all looks a lot better. I've had to notch the rear bar so that it would fold flat enough, the final design will trim this down even more to make it look a whole lot better.
Just to show that it does indeed fold up.
Smooth head carriage bolts make for a nice clean finish. On the other side is domed nuts to keep it all clean, all the hardware is now on, washers, nylon washer, domed nuts and carriage bolts. Just the hardware for the roof is about R100 buying from a wholesaler.
Gives you an idea of how much is going on in the folding scissor mechanism. 2 of the tabs still have to be welded on, but I've decided that I'm going to have them Co2 welded as the arc welder just creates too much heat and I'm scared that it's going to go straight through the pipe. I'll have this done on Friday afternoon, (both sides).
Showing you lot, how flat this thing goes. Still goes well under the rear deck, I also have to take into account the fact that with the roof on, it's going to be a bit thicker. Either way, I have a good 5cm to play with.
Next plan of action is to now finish off the final length of the C-pillar bar and for that the roof has to go on one last time to make sure that the C-pillar bar is above the rear window opening. I can then trim off all the bars and bolts and trim everything off. I'm hoping to have the whole lot in primer by Friday so that it looks way neater. But it's still kinda cool to see all the joints and in turn seeing how it all comes together. I should have the last of the other side bent and fitted by Wednesday and then just wait for Friday to Co2 all the tabs together.
I've also decided that this is prototype #1. I want to make another one with thicker bars 3mm to what will be 4.5mm, this will allow the carriage bolts to fit way better and also to make the whole frame way more rigid. This first frame however has taught me a lot about geometry and also the final length of what all the bars should be. The one thing that will now change is the thickness of the folding up unit. I reckon that I can shave off another 10-20mm by spending more time with bending the bars and getting them to work even closer than where they are now. I also want to change the bow a bit as I've been stuck on trying to make this frame work for a replicars roof, where in fact, the roof isn't right and it can be way better. The bar will be made to tuck up closer to the body of the car and will allow more of a straight surface to mount the pivot points on.
I already have all the steel for proto2 and once this one is done to the point of where I'm happy with it, I'll then speak to my tame Industrial Designer about working on a working pre-production laser cut unit.
-
acpaterson

- Carburettor
- Posts: 1960
- Joined: Sat Jan 05, 2013 6:50 pm
- What model do you have?: Winston, a 74 Bay
- Location: Parklands, Cape Town
- Has thanked: 80 times
- Been thanked: 131 times
- Contact:
Re: 2.0 KCC 356 Porsche Speedster - Work on scissor roof sta
After getting sets lasercut etc, would that include a roof made?
How would you plan on selling these off to prospective buyers?
Work is superb.
regards
Alan
How would you plan on selling these off to prospective buyers?
Work is superb.
regards
Alan
-
flatfourfan
- Full-time Bug Nutter
- Posts: 4195
- Joined: Tue Nov 08, 2005 12:06 pm
- What model do you have?: Speedster Replica
- Location: Pretoria
- Has thanked: 36 times
- Been thanked: 50 times
Re: 2.0 KCC 356 Porsche Speedster - Work on scissor roof sta
The price that we set will be for the frame only. The roof will be made by a 3rd party and we’ll just be ordering them as we need them, no added price on that item. People can buy the frame from us and use their existing replicars roof and then just change the front bow, or they can order a roof as well and we’ll ship a complete unit. If I had to make another frame by hand, then I wouldn’t charge less than R4500 for a turn-key completed one that’s been powder coated and supplied with a front bow. We don’t know the price of the laser cut parts, but I can’t see it being anywhere near the hand built price.
The frame that I have will work with a replicars roof, but if you’ve gone the route of getting a proper frame, then go that little extra and have a new roof made up as well. Last quote for a roof with a single rear window was for about R2000 for a basic unit.
I know that for a 2 bow basic frame and roof locally from universal is R15 000. So it makes ours look like a total bargain.
-
flatfourfan
- Full-time Bug Nutter
- Posts: 4195
- Joined: Tue Nov 08, 2005 12:06 pm
- What model do you have?: Speedster Replica
- Location: Pretoria
- Has thanked: 36 times
- Been thanked: 50 times
Re: 2.0 KCC 356 Porsche Speedster - Work on scissor roof sta
whoot whoot...................35 000 views.............seems a plastic car with a waterpumper is interesting afterall.
cheers all.
cheers all.
-
acpaterson
- Carburettor
- Posts: 1960
- Joined: Sat Jan 05, 2013 6:50 pm
- What model do you have?: Winston, a 74 Bay
- Location: Parklands, Cape Town
- Has thanked: 80 times
- Been thanked: 131 times
- Contact:
Re: 2.0 KCC 356 Porsche Speedster - Work on scissor roof sta
FYI. I can't find anyone down here who came make a Canvas roof. Unless I can get one made up there, then there's no point for me. Mine will remain roofless for the time being.
Cheers
Alan
Cheers
Alan
-
flatfourfan
- Full-time Bug Nutter
- Posts: 4195
- Joined: Tue Nov 08, 2005 12:06 pm
- What model do you have?: Speedster Replica
- Location: Pretoria
- Has thanked: 36 times
- Been thanked: 50 times
Re: 2.0 KCC 356 Porsche Speedster - Work on scissor roof sta
Well I have two local companies that can make them and my last quote was mid last year for R1800, made to the same spec as my current roof with a single window and no rear zipper. So for us to supply is no problem.
-
flatfourfan
- Full-time Bug Nutter
- Posts: 4195
- Joined: Tue Nov 08, 2005 12:06 pm
- What model do you have?: Speedster Replica
- Location: Pretoria
- Has thanked: 36 times
- Been thanked: 50 times
Re: 2.0 KCC 356 Porsche Speedster - Work on scissor roof sta
aaaaaaaaaaaah crap............Last night when doing some test mock up, I noticed something. The bow that I'm using is higher than the guy who's plans I've used, so the sizes are slightly out of wack. Also I'm going to have to go it alone on the mounting points as his bow is way shorter than ours as well as he is able to mount higher on the curve, where ours is more flat. Will be doing something different there. honestly on this one, I should have made one to fit our cars from scratch instead of trying to make someone elses idea work on our cars.

This shows the differences. Makes sense when you come to think of it as you want the front bow pulled in as much as possible.
The yellow lines are supposed to be on the same axis, in other words my rear bar to the B-pillar is too short and my front bar to the A-pillar is too long. If done like this, then the unit won't fold in under the rear tonneau cover once the A pillar bow is mounted to it.
Luckily my mounting points will stay the same on the B-bow. So it's just a case of extending the one bar and chopping a section out of the other. Maybe put me back 1/2 hour.....lol.
Last edited by flatfourfan on Fri Feb 21, 2014 10:19 am, edited 2 times in total.
-
Dazz
- Oil Cooler
- Posts: 390
- Joined: Fri Aug 28, 2009 6:08 pm
- What model do you have?: T3 Syncro
- Location: Centurion
- Has thanked: 2 times
- Been thanked: 4 times
Re: 2.0 KCC 356 Porsche Speedster - Work on scissor roof sta
This is truly a work of art I just like the way the Geometry makes everything work....
there is no substitute for true engineering... 
there is no substitute for true engineering...
Measure twice CUTonce.
1975 Kombie
1979 Kombie
W203 C320 CDI
'68 Austin Cambridge A60
Looking for a kombi project
1975 Kombie
1979 Kombie
W203 C320 CDI
'68 Austin Cambridge A60
Looking for a kombi project
-
flatfourfan
- Full-time Bug Nutter
- Posts: 4195
- Joined: Tue Nov 08, 2005 12:06 pm
- What model do you have?: Speedster Replica
- Location: Pretoria
- Has thanked: 36 times
- Been thanked: 50 times
Re: 2.0 KCC 356 Porsche Speedster - Work on scissor roof sta
ooooooooh so much to update.
Firstly the roof is pretty much done now. I ended up re-doing the whole thing. I wasn't happy with just modding the old frame.
1) new main and rear bow that are more straight on the sides that allow for the roof to be pulled in tighter.
2) new rods all built from 3mm bars, all extended and also more precise bends.
The Roof folds flatter now (if that was even possible) It's a lot smoother going up and down than what it was. The top also folds in nicely. Pics to follow as I'm waiting on something that will be a game changer from all kit roofs and it's only half installed at the moment.
i updated this on the finds thread and thanks to Roger, I think that I can make this work. More than likely I'm looking at making a steering column from scratch with a keyway end.


To keep me busy, I also molded a set of bumper bars that I got from Roger. That was fun............cleaned, then all the holes closed with card and hotglue, 7 layers of wax and then gelcoat. Then 4 layers of glass and wait 3 days. I was soooooooo nervous as these are expensive original porsche parts, but Willem wasn't phased and said that I've done it all right. With all of this it's down to prep, prep, prep.
First I had to fill in all the gaps so that they can be cut to fit our cars and bumpers. This was done with hot glue and cardboard.

I also had to close off the exhaust hole as afterall it's fibreglass. The tall ones.........


The short ones.................

Gellcoat..............

Glass on.


Then last night finally got to pull the mold apart after letting it dry for 3 days. Trimmed off the edges and then worked lolli sticks in and hit it a few times and presto.........

I still have more trimming to do as well as make some minor changes to the mold as I want a small line when there cut out goes in that can easily be sanded out if need be.
Plan of action is to have steel ones made of the shorter one as I reckon the guys will be after those more than anything. And the high ones will be on request only as they need all the bars, over-riders, hardware and body mods to make them fit.
Expect a massive update in the next 2 weeks.
Firstly the roof is pretty much done now. I ended up re-doing the whole thing. I wasn't happy with just modding the old frame.
1) new main and rear bow that are more straight on the sides that allow for the roof to be pulled in tighter.
2) new rods all built from 3mm bars, all extended and also more precise bends.
The Roof folds flatter now (if that was even possible) It's a lot smoother going up and down than what it was. The top also folds in nicely. Pics to follow as I'm waiting on something that will be a game changer from all kit roofs and it's only half installed at the moment.
i updated this on the finds thread and thanks to Roger, I think that I can make this work. More than likely I'm looking at making a steering column from scratch with a keyway end.
To keep me busy, I also molded a set of bumper bars that I got from Roger. That was fun............cleaned, then all the holes closed with card and hotglue, 7 layers of wax and then gelcoat. Then 4 layers of glass and wait 3 days. I was soooooooo nervous as these are expensive original porsche parts, but Willem wasn't phased and said that I've done it all right. With all of this it's down to prep, prep, prep.
First I had to fill in all the gaps so that they can be cut to fit our cars and bumpers. This was done with hot glue and cardboard.
I also had to close off the exhaust hole as afterall it's fibreglass. The tall ones.........
The short ones.................
Gellcoat..............
Glass on.
Then last night finally got to pull the mold apart after letting it dry for 3 days. Trimmed off the edges and then worked lolli sticks in and hit it a few times and presto.........
I still have more trimming to do as well as make some minor changes to the mold as I want a small line when there cut out goes in that can easily be sanded out if need be.
Plan of action is to have steel ones made of the shorter one as I reckon the guys will be after those more than anything. And the high ones will be on request only as they need all the bars, over-riders, hardware and body mods to make them fit.
Expect a massive update in the next 2 weeks.