Page 1 of 10

Retrovan's Hahn SP - Project

Posted: Thu Sep 23, 2021 10:14 pm
by retrovan
WEEK One Of Build ........and so it starts... :shock:


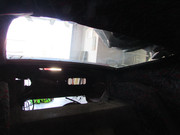
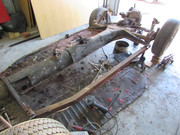
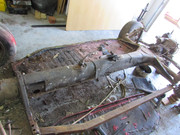
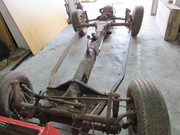
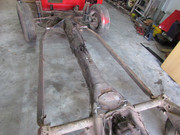
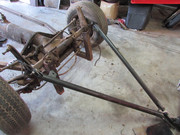
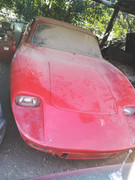
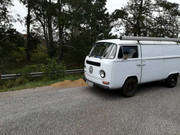
Hi guys have a look what followed me home today......... :shock:

After 5 years of hunting down this legend "bigfoot" that I 1st heard may be found in East London by my friend Clem.

He is the guy with the other Hahn SP that is up and running and has been seen here on this forum.

Well I traced it to a person in Jeffreys Bay of all places and then got to be invited to a shed in Uitenhage.

Thats where I saw the car I only thought to be a legend

Image

So after some long and hard negotiations, we landed up with an agreement that suited both party's.

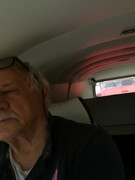
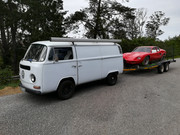
Set off on Wednesday to collect her and found out she will not allow herself to dragged along by a simple "A" frame, so sad and upset we went home without her.

Today how ever we got hold of a smart ( to suit the Lady) car trailer and set off again to bring her home.

So here is the part that I show you what followed me home...... :D

Image

Image

Image

Image

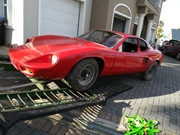
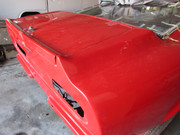
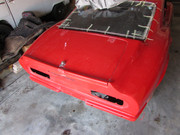
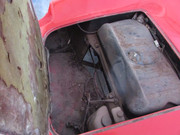
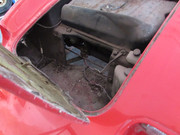
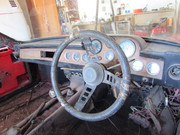
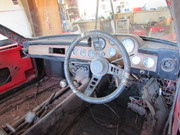
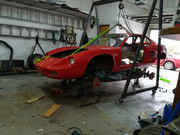
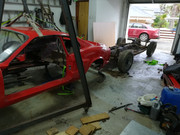
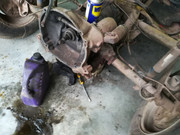
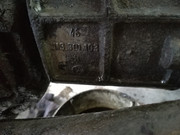
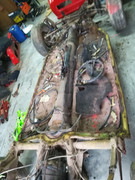
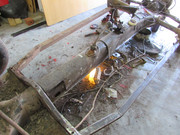
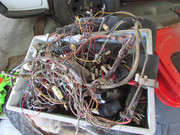
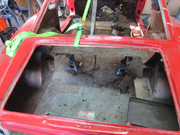
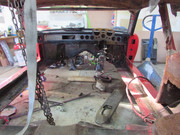
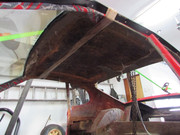
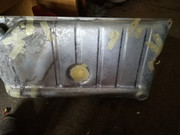
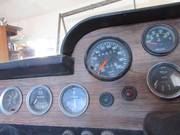
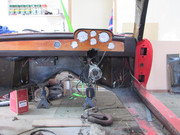
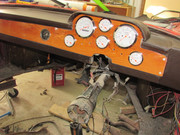
So now she is home we will start with her rebuild to original, as she had a Golf motor in, and a not so nice golf bump on her bonnet/engine cover.

We can not wait to get stuck in to this one.

Till next time.

Herman and the team :lol:

Re: Retrovan's Hanh, finally snagged her.

Posted: Fri Sep 24, 2021 9:42 am
by Dawie
So this is why you were looking for a type 1 engine... Good that you are going back to aircooled.
Congratulations with your find.

Re: Retrovan's Hanh, finally snagged her.

Posted: Fri Sep 24, 2021 9:52 am
by Haans
Right here in my backyard???!!😬🙄😳

Good luck,......what's the plan ?

Regards Haans

Re: Retrovan's Hahn, finally snagged her.

Posted: Sat Sep 25, 2021 5:43 pm
by retrovan
Dawie wrote: ↑Fri Sep 24, 2021 9:42 am So this is why you were looking for a type 1 engine... Good that you are going back to aircooled.
Congratulations with your find.
Thank you Dawie, Yes , as they have cut a lot out of the body to fit the Golf motor (fitted in 1991)

we will want to have a old type 1 beetle motor in-place when doing the fiberglass work just to make sure we have it right.

And being an old motor we do not have to be concerned that we will be getting dust into the motor as it will be reconditioned after wards.

The whole idea is to go back to original body and engine style but with a few upgrades to the motor and the brakes.
Haans wrote: ↑Fri Sep 24, 2021 9:52 am ...........what's the plan ? ...Regards Haans
Thanks Nick, yes it was a bit of a run around just to find out I should have started at home (Jeffreys Bay)

She will be stripped down to pan, and the floor pans replaced , the chassis will be brought back to OEM finish.

During this time we want to upgrade the front brakes to disk and the back to smooth face brake drums.

This will allow us to fit our own choice of Mags with a 4 x 100 bolt pattern.

Will want to fit a SFAS gearbox if it has not got one now (have not looked yet) and fit a longer final drive.

As can be seen below the original upholstery was not to anybody's taste, and the replacement even worse.

But before we can get to that we will have to repair the cut Body panels and get the engine bay back to being sealed off for a Type 1 Beetle motor.

The raised Golf Motor Bump in the bonnet has to be cut out and the back end brought back to the original flat shape.

This will include the repair to body panels in the fount boot area as this is where they had the radiator.

The dash will have to come out as it was of laminated wood which had bad water damage and a new wood finish dash made to OEM spec.

The wiring has been gippo'd to such an extent that its a spiders nest under the dash, this will have to be sorted wire for wire.

Then we are going to have to make window regulators and fit one piece side glass.

Quater windows also have to be made, as well as the head light screens.

Talking about that we need to find Chev Firenza / Ford escort Mr 1 / Ford Capri Mr1 / Hillman Hunter semi sealed head lights, If you have let me know please.

Then when all is done we will be painting it as we do not like the red paint and we have a red car in the shed, so we will be making it a Gunston Car ........ :shock: :shock: :shock: :roll: :roll: :roll: :wink:
Image

WHY ... becouse I smoked Gunston Plain in the 70's when this car was made, smoked it during my army call-up days and the other two destroyed Hahns where used in racing in the Gunston Colour days.

Have placed some "as Is" photo's of how the car was found, so it will be easy to spot the difference once done.

Now all I need to do is get my team back to work.

So from Me , Myself and I ,

till next time

Herman

Image

Image

Image

Image

Image

Image

Image

Image

Image

Image

Image

Image

Image

Image

Image

Image

Image


Image

Re: Retrovan's Hahn, finally snagged her.

Posted: Sun Sep 26, 2021 5:56 pm
by AlanH
Yo, well done Herman. Nice project, should keep you busy for some time. I'm sure it will be better than new once you have finished.

Re: Retrovan's Hahn, finally snagged her.

Posted: Sun Sep 26, 2021 6:32 pm
by Pine
Awesome find! Bestaluck with the project, Herman

Re: Retrovan's Hahn, Project

Posted: Wed Sep 29, 2021 6:53 pm
by retrovan
Started striping the Hahn and was amazed how much rust is on a fiberglass car..... :lol: :lol:

As near all bolts where rusted and others where covered with Fiberglass, it was a struggle to get all the bolts out.

How ever the body is now off and we can start with the chassis rebuild.

Pans have been ordered and we will start cutting out the old rust in the next few days.

Can not read the gearbox number but looks to be a AB box, will the experts please see the photo's and let me know what box I have here PLEASE.

My thinks its a 1300....... :roll:

Thanks for looking

Herman

Image

Image

Image

Image

Image

Image

Image

Image

Re: Retrovan's Hahn, Project

Posted: Thu Sep 30, 2021 7:35 pm
by Tony Z
Definitely not wasting any time.... this will be finished before you know it ;-)

Re: Retrovan's Hahn SP - Project

Posted: Fri Oct 01, 2021 1:16 am
by retrovan
:lol: :lol:

Thanks Tony...

As the fuel tank was so badly rusted we went hunting for a "new" tank

Finally found a Less rusted tank without holes to replace the old tank that was just holes.

Will be getting it de-rusted and phosphated

will then do the tank epoxy system that I have done many years ago, on the Fastbacks tank, which is still as good as new.

Herman

Re: Retrovan's Hahn SP - Project

Posted: Sat Oct 02, 2021 6:38 pm
by retrovan
Found me a SFAS gearbox........ :D :D

Will be getting it sorted and a longer final drive added ,

Becouse ...........

This here Lady is going to have Loooooooong Legs :shock: :shock: :shock: :roll: :oops:

Herman

Re: Retrovan's Hahn SP - Project

Posted: Sun Oct 03, 2021 8:41 pm
by retrovan
We cut and stripped the two rusty pan half's out of the chassis.

Then used the hammer chisel to remove the left over edge with spot-welds to prepare the chassis for the new floor pans.

Completed the one side then moved over to the other side as we had to lift it off the floor to get in under so we can follow the center tunnel lip.

Now we are ready to sandblast the rest of the chassis and start renewing it.

Till then

Herman

Image

Image

Image

Image

Image

Image

Image

Re: Retrovan's Hahn SP - Project

Posted: Mon Oct 04, 2021 7:46 am
by AlanH
Great stuff, you are moving fast. I need to pick up the pace on mine otherwise this will be done before my project is done.
Nice work, looks a lot better already.

Re: Retrovan's Hahn SP - Project

Posted: Sun Oct 10, 2021 3:21 pm
by Bugger
Nice project
Keep the pics coming

Sent from my SM-G991B using Tapatalk


Re: Retrovan's Hahn SP - Project

Posted: Sun Oct 10, 2021 9:00 pm
by retrovan
WEEK 2 of build


Thanks guys.

This week we have adapted the MeFusco "A" frame to fit the Hahn chassis so that we can tow it to the sandblaster and back.

Image

We also got stuck into the wire mess that was under the dash, engine compartment and bonnet.

They had a 28 fuses, fuse box with everything and its dog going to the fuse box .......... :shock: :roll:

Image

Next was the old dash with the gauges, :shock: :shock: this car must have been in the rain with out windows

Everything behind the dash was rusted, so out came all the gauges, straight into the dustbin........ :(

Image

As we where totally pissed off, we got stuck into the :bn: upholstery.... :evil:

Ripped out what we could just for fun.

Image

This got us in to cleaning out the body for the next stage of the project.

Well till next week, Thanks for looking.

Herman

Image

Image

Image

Re: Retrovan's Hahn SP - Project

Posted: Sun Oct 17, 2021 8:21 pm
by retrovan
WEEK 3 of build


So this week we have repaired the fuel tank, my plating guy did the de-rusting of the sieve,Some call it a Beetle fuel tank.

So we had a few handful's of holes all over the tank but I was not concerned.

We epoxy ed the tank as per the old thread viewtopic.php?t=25951

If you see the white spots on the internally treated tank, you will be looking at a hole

These are now closed and it holds fuel. We are going to over paint these spots with more epoxy on the outside just to lock the inside and the outside together through the hole

We then shifted our efforts to the rotten dash removing the old black chipped covering and recovering it in a chocolate brown vinyl.

We then made a new laminated wood dash cover, replacing the rotten marine ply old dash.

As the old gauges where rusted and in bad condition I decided to fit new classic style gauges.

We also reduced the number of gauges as it is not an airplane.

Could not however get a 52mm white face clock, so will be using the original black one as it still works.

Maybe if someone knows a watch maker that can service it and replace the face with a white matching face, it would be much appreciated.

Will probably continue with the Chassis this following week.

So I will leave you with this weeks photo's

Thanks

Herman

Image

Image

Image

Image

Image

Inside the fuel tank after epoxy

Image

Image

Old Dash ...

Image

Image

New dash not bolted down just to test fit.....

Image

Now you can see where the colours fit in .........

Image

Image

Image