My 181 - Kubel - Trekker - Thing
-
Ron&Gill

- Full-time Bug Nutter
- Posts: 4054
- Joined: Fri Aug 29, 2008 4:16 am
- What model do you have?: Type 1, 21b, 34, 316
- Location: St Lucia KZN/Cameron LA
- Has thanked: 1 time
- Been thanked: 21 times

Re: My 181 - Kubel - Trekker - Thing
Nice work, mate! Anally accurate... 
1964 T34 - The Razor: viewtopic.php?f=23&t=10290
1956 T2 1b - Gill's bus: viewtopic.php?f=23&t=10948
1967 T316 - viewtopic.php?f=23&t=10931 & viewtopic.php?f=23&t=15977
2000 beach buggy - viewtopic.php?f=23&t=10915
1956 T2 1b - Gill's bus: viewtopic.php?f=23&t=10948
1967 T316 - viewtopic.php?f=23&t=10931 & viewtopic.php?f=23&t=15977
2000 beach buggy - viewtopic.php?f=23&t=10915


-
Ron&Gill
- Full-time Bug Nutter
- Posts: 4054
- Joined: Fri Aug 29, 2008 4:16 am
- What model do you have?: Type 1, 21b, 34, 316
- Location: St Lucia KZN/Cameron LA
- Has thanked: 1 time
- Been thanked: 21 times
Re: My 181 - Kubel - Trekker - Thing
Not if you know Tom, pal, he'll be working on that for a long while yet, not because he's lazy, slow, but because he is very accurate and wants everything "just so". It's the right way to tackle these projects really. Anything that is not quite "just so" will just irritate the crap out of you until it is "just so", so might as well do it right first time, never mind if it takes longer, not so Tom? 
1964 T34 - The Razor: viewtopic.php?f=23&t=10290
1956 T2 1b - Gill's bus: viewtopic.php?f=23&t=10948
1967 T316 - viewtopic.php?f=23&t=10931 & viewtopic.php?f=23&t=15977
2000 beach buggy - viewtopic.php?f=23&t=10915
1956 T2 1b - Gill's bus: viewtopic.php?f=23&t=10948
1967 T316 - viewtopic.php?f=23&t=10931 & viewtopic.php?f=23&t=15977
2000 beach buggy - viewtopic.php?f=23&t=10915
-
Tom Bishop

- Single Port
- Posts: 1205
- Joined: Thu Sep 07, 2006 5:04 pm
- What model do you have?: A Yellow 181
- Facebook: http://www.facebook.com/profile.php?id=1321084423
- Location: Cape Town
- Been thanked: 5 times
Re: My 181 - Kubel - Trekker - Thing
Got to do some work last Saturday and yesterday (election day)
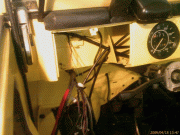
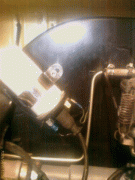
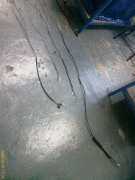
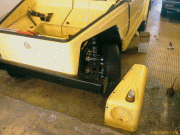
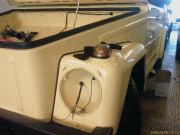
Wires from the back coming out in the front. See how the loom runs externally, not hidden or protected. Also see that I can check my brake fluid level from inside the car. There is meant to be a little plate covering it so if anybody has one please let me know.
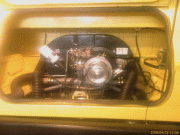
All connection to the motor are done, took the carb and dizzy out to give me a bit more space while working.
Alternater connected.
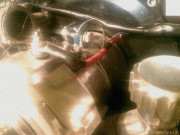
and coil connected.
Wires from the back coming out in the front. See how the loom runs externally, not hidden or protected. Also see that I can check my brake fluid level from inside the car. There is meant to be a little plate covering it so if anybody has one please let me know.
All connection to the motor are done, took the carb and dizzy out to give me a bit more space while working.
Alternater connected.
and coil connected.
”Experience is what you get when you do not get what you want”
-
Tom Bishop
- Single Port
- Posts: 1205
- Joined: Thu Sep 07, 2006 5:04 pm
- What model do you have?: A Yellow 181
- Facebook: http://www.facebook.com/profile.php?id=1321084423
- Location: Cape Town
- Been thanked: 5 times
Re: My 181 - Kubel - Trekker - Thing
Thanks Johanb.johanb wrote:Just went through the theread,, very nice project.. nearly there..
Other than the wires and seats its done. If only I could get 5 days solid work with no interruptions it could be completed.
And yes where most would turn a blind eye I dont. Even things others cant see. Why?? Because I would know Its there.
”Experience is what you get when you do not get what you want”
-
Tom Bishop
- Single Port
- Posts: 1205
- Joined: Thu Sep 07, 2006 5:04 pm
- What model do you have?: A Yellow 181
- Facebook: http://www.facebook.com/profile.php?id=1321084423
- Location: Cape Town
- Been thanked: 5 times
Re: My 181 - Kubel - Trekker - Thing
A sad place.
Got this link from Barrie Gasson, the guy I bought my 181 from.
http://www.181spirit.com
and
http://www.kubelwagen.co.uk
Looks like WWII versions parts are more available than the 181.
Got this link from Barrie Gasson, the guy I bought my 181 from.
http://www.181spirit.com
and
http://www.kubelwagen.co.uk
Looks like WWII versions parts are more available than the 181.
”Experience is what you get when you do not get what you want”
-
Blitzkrieg
- ACVWSA Junkie
- Posts: 10784
- Joined: Wed Mar 07, 2007 10:41 am
- What model do you have?: none
- Location: Johannesburg
- Has thanked: 91 times
- Been thanked: 44 times
Re: My 181 - Kubel - Trekker - Thing
Tom, I don't know if I've missed it or what, but what's the history behind your car?
Any idea how many are there here in SA?
On TheSamba, there was a picture of a dusty Blue one in a Mozambiquen township.
And there were two parked side by side in some movie from up Africa that was playing on SABC sometime last year...
Any idea how many are there here in SA?
On TheSamba, there was a picture of a dusty Blue one in a Mozambiquen township.
And there were two parked side by side in some movie from up Africa that was playing on SABC sometime last year...
If it's too low, you're too old 
-
Tom Bishop
- Single Port
- Posts: 1205
- Joined: Thu Sep 07, 2006 5:04 pm
- What model do you have?: A Yellow 181
- Facebook: http://www.facebook.com/profile.php?id=1321084423
- Location: Cape Town
- Been thanked: 5 times
Re: My 181 - Kubel - Trekker - Thing
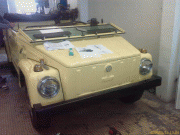
My 181 was delivered in 75 to a portugese guy (forgot his name but got it in the docs) in Angola from the Hanover factory, Germany. It was in olive green and was ordered with the opional limited slip diff and it is still in there.
I belived it had a hard life and ended up being a used to pull the owners boat in and out the river and for hunting. As things turned in Angola the guy moved to the then SWA. As things turned there he moved to Johannesburg and as things turned he had enough and returned to Portugal, Selling his 181. The second guy sold it to Barrie Gasson who used it as his daily transport. I bought it from Barrie.
Between the first and second owner it was sprayed yellow twice. The first time, from how it was painted, looks like it was a Body Off job. The second time a blow over, painting just about everything. The body off restoration was poor eg no rubbers between the body and pan and the pan was repaired with sheet metal.
I bought the car on the fly. I belong to a motot club where the Rolls and Bently guys wanted there own division. One member organised a VW evening, the time when VW had just taken over Bently. So could you believe at the club house were Beetles and Buggies. Barrie had the kubel there for sales. In the dark ,within 15mins of seeing it, it was sold.
Barrie was selling it as he already had another military 181 and had now bought a WWII kubel and needed space. Barrie kept the 181 in got nick, having it serviced regulary and had all the receipts to prove it.
It was not a bad car. I drove it all over, To worcester and back a number of times, Hermanus many, To Lamberts Bay no problem and George. Must have done 20,000 km in about 9 months. The only problem was the rear suspension has sagged. On a day I bought a set of coil shocks. This made such an improvement I decided this car need to be fixed properly and so the restoration began.
It was stripped, about a year ago, in 3 days flat and this is where I say what I had. Just about everything was worn out badly. With the paint removed from the body, I was in for a shock. This thing had been covered in Filler. (This has now been replaced new panels.) It was in pieces and the only way forward was a Total component restoration, Everything on the 181 is new. I think it is better than the day it came off the production line as it has todays bearings, coatings and paints. You can ask the guys that has seen it in the flesh. I am almost dreading to drive it on the road.
It is not a 100% original restoration but the way I like it. EG the air scoops should be pop riveted on. It looks so home made so I used Hex Screws instead.
Anyway for those that want to join me once the niggles are sorted ,and there always are, I will be off to the Hell and Back. Will let you know when I am going.
(Damn, Didnt know I could write so much, watch out Pine and Ron)
”Experience is what you get when you do not get what you want”
-
Blitzkrieg
- ACVWSA Junkie
- Posts: 10784
- Joined: Wed Mar 07, 2007 10:41 am
- What model do you have?: none
- Location: Johannesburg
- Has thanked: 91 times
- Been thanked: 44 times
Re: My 181 - Kubel - Trekker - Thing
Now there's a cool story if there ever was one
If it's too low, you're too old
-
Tom Bishop
- Single Port
- Posts: 1205
- Joined: Thu Sep 07, 2006 5:04 pm
- What model do you have?: A Yellow 181
- Facebook: http://www.facebook.com/profile.php?id=1321084423
- Location: Cape Town
- Been thanked: 5 times
Re: My 181 - Kubel - Trekker - Thing
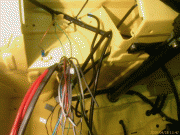
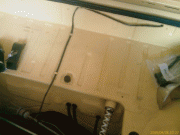
Here we have the front loom comming together:
First I needed to work out which colour wire went where and how long each wire needed to be.
Once that was done I started laying out the wires to wrap them in there sets.
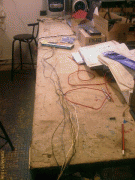
These are the 3 main sets wrapped, Left Lights, Right Lights and Horn/Washer Bottle
Unfortunatly I never took a picture of the completed front loom but it looks neet and fits perfectly.
Things behind the dash are starting to get a bit cluttered. One everything it connected and working I will shorten and neaten this mess.
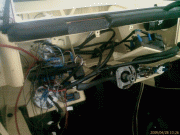
Wires for the Fuel Gauge In.
Now I still need to get the wires from the Brake switch and Electric fuel pump.
First I needed to work out which colour wire went where and how long each wire needed to be.
Once that was done I started laying out the wires to wrap them in there sets.
These are the 3 main sets wrapped, Left Lights, Right Lights and Horn/Washer Bottle
Unfortunatly I never took a picture of the completed front loom but it looks neet and fits perfectly.
Things behind the dash are starting to get a bit cluttered. One everything it connected and working I will shorten and neaten this mess.
Wires for the Fuel Gauge In.
Now I still need to get the wires from the Brake switch and Electric fuel pump.
”Experience is what you get when you do not get what you want”
-
Dam

- Flywheel
- Posts: 522
- Joined: Wed May 30, 2007 2:46 pm
- What model do you have?: A few
- Location: Kempton Park
- Has thanked: 5 times
- Been thanked: 7 times
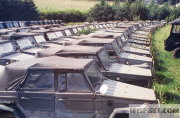
Re: My 181 - Kubel - Trekker - Thing
I think this is the place in Belgium where I got my parts from way back in '94Tom Bishop wrote:A sad place.
Got this link from Barrie Gasson, the guy I bought my 181 from.
http://www.181spirit.com
and
http://www.kubelwagen.co.uk
Looks like WWII versions parts are more available than the 181.
-
Dam
- Flywheel
- Posts: 522
- Joined: Wed May 30, 2007 2:46 pm
- What model do you have?: A few
- Location: Kempton Park
- Has thanked: 5 times
- Been thanked: 7 times
Re: My 181 - Kubel - Trekker - Thing
See the one at the far end in the long grass without a roof, windscreen & frame & side screens, it's on mine now 
-
Tom Bishop
- Single Port
- Posts: 1205
- Joined: Thu Sep 07, 2006 5:04 pm
- What model do you have?: A Yellow 181
- Facebook: http://www.facebook.com/profile.php?id=1321084423
- Location: Cape Town
- Been thanked: 5 times
Re: My 181 - Kubel - Trekker - Thing
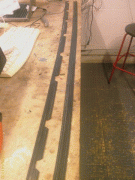
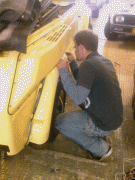
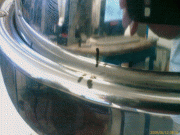
The last week saw us refit the mudguards inserting their fenderwelt. This was a killer. Fitting Beetle Fenderwelt is a joke compared to this on.
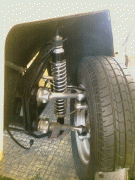
Last look at the front suspension before the mudguard goes back.
Getting Ready.
Back one done.
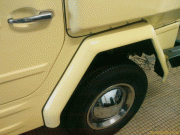
Front Left done and wires pulled through for the head light.
Making up the fenderwelt lenghts for the right side.
Eventually I kinda gave up with this. I were seriously considering leaving the Kubel without its fenderwelt. Nobody had noticed it was missing before. My son took over and with patience, about an hour of it, he got this beading into place.
Last look at the front suspension before the mudguard goes back.
Getting Ready.
Back one done.
Front Left done and wires pulled through for the head light.
Making up the fenderwelt lenghts for the right side.
Eventually I kinda gave up with this. I were seriously considering leaving the Kubel without its fenderwelt. Nobody had noticed it was missing before. My son took over and with patience, about an hour of it, he got this beading into place.
”Experience is what you get when you do not get what you want”
-
Tom Bishop
- Single Port
- Posts: 1205
- Joined: Thu Sep 07, 2006 5:04 pm
- What model do you have?: A Yellow 181
- Facebook: http://www.facebook.com/profile.php?id=1321084423
- Location: Cape Town
- Been thanked: 5 times
Re: My 181 - Kubel - Trekker - Thing
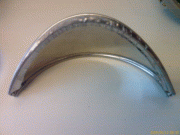
Another bug that crawled up my shorts was fitting the Headlight Eyelids.
Every time I guessed what was upright for the lens and the correct position for the eyelid. When I then fitted it back to the Kubel one or both were always wrong.
If you are going to fit these things to your existing lights, make marking in the front and rear of the light before you dismantle it. This will help you align things when assembling it. In the front make a mark on the lens where the bottom screw it located and in the rear make a mark on the chrome ring where the drainage slot of the reflector is located.
I have mix n matched reflectors, lenses and chrome rings to make the perfect set. After battling for about 4 hours with the first one I eventually ended up using measurement to get everything alligned. The 2nd light took about 10 minutes to assemble.
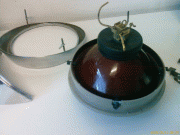
The light before the eyelid.

Remove the clips that hold reflector, lense and chrome ring together.
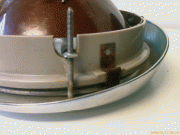
There are four.
Slip the Headlight adjustment screws from there mountings.
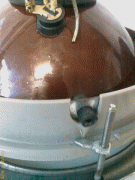
And all should come apart.
Keep the reflector clean. No fingerprints. Unless its super dirty, dont clean it. The cleaning marks will showup when the lens get hot.
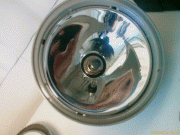
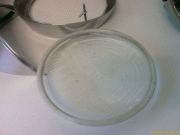
Clean the Lens on both sides
Find and mark the middle point of the eyelid.

The eyelid needs to be bent until it follows the same profile as the inside of the chrome ring.
From the bottom screw find the centre top point of the ring.

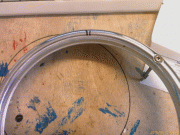
Align the centre of the eyelid and chrome ring.
Next you insert the lens. In a later pic you can see how the ends of the eyelid needs to line up with the top horizontal line of the lens.
The drainage slot of the reflector need to be centre with the bottom hole in the chrome ring.
Then with your three hands, hold the whole lot and return the adjuster screws to their holders and clip the whole assembly together.

The light together


And back on the 181.
Every time I guessed what was upright for the lens and the correct position for the eyelid. When I then fitted it back to the Kubel one or both were always wrong.
If you are going to fit these things to your existing lights, make marking in the front and rear of the light before you dismantle it. This will help you align things when assembling it. In the front make a mark on the lens where the bottom screw it located and in the rear make a mark on the chrome ring where the drainage slot of the reflector is located.
I have mix n matched reflectors, lenses and chrome rings to make the perfect set. After battling for about 4 hours with the first one I eventually ended up using measurement to get everything alligned. The 2nd light took about 10 minutes to assemble.
The light before the eyelid.
Remove the clips that hold reflector, lense and chrome ring together.
There are four.
Slip the Headlight adjustment screws from there mountings.
And all should come apart.
Keep the reflector clean. No fingerprints. Unless its super dirty, dont clean it. The cleaning marks will showup when the lens get hot.
Clean the Lens on both sides
Find and mark the middle point of the eyelid.
The eyelid needs to be bent until it follows the same profile as the inside of the chrome ring.
From the bottom screw find the centre top point of the ring.
Align the centre of the eyelid and chrome ring.
Next you insert the lens. In a later pic you can see how the ends of the eyelid needs to line up with the top horizontal line of the lens.
The drainage slot of the reflector need to be centre with the bottom hole in the chrome ring.
Then with your three hands, hold the whole lot and return the adjuster screws to their holders and clip the whole assembly together.
The light together
And back on the 181.
”Experience is what you get when you do not get what you want”
-
Tom Bishop
- Single Port
- Posts: 1205
- Joined: Thu Sep 07, 2006 5:04 pm
- What model do you have?: A Yellow 181
- Facebook: http://www.facebook.com/profile.php?id=1321084423
- Location: Cape Town
- Been thanked: 5 times
Re: My 181 - Kubel - Trekker - Thing
This weekend I manages to get a lot done on the wiring.
All things in the front are complete and the fusebox is done.
Now just the taillights and the wiring is complete
All things in the front are complete and the fusebox is done.
Now just the taillights and the wiring is complete
”Experience is what you get when you do not get what you want”