My German Import RHD 58 - Updated
-
Dutch_Diver

- Full-time Bug Nutter
- Posts: 4028
- Joined: Tue Nov 20, 2007 8:52 am
- What model do you have?: 64 bus & 63 Bug
- Facebook: www.facebook.com/people/Frank-Van-Hoof/576686903
- Location: St Ives, Dorset, UK
- Been thanked: 10 times
- Contact:
Re: My German Import RHD 58 - Updated
KK, love the car and great news on the semaphores! When you completed?
"MO" - 1965 Splitscreen bus --> http://www.aircooledvwsa.co.za/viewtopi ... =37&t=9305" onclick="window.open(this.href);return false;
"BOBBIE" - 1963 Beetle --> http://www.aircooledvwsa.co.za/viewtopi ... 23&t=11338" onclick="window.open(this.href);return false;
"BOBBIE" - 1963 Beetle --> http://www.aircooledvwsa.co.za/viewtopi ... 23&t=11338" onclick="window.open(this.href);return false;
-
GavinHuart
- Pushrod
- Posts: 917
- Joined: Wed Aug 27, 2008 4:49 pm
- What model do you have?: '62, '63 & '75
- Facebook: http://www.facebook.com/profile.php?id=710891856
- Location: Johannesburg
- Has thanked: 48 times
- Been thanked: 9 times
Re: My German Import RHD 58 - Updated
'62 Bug, '57 Bug, '63 Panel Van & '75 Fleetline.. (O\ | /O) & |o\*/o|
-
karmakoma
- Full-time Bug Nutter
- Posts: 4126
- Joined: Sat Mar 29, 2008 9:11 pm
- What model do you have?: 69 dual trunk coupe
- Location: Gauteng
- Has thanked: 1 time
- Been thanked: 8 times
Re: My German Import RHD 58 - Updated
Haven't had a chance to do anything new to the beetle in months. Sad Really.
So thought today will be the day. I fitted a couple of accessories, also got the rechromed bumpers back last month.
Now this is an interesting one. They were not panelbeated, and they were not straight when they were on the car, I just had them rechromed as is.
How do you panelbeat a bent "towel rail" anyway?
A while ago I also got some new overriders from hubcap.
After fitting the one or two accessories on the beetle, I started the ultimate bumper puzzle.
Take off the "temp" bumpers currently on the beetle, then use the best of the rechromed bits, and two new overriders.
Add to that some miracle whip, also known as Autosol :
: 
Really something everyone should have in their "resto toolbox" and a lot of elbow grease later.
You end up with a complete set of bumpers, in 95% original german metal, oh, by the way, how do you know if a bumper is german metal or brazilian?
When the no 14 spanner slips off the old rounded bolt and you bruise your hand on the bumper edge first try, then its german , yes, I can laugh about it now.
I digress, also took a drill to one of the new overriders, man, that felt strange, but worked out just fine . Was easier than I thought.
Finally, after what took AGES and much longer than I thought, we end up with this. Ready to be fitted.
I also made a new trunk liner and sprayed it black, but will trial fit it first before I post any pics, and then you can also see the other accessories. All this to FINALLY take it for roadworthy (if they are open this week!).
So thought today will be the day. I fitted a couple of accessories, also got the rechromed bumpers back last month.
Now this is an interesting one. They were not panelbeated, and they were not straight when they were on the car, I just had them rechromed as is.
How do you panelbeat a bent "towel rail" anyway?
A while ago I also got some new overriders from hubcap.
After fitting the one or two accessories on the beetle, I started the ultimate bumper puzzle.
Take off the "temp" bumpers currently on the beetle, then use the best of the rechromed bits, and two new overriders.
Add to that some miracle whip, also known as Autosol
Really something everyone should have in their "resto toolbox" and a lot of elbow grease later.
You end up with a complete set of bumpers, in 95% original german metal, oh, by the way, how do you know if a bumper is german metal or brazilian?
When the no 14 spanner slips off the old rounded bolt and you bruise your hand on the bumper edge first try, then its german
I digress, also took a drill to one of the new overriders, man, that felt strange, but worked out just fine
Finally, after what took AGES and much longer than I thought, we end up with this. Ready to be fitted.
I also made a new trunk liner and sprayed it black, but will trial fit it first before I post any pics, and then you can also see the other accessories. All this to FINALLY take it for roadworthy (if they are open this week!).
You do not have the required permissions to view the files attached to this post.
Last edited by karmakoma on Tue Dec 28, 2010 9:30 pm, edited 1 time in total.
-
karmakoma
- Full-time Bug Nutter
- Posts: 4126
- Joined: Sat Mar 29, 2008 9:11 pm
- What model do you have?: 69 dual trunk coupe
- Location: Gauteng
- Has thanked: 1 time
- Been thanked: 8 times
Re: My German Import RHD 58 - Updated
Ok, the bumpers aren't perfect, but to get them any better in solid metal you will have to import the triple chrome ones from WW, and these are mostly the ones original to the car, further enhancing the "preserved not restored" motto for this one
Can't wait to post some more pics with them fitted !
That reminds me, the long front "towel rail" would not line up with the bolt holes on the blade, did I ONLY work up a sweat to lean on the towel rail (after wedging it under a cupboard in the garage), to force the two holes into submission long enough to put the bolt in Who needs to go to a gym after that session!
Can't wait to post some more pics with them fitted
That reminds me, the long front "towel rail" would not line up with the bolt holes on the blade, did I ONLY work up a sweat to lean on the towel rail (after wedging it under a cupboard in the garage), to force the two holes into submission long enough to put the bolt in
-
karmakoma
- Full-time Bug Nutter
- Posts: 4126
- Joined: Sat Mar 29, 2008 9:11 pm
- What model do you have?: 69 dual trunk coupe
- Location: Gauteng
- Has thanked: 1 time
- Been thanked: 8 times
Re: My German Import RHD 58 - Updated
Phew, what a day, tired, but feeling good!
The 6V battery in the beetle was dead, what are the odds of finding a new one on the 28th of December? Pretty good apparently! Phoned and 3rd place had, and they were open today! Drove straight there, got the battery, installed it and the beetle started just fine after a little cranking
Pulled her into the garage and then the real work started. Fitted the newly prepared bumpers, sounds so simple when you say it like that, but no, the bumper brackets don't all line up, and some of the bolt holes also don't line up. Some muscling of metal and lots of swea(r)ting later, and FINALLY, they were on properly.
I then connected the spotlight so that it lights up when you hit the brights. Works and looks cool
But wait, there's more!
Cleaned the entire under bonnet area. 50 odd years of dust and junk, took over an hour just to get it semi-respectable, and then I was able to fit the new trunk liner, and put the original looking material toolkit in it's right place. Now that it's all clean though, the poorly repaired accident damage really lets the team down, but, that's for another year.
This is what it looks like now:
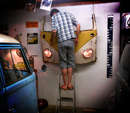
Had a visitor for almost the entire day while I was working, first the trunk, then in the beetle, then back to the trunk, head swivelling as it followed me when I walked round the car, took this pic when it checked if I did the splicing of the wires correctly :
After the trunk got sorted, it was time to fit the early 911 fluted headlights, this was actually quite easy. The glass is a direct fit, even if the Porsche chrome surround looks different to the beetle's. The Porsche light bucket also looks almost identical to the early sixties beetle light bucket, but not the same as the late fifties one. The left hand side light is still the original light and bucket, and what a thing of beauty to see how they used to do the light adjustment. No rubber grommets here, a spring, and a piece of stiff wire running from one side to the other with similar adjustment screws as the "newer" lights. Everything also felt very solid and hefty, the bucket was PRISTINE. I almost felt guitly to open it after all this time.
Lights in, on to the next task.
I realized that the beetle does not have any mirrors, so there is no way that it would pass a roadworthy, , time to call up the swans.
Cut the side beading and they fitted quite easily, looks
NEXT! :
Fitting the wolfsburg badge as a 58 should have - light blue in this case.
Marked and drilled two small holes, fitted no problem, the bonnet beading was a problem though, as with the above mentioned accident repair, they used a later bonnet and the thin beading.
This was clearly not going to cut it.
Fortunately I had a package which I received from Lord Far Hard a couple of months back, with various bits and pieces of trim.
One piece which looked like it was from a door or quarter panel seemed to me to be just the ticket:
Only problem was, I did not have the clips to fit this to the bonnet, as the beading clips on there was the thin plastic type.
What to do ? Well there was some offcut pieces of beading left, so I flattend these, and drilled a small 4.5mm hole in the middle, and after a bit of bending, had a couple of brackets to fit the beading using the same holes as the thin beading.
Picture is not clear, but you get the idea:
This obviously took some time, as "fabricating" (if you can call it that ) is quite fiddley. That was were I called it a day.
Over the weekend I also put the chromed roofrack back, installed a two post vintage antenna I got from calooker almost a year ago, as well as bonnet handle guard.
Most of the accessories were purchased and stored not long after I got this beetle, and I wanted to keep them till the "nose" was repaired and resprayed. But seeing all those nice beetles out there (Calooker's, Dsan's, Splitfans, Fig, Eddyr's etc etc etc) with the full house of accessories as it were, really made me decide, to run her rat, with all the trimmings, until her turn comes to be painted.
The hooter still has to be fixed before I can take her for roadworthy (it sounds like an asthmatic with a cold after smoking a pack of twenty while doing a fun run)
but good progress was made today
I didn't want to post a pic of her as she is now, as she was standing outside and is disgustingly, no , make that embarrassingly dirty, but after a day like that, one has to take just one pic before you turn off the light:
The 6V battery in the beetle was dead, what are the odds of finding a new one on the 28th of December? Pretty good apparently! Phoned and 3rd place had, and they were open today! Drove straight there, got the battery, installed it and the beetle started just fine after a little cranking
Pulled her into the garage and then the real work started. Fitted the newly prepared bumpers, sounds so simple when you say it like that, but no, the bumper brackets don't all line up, and some of the bolt holes also don't line up. Some muscling of metal and lots of swea(r)ting later, and FINALLY, they were on properly.
I then connected the spotlight so that it lights up when you hit the brights. Works and looks cool
But wait, there's more!
Cleaned the entire under bonnet area. 50 odd years of dust and junk, took over an hour just to get it semi-respectable, and then I was able to fit the new trunk liner, and put the original looking material toolkit in it's right place. Now that it's all clean though, the poorly repaired accident damage really lets the team down, but, that's for another year.
This is what it looks like now:
Had a visitor for almost the entire day while I was working, first the trunk, then in the beetle, then back to the trunk, head swivelling as it followed me when I walked round the car, took this pic when it checked if I did the splicing of the wires correctly
After the trunk got sorted, it was time to fit the early 911 fluted headlights, this was actually quite easy. The glass is a direct fit, even if the Porsche chrome surround looks different to the beetle's. The Porsche light bucket also looks almost identical to the early sixties beetle light bucket, but not the same as the late fifties one. The left hand side light is still the original light and bucket, and what a thing of beauty to see how they used to do the light adjustment. No rubber grommets here, a spring, and a piece of stiff wire running from one side to the other with similar adjustment screws as the "newer" lights. Everything also felt very solid and hefty, the bucket was PRISTINE. I almost felt guitly to open it after all this time.
Lights in, on to the next task.
I realized that the beetle does not have any mirrors, so there is no way that it would pass a roadworthy,
Cut the side beading and they fitted quite easily, looks
NEXT! :
Fitting the wolfsburg badge as a 58 should have - light blue in this case.
Marked and drilled two small holes, fitted no problem, the bonnet beading was a problem though, as with the above mentioned accident repair, they used a later bonnet and the thin beading.
This was clearly not going to cut it.
Fortunately I had a package which I received from Lord Far Hard a couple of months back, with various bits and pieces of trim.
One piece which looked like it was from a door or quarter panel seemed to me to be just the ticket:
Only problem was, I did not have the clips to fit this to the bonnet, as the beading clips on there was the thin plastic type.
What to do ? Well there was some offcut pieces of beading left, so I flattend these, and drilled a small 4.5mm hole in the middle, and after a bit of bending, had a couple of brackets to fit the beading using the same holes as the thin beading.
Picture is not clear, but you get the idea:
This obviously took some time, as "fabricating" (if you can call it that
Over the weekend I also put the chromed roofrack back, installed a two post vintage antenna I got from calooker almost a year ago, as well as bonnet handle guard.
Most of the accessories were purchased and stored not long after I got this beetle, and I wanted to keep them till the "nose" was repaired and resprayed. But seeing all those nice beetles out there (Calooker's, Dsan's, Splitfans, Fig, Eddyr's etc etc etc) with the full house of accessories as it were, really made me decide, to run her rat, with all the trimmings, until her turn comes to be painted.
The hooter still has to be fixed before I can take her for roadworthy (it sounds like an asthmatic with a cold after smoking a pack of twenty while doing a fun run)
but good progress was made today
I didn't want to post a pic of her as she is now, as she was standing outside and is disgustingly, no , make that embarrassingly dirty, but after a day like that, one has to take just one pic before you turn off the light:
You do not have the required permissions to view the files attached to this post.
-
Ron&Gill
- Full-time Bug Nutter
- Posts: 4054
- Joined: Fri Aug 29, 2008 4:16 am
- What model do you have?: Type 1, 21b, 34, 316
- Location: St Lucia KZN/Cameron LA
- Has thanked: 1 time
- Been thanked: 21 times

Re: My German Import RHD 58 - Updated
I like what you're doing.
1964 T34 - The Razor: viewtopic.php?f=23&t=10290
1956 T2 1b - Gill's bus: viewtopic.php?f=23&t=10948
1967 T316 - viewtopic.php?f=23&t=10931 & viewtopic.php?f=23&t=15977
2000 beach buggy - viewtopic.php?f=23&t=10915
1956 T2 1b - Gill's bus: viewtopic.php?f=23&t=10948
1967 T316 - viewtopic.php?f=23&t=10931 & viewtopic.php?f=23&t=15977
2000 beach buggy - viewtopic.php?f=23&t=10915
-
Farhaad

- Fuel Injection
- Posts: 2114
- Joined: Sat Jun 27, 2009 10:52 pm
- What model do you have?: memories
- Location: cape town
- Been thanked: 2 times
Re: My German Import RHD 58 - Updated
well done KK. glad to have played a tinny role in this project.
im liking the swans. it does look the
im liking the swans. it does look the
-
Tony Z

- Donor

- Posts: 15010
- Joined: Wed Sep 14, 2005 8:33 am
- What model do you have?: 2.3L 69; 1302; P/Van
- Location: Klipheuwel (near Durbanville), Cape Town or working at sea
- Has thanked: 192 times
- Been thanked: 488 times

Re: My German Import RHD 58 - Updated
give her a good wash so she looks cared for
ANGRRR
http://www.aircooledvwsa.co.za/viewtopi ... 23&t=14775
1302S
http://www.aircooledvwsa.co.za/viewtopi ... 23&t=33521
Panel Van
http://www.aircooledvwsa.co.za/viewtopic.php?p=288723
http://www.aircooledvwsa.co.za/viewtopi ... 23&t=14775
1302S
http://www.aircooledvwsa.co.za/viewtopi ... 23&t=33521
Panel Van
http://www.aircooledvwsa.co.za/viewtopic.php?p=288723
vader wrote: The Force is strong with you young Sith Lord Z!
-
karmakoma
- Full-time Bug Nutter
- Posts: 4126
- Joined: Sat Mar 29, 2008 9:11 pm
- What model do you have?: 69 dual trunk coupe
- Location: Gauteng
- Has thanked: 1 time
- Been thanked: 8 times
Re: My German Import RHD 58 - Updated
You bet, first thing on my list for tomorrow morning EARLY, so she is dry by the time I go there 

-
jolas

- Donor
- Posts: 4253
- Joined: Fri Jul 16, 2010 10:11 am
- What model do you have?: '65 Kombi
- Location: Klapmuts, Western Cape
- Has thanked: 393 times
- Been thanked: 173 times
Re: My German Import RHD 58 - Updated
Looking great !!!!! Good luck with the roadworthy
by fig » Mar 26, 2018
Sambas in South Africa are good for only 2 things: showing off and sunburn.
Sambas in South Africa are good for only 2 things: showing off and sunburn.
-
karmakoma
- Full-time Bug Nutter
- Posts: 4126
- Joined: Sat Mar 29, 2008 9:11 pm
- What model do you have?: 69 dual trunk coupe
- Location: Gauteng
- Has thanked: 1 time
- Been thanked: 8 times
Re: My German Import RHD 58 - Updated
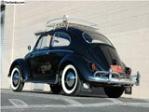
and finally some pics of the lesser spotted, washed, roadworthied, and licensed (post office was still open today so I already got my disc! ) 58 black swan!~
How big is the smile on my face ?
Thanks for everyones words of encouragement. Now the REAL work can start on her, BIG plans for 2011. Keep watching!
How big is the smile on my face ?
Thanks for everyones words of encouragement. Now the REAL work can start on her, BIG plans for 2011. Keep watching!
You do not have the required permissions to view the files attached to this post.
-
karmakoma
- Full-time Bug Nutter
- Posts: 4126
- Joined: Sat Mar 29, 2008 9:11 pm
- What model do you have?: 69 dual trunk coupe
- Location: Gauteng
- Has thanked: 1 time
- Been thanked: 8 times
Re: My German Import RHD 58 - Updated
Got very lucky today with a whole stash of lights. I wasn't even looking that hard to be honest.
Got two very good condition Hella fender indicators. Replaced the drivers side rusted item straight away.
Also got two sets of snowflake lights, with housings.
Both sets had only one mounting bracket, both left side, but at least that gives us something to work with
I cleaned the lights and housing that came off this beetle originally, assembled it all with the retention clips I now also had, and layed it all out to see what is still required.
Time to make that right hand bracket and fit these beauties!
You do not have the required permissions to view the files attached to this post.