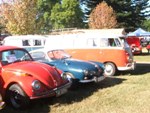
Love the colour!
Warwicks Split
-
Retrobug

- Donor

- Posts: 1664
- Joined: Mon Jan 23, 2012 7:45 pm
- What model do you have?: 1962 Beetle
- Location: Alberton ZA
- Has thanked: 15 times
- Been thanked: 32 times
- Contact:
Re: Warwicks Split
that blue is 
Love the colour!
Love the colour!
The two secrets to success: 1) Don't tell everyone everything that you know
http://www.aircooledvwsa.co.za/viewtopi ... 23&t=24181
http://www.aircooledvwsa.co.za/viewtopi ... 23&t=24181
-
Warwick-Lowlight
- Donor
- Posts: 750
- Joined: Thu Jul 21, 2011 4:14 pm
- What model do you have?: 61 Split
- Facebook: http://www.facebook.com/warwick.beaumont
- Location: Grabouw Westen Cape
- Has thanked: 18 times
- Been thanked: 14 times
Re: Warwicks Split
Up in the morning before the sun
Seems that when project arrives I get that Bar One kind of feeling
Rose drivers that come in at 5 know there is something up when I beat them to the shed
Well plans for the day
Step one
Clean-up the work area
All got a bit messy after the Applewood day
One Manx
One Massey for engine job
One Kabouta for clutch job
Now where do I put the Splitt ??
Was going to build extention shed in the yard - not going to be practical with the winter cold and all the stuff is here in the workshop
A little power tetras and all will fit
Build work and storage table as the bins used currently have no storage space - will have if on thier side but then you need to be as tall as Vader to see anything on top
Have some bits from an old fold out bed that should weld up good as said table
Will start at the front today and do some bashing on the front bumper
Strip left door as its already off - top hinge snapped in the middle and tore the bottom one out- this was befor me
Right door top off
Drop engine and clean up
Thanks Paul for the comments - ie get the thing running and go for a drive for a test feel before taking anything apart
Should be a few roads down here that are not to busy
-
Warwick-Lowlight
- Donor
- Posts: 750
- Joined: Thu Jul 21, 2011 4:14 pm
- What model do you have?: 61 Split
- Facebook: http://www.facebook.com/warwick.beaumont
- Location: Grabouw Westen Cape
- Has thanked: 18 times
- Been thanked: 14 times
Re: Warwicks Split
Well just managed to strip down the left door
Got the table sorted
started the clean -took longer than expected
Nothing quite like a fresh start
Good to see the mates together
Sure there will be lotsa stories tonight
One clean space

By lowlightwarwick at 2012-06-06
Buds together

By lowlightwarwick at 2012-06-06
Got the table sorted
started the clean -took longer than expected
Nothing quite like a fresh start
Good to see the mates together
Sure there will be lotsa stories tonight
One clean space
By lowlightwarwick at 2012-06-06
Buds together
By lowlightwarwick at 2012-06-06
-
Tony Z

- Donor
- Posts: 14992
- Joined: Wed Sep 14, 2005 8:33 am
- What model do you have?: 2.3L 69; 1302; P/Van
- Location: Klipheuwel (near Durbanville), Cape Town or working at sea
- Has thanked: 192 times
- Been thanked: 488 times

Re: Warwicks Split
looks like a barnfind
ANGRRR
http://www.aircooledvwsa.co.za/viewtopi ... 23&t=14775
1302S
http://www.aircooledvwsa.co.za/viewtopi ... 23&t=33521
Panel Van
http://www.aircooledvwsa.co.za/viewtopic.php?p=288723
http://www.aircooledvwsa.co.za/viewtopi ... 23&t=14775
1302S
http://www.aircooledvwsa.co.za/viewtopi ... 23&t=33521
Panel Van
http://www.aircooledvwsa.co.za/viewtopic.php?p=288723
vader wrote: The Force is strong with you young Sith Lord Z!
-
Bushpig
- Crankshaft
- Posts: 707
- Joined: Thu Mar 04, 2010 8:37 am
- What model do you have?: 1956, 1957 and 70's
- Location: Auckland, New Zealand
- Has thanked: 1 time
- Been thanked: 5 times
Re: Warwicks Split
Nice to see the cleanup.  Have you given her/him a name yet?
Decisions Decisions on what to tackle first Buggy vs Bus.
Decisions Decisions on what to tackle first Buggy vs Bus.
-
Warwick-Lowlight
- Donor
- Posts: 750
- Joined: Thu Jul 21, 2011 4:14 pm
- What model do you have?: 61 Split
- Facebook: http://www.facebook.com/warwick.beaumont
- Location: Grabouw Westen Cape
- Has thanked: 18 times
- Been thanked: 14 times
Re: Warwicks Split
A couple of pics of the seats at current
Front one not in too bad a shape - seems the material first went at the door side and then the rust set in
Generally the metal frame is in a good state just some of the springs and thier frames will need to be repaired
Interesting to see that the colour looks to be grey with white piping -possibly original
For the rear middle - seems the colour was blue without piping - maybe replaced after the years as a school bus with all the ins and outs
Door crds blue and spare wheel cover back blue
Mid seat from back

By lowlightwarwick at 2012-06-06
Blue piping frame looking good

By lowlightwarwick at 2012-06-06
Top will need some work and springs

By lowlightwarwick at 2012-06-06
Passenger front left - will need some work also - check white piping

By lowlightwarwick at 2012-06-06
Will check with Uncle Sam on the repair of these - got two "spare" seats from the Manx - Springs and spring frame repair parts
Door issues - passenger side

By lowlightwarwick at 2012-06-06

By lowlightwarwick at 2012-06-06
This will need some bashing

By lowlightwarwick at 2012-06-06
Front one not in too bad a shape - seems the material first went at the door side and then the rust set in
Generally the metal frame is in a good state just some of the springs and thier frames will need to be repaired
Interesting to see that the colour looks to be grey with white piping -possibly original
For the rear middle - seems the colour was blue without piping - maybe replaced after the years as a school bus with all the ins and outs
Door crds blue and spare wheel cover back blue
Mid seat from back
By lowlightwarwick at 2012-06-06
Blue piping frame looking good
By lowlightwarwick at 2012-06-06
Top will need some work and springs
By lowlightwarwick at 2012-06-06
Passenger front left - will need some work also - check white piping
By lowlightwarwick at 2012-06-06
Will check with Uncle Sam on the repair of these - got two "spare" seats from the Manx - Springs and spring frame repair parts
Door issues - passenger side
By lowlightwarwick at 2012-06-06
By lowlightwarwick at 2012-06-06
This will need some bashing
By lowlightwarwick at 2012-06-06
-
Warwick-Lowlight
- Donor
- Posts: 750
- Joined: Thu Jul 21, 2011 4:14 pm
- What model do you have?: 61 Split
- Facebook: http://www.facebook.com/warwick.beaumont
- Location: Grabouw Westen Cape
- Has thanked: 18 times
- Been thanked: 14 times
Re: Warwicks Split
Huewy
Deuwy
and
Blue-E
No name yet waiting for the kids to come up with one
Messy has been mentioned - dont think so
Yes Bruce makes a difference after falling over things on Sunday
Still haven't found my rear view mirror for Sweet Pea
Deuwy
and
Blue-E
No name yet waiting for the kids to come up with one
Messy has been mentioned - dont think so
Yes Bruce makes a difference after falling over things on Sunday
Still haven't found my rear view mirror for Sweet Pea
-
Warwick-Lowlight
- Donor
- Posts: 750
- Joined: Thu Jul 21, 2011 4:14 pm
- What model do you have?: 61 Split
- Facebook: http://www.facebook.com/warwick.beaumont
- Location: Grabouw Westen Cape
- Has thanked: 18 times
- Been thanked: 14 times
Re: Warwicks Split
Well progress to date
managed to get the engine out
Oil in the oil bath and engine oil level just below the mark!!
Everthing seems alright turns nice and easy but will still get her down to the doctor for a 25 year checkup
Got door hinges loose - one by impact driver and a bit of banging
After learning the hard way when I stripped a head on the beetle door - filed down the point of the big star head -this is so that it seats better
a bit of Q20 over night and away we go had a little issue with the last one at the bottom
Always seems to be the last one that gives issues - more of a space issue
Note to self-start the right door at the bottom then hopefully it will be easier towards the end
Lets see what old Murphy has to say about that
Took of top of right door to give more a bakkie look
Weekend plan sort out the hack hole on the rear valance and then some spray work on the Manx
Thats the plan will have to see what the govener has to say
Playing with the idea of converting to 12 V with the 1600 twin thats supposed to go in the Manx
what are the changes that need to be done to achieve this "conversion"
Flywheel ? Clutch & release bearing?
Do the holes match up on the bellhousing
and the "extra" power on the gearbox and reduction gears ??
Can get a converter for the wiper motor or have it rewound - loom should be fine just the bulbs need changing -need full set seems the are also tik koppe in the karoo - Sorry Tik Koppe it was just kids !!
Engine In

By lowlightwarwick at 2012-06-08
Engine Out

By lowlightwarwick at 2012-06-08
Something not seen everyday

By lowlightwarwick at 2012-06-08
Door problems

By lowlightwarwick at 2012-06-08
Better practise my welding to stitch this up

By lowlightwarwick at 2012-06-08
Stuborn little buggers

By lowlightwarwick at 2012-06-08
Stuborn little bugger sorter outer

By lowlightwarwick at 2012-06-08
Grabouw look

By lowlightwarwick at 2012-06-08
Rear valance with extra hole to fit the twin beetle exhaust
will bash it back luckely it was just cut and bent over

By lowlightwarwick at 2012-06-08
managed to get the engine out
Oil in the oil bath and engine oil level just below the mark!!
Everthing seems alright turns nice and easy but will still get her down to the doctor for a 25 year checkup
Got door hinges loose - one by impact driver and a bit of banging
After learning the hard way when I stripped a head on the beetle door - filed down the point of the big star head -this is so that it seats better
a bit of Q20 over night and away we go had a little issue with the last one at the bottom
Always seems to be the last one that gives issues - more of a space issue
Note to self-start the right door at the bottom then hopefully it will be easier towards the end
Lets see what old Murphy has to say about that
Took of top of right door to give more a bakkie look
Weekend plan sort out the hack hole on the rear valance and then some spray work on the Manx
Thats the plan will have to see what the govener has to say
Playing with the idea of converting to 12 V with the 1600 twin thats supposed to go in the Manx
what are the changes that need to be done to achieve this "conversion"
Flywheel ? Clutch & release bearing?
Do the holes match up on the bellhousing
and the "extra" power on the gearbox and reduction gears ??
Can get a converter for the wiper motor or have it rewound - loom should be fine just the bulbs need changing -need full set seems the are also tik koppe in the karoo - Sorry Tik Koppe it was just kids !!
Engine In
By lowlightwarwick at 2012-06-08
Engine Out
By lowlightwarwick at 2012-06-08
Something not seen everyday
By lowlightwarwick at 2012-06-08
Door problems
By lowlightwarwick at 2012-06-08
Better practise my welding to stitch this up
By lowlightwarwick at 2012-06-08
Stuborn little buggers
By lowlightwarwick at 2012-06-08
Stuborn little bugger sorter outer
By lowlightwarwick at 2012-06-08
Grabouw look
By lowlightwarwick at 2012-06-08
Rear valance with extra hole to fit the twin beetle exhaust
will bash it back luckely it was just cut and bent over
By lowlightwarwick at 2012-06-08
-
Warwick-Lowlight
- Donor
- Posts: 750
- Joined: Thu Jul 21, 2011 4:14 pm
- What model do you have?: 61 Split
- Facebook: http://www.facebook.com/warwick.beaumont
- Location: Grabouw Westen Cape
- Has thanked: 18 times
- Been thanked: 14 times
Re: Warwicks Split
High Ho High ho its off to the doctor I go
time for a chat about matters Splitt with Uncle
will put up recomendations from the wise man - will ask first
Jacques and Muds working hard on the panel department
Splitbusaholics recomendation of an air tool kit could be early christmas pressie from me to me
this one -http://www.tooltime.co.za/Products.aspx?cat=36
Will slso pop in at the Osmonds - maybe some bits
-
Warwick-Lowlight
- Donor
- Posts: 750
- Joined: Thu Jul 21, 2011 4:14 pm
- What model do you have?: 61 Split
- Facebook: http://www.facebook.com/warwick.beaumont
- Location: Grabouw Westen Cape
- Has thanked: 18 times
- Been thanked: 14 times
Re: Warwicks Split
Well meeting at the doctor went well
Advise is to keep the bus OG so the 6 V will stay
Just gonna change the gennie to a late and last version 7 v
A wee bit of end play so we gonna look a bit deeper
For now back to the farm strip off all the bits - get the sub back and then we look again
Doctor fairly happy with the engine still has many OG bits on lets hope the owner was correct in memory of 500 km or maybe miles and then it got parked
Other news from a book at the Grand Slam Office
DER LASTESEL DES WIRTSCHAFTSWUNDERS
Literal translation - "The Work donkey of economic upswing"
ISBN 0-9541746-8-2
Great history on the Bus only hassle you need to get a learn German Cd as is only in German
BAck page has all the production data
So bus is official
From chassis number
Made August 1961
Dr Jurgen is of the opinion it is then a 62 as the new "model" came out after the holidays ( July )
Back to engine
Penatrating oils on
Remave all bits
Get tin to sandblast and then paint
-
Warwick-Lowlight
- Donor
- Posts: 750
- Joined: Thu Jul 21, 2011 4:14 pm
- What model do you have?: 61 Split
- Facebook: http://www.facebook.com/warwick.beaumont
- Location: Grabouw Westen Cape
- Has thanked: 18 times
- Been thanked: 14 times
Re: Warwicks Split
Yesterday morning was stipping all the tin from the engine
Had a universe kind of moment
a while ago when nearly finished with Sweet Pea decided I needed a signature for the projects
Came up with this

By lowlightwarwick at 2012-06-16
The plan is to have the Gecko somewhere on all the projects as the intended signature
Now how supprised was i when not one but two live-ones came with the splitt and were hiding in the tin

By lowlightwarwick at 2012-06-16
I am still amazed by it all
The other funny bit was part #311115541
This was attached to the oil breather pipe
The owner said that he had got the engine "off the shelf"
Can anyone shed some light on this part as all I can think is that it is a kind of dust protector that should be removed after fitting

By lowlightwarwick at 2012-06-16
Had a universe kind of moment
a while ago when nearly finished with Sweet Pea decided I needed a signature for the projects
Came up with this
By lowlightwarwick at 2012-06-16
The plan is to have the Gecko somewhere on all the projects as the intended signature
Now how supprised was i when not one but two live-ones came with the splitt and were hiding in the tin
By lowlightwarwick at 2012-06-16
I am still amazed by it all
The other funny bit was part #311115541
This was attached to the oil breather pipe
The owner said that he had got the engine "off the shelf"
Can anyone shed some light on this part as all I can think is that it is a kind of dust protector that should be removed after fitting
By lowlightwarwick at 2012-06-16
-
hitlers revenge

- ACVWSA Junkie
- Posts: 6486
- Joined: Wed Jan 18, 2006 11:38 pm
- What model do you have?: buggy
- Location: back in the 'Fell
- Been thanked: 36 times

Re: Warwicks Split
Why do we celebrate the guy that invented the wheel??
Surely we must celebrate the guy tat invented the other three
Surely we must celebrate the guy tat invented the other three
-
Bushpig
- Crankshaft
- Posts: 707
- Joined: Thu Mar 04, 2010 8:37 am
- What model do you have?: 1956, 1957 and 70's
- Location: Auckland, New Zealand
- Has thanked: 1 time
- Been thanked: 5 times
Re: Warwicks Split
Warick,
From the Lindsay Saker parts list it is just listed as "Rubber Valve" (and cost 57c in 1983)
I am sure that helps a ton
I will check around....
From the Lindsay Saker parts list it is just listed as "Rubber Valve" (and cost 57c in 1983)
I am sure that helps a ton
I will check around....