

Had a problem with the Fastback fuel tank that started to rust again after cleaning it out, when restored since its long rest under a tree in Bloemfontein.
The prospect of splitting the tank and reworking it, did not Gel with me, as it would seem that the joint will start rusting again, or even worse, leaking.
So I opted for the DIY rout, so that I can be in control of the quality of the job, after all, this is not something you want to have happen every few years.
So Here is what I done,
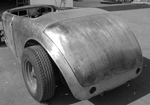
Removed tank from Fastback, and removed all fittings, and senders so that the tank is bear.
Now I also removed the beetle tank, as it also re started rusting, (checked it when I found the Fastback tank had rusted) and I will explain why I am going to do both at the same time later.
My friendly local Electro Plating Firm took my tanks into their de-rusting tanks, and left them there over night.
R30 later they where totally de-rusted and rinsed out with clean water, neutralised, and clean.
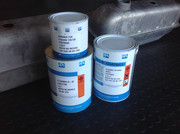
I then when to my local Braemer Paints store and got me
Two, one litre tins of Sigmaguard 720 Neutral Base epoxy,
Two 250 ml tins of Sigmaguard 720 Hardener (grey)
One Litre tin of Sigma 91-92 epoxy thinners
Total cost R396.00 ex vat.
Returning home I placed half the thinners into the 1st tank and rinsed it out fully.
Then transferred the thinners to the 2nd tank, and did the same.
Stored this thinners from the tanks, to clean the brushes.
Now the reason for doing both tanks at the same time.....Well it takes one litre of epoxy to do TWO coats on one tank, and you can not store the epoxy once you mixed it, so you need to do two tanks OR half the epoxy and hardener before you start.
Now as you can get the mixing incorrect, when you half the epoxy, I decided to do it this way.
I taped up all openings with masking tape, except the filler hole one.
Mixed the epoxy, hardener, and thinners to a usable fluid thickness, as you need it to flow around the tank with ease.
poured it into the tank, and taped up the filler hole as well.
Now I slowly rotated the tank for a long time so that the epoxy will coat the inside evenly and build up a few layers.
Opened the filler hole and transferred the remaining epoxy to the 2nd tank.
Did the same here.
opened the filler and drained the remaining epoxy from the tank. Used a brush and coated the outside with a layer.
Placed both tanks in the shade, so that the epoxy can harden from the inside and not form a crust, trapping the thinners.
Let the epoxy dry for 3 days, then repeated the coating process with the 2nd coat exactly as the 1st coat.
Now I let it dry in the shade again for 3 days, and then dried, and removed the fumes with a heat gun set on low, do not burn epoxy, into the filler neck, then placed in sun for a day just to make sure the epoxy has fully set.
Painted the outside with a nice Black spray paint, and refitted the tank as normal.
Hope this will save you some bucks and frustration, as you now will not have to push the car home with blocked fuel filter.
Herman
Edit, 16 June 2024, just to say that the tank's are still as good as they were the day I did the re coating, Proof it works.
[/quote]