Tony's 1302S

-
riaanj
- Exhaust Pipe
- Posts: 1665
- Joined: Wed Oct 06, 2010 8:17 pm
- What model do you have?: None ATM, oneday...
- Location: Germiston
- Has thanked: 6 times
- Been thanked: 41 times
Re: Tony's 1302S
Nice seeing a topic on the car and progress, I feel hell-of-a-guilty that mine is taking so long..
Tony your 1302 is looking awesome and the BBS' are going to look killer in gold along with the proper brown now!
Awesome seeing the car taking shape!
Tony your 1302 is looking awesome and the BBS' are going to look killer in gold along with the proper brown now!
Awesome seeing the car taking shape!
Just keep on BUGGIN'
Protect the endangered, say NO to exporting our AirCooled spares & cars..
T6 Ranger 2.2TDCi D/Cab
307E Anglia panel-van
Honda CBR600RR
Honda CBR600F4
Honda CBR1100XX SuperBlackbird
Protect the endangered, say NO to exporting our AirCooled spares & cars..
T6 Ranger 2.2TDCi D/Cab
307E Anglia panel-van
Honda CBR600RR
Honda CBR600F4
Honda CBR1100XX SuperBlackbird
-
Thumper

- Carburettor
- Posts: 1946
- Joined: Mon Dec 05, 2005 4:00 pm
- What model do you have?: Just scale models
- Location: Cape Town
- Has thanked: 6 times
- Been thanked: 13 times

Re: Tony's 1302S
The hard work is paying off, and the Bug looks amazing. Nicely done.
My Bug: http://www.aircooledvwsa.co.za/viewtopi ... 37&t=12416" onclick="window.open(this.href);return false;
-
Tony Z

- Donor

- Posts: 14992
- Joined: Wed Sep 14, 2005 8:33 am
- What model do you have?: 2.3L 69; 1302; P/Van
- Location: Klipheuwel (near Durbanville), Cape Town or working at sea
- Has thanked: 192 times
- Been thanked: 488 times
Re: Tony's 1302S
Its been a while since I posted in this thread.
Heck, its been a while since I touched this car.
For those of you over optimistic types, dont get excited, the car isnt finished, I've hardly begun to do the work to it which I have planned.
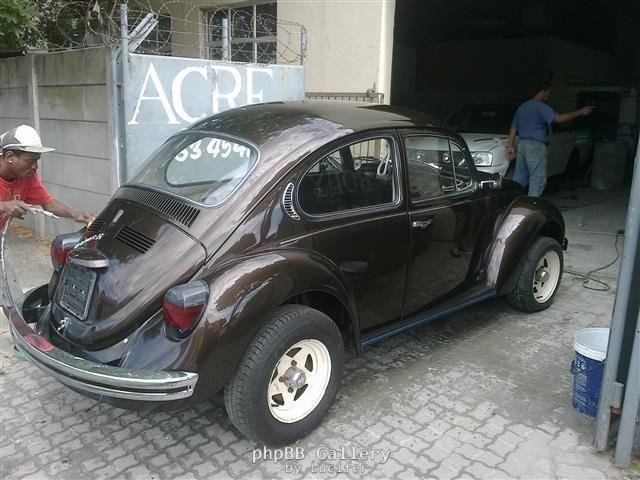
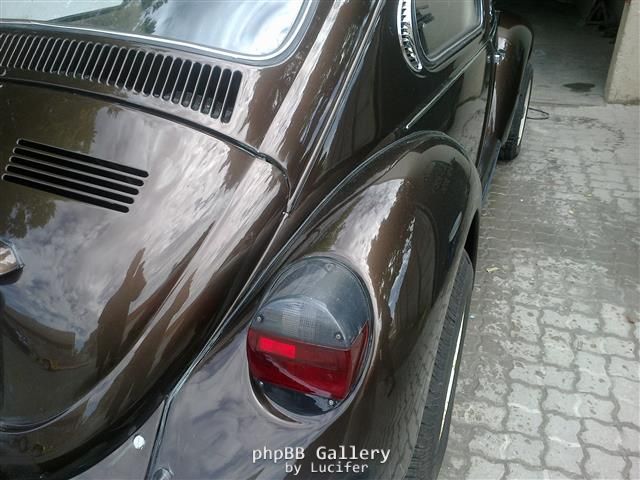
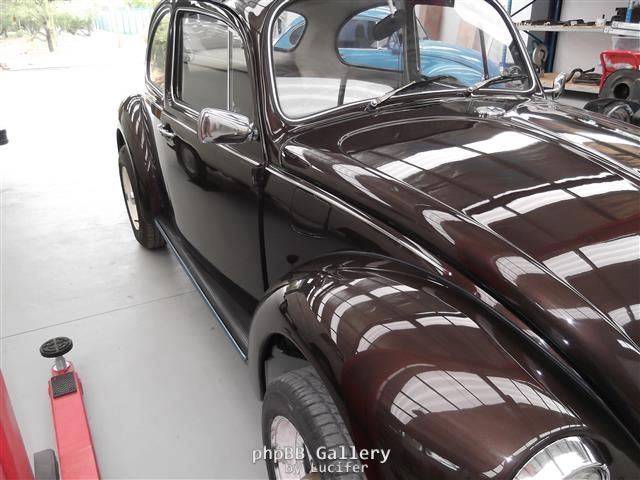
This post is just a quick refresher. Thanks to photobucket kicking the bucket I have decided to throw in a few pics of the car as it stood after I got it back from its colour change.
Heck, its been a while since I touched this car.
For those of you over optimistic types, dont get excited, the car isnt finished, I've hardly begun to do the work to it which I have planned.
This post is just a quick refresher. Thanks to photobucket kicking the bucket
ANGRRR
http://www.aircooledvwsa.co.za/viewtopi ... 23&t=14775
1302S
http://www.aircooledvwsa.co.za/viewtopi ... 23&t=33521
Panel Van
http://www.aircooledvwsa.co.za/viewtopic.php?p=288723
http://www.aircooledvwsa.co.za/viewtopi ... 23&t=14775
1302S
http://www.aircooledvwsa.co.za/viewtopi ... 23&t=33521
Panel Van
http://www.aircooledvwsa.co.za/viewtopic.php?p=288723
vader wrote: The Force is strong with you young Sith Lord Z!
-
Tony Z
- Donor
- Posts: 14992
- Joined: Wed Sep 14, 2005 8:33 am
- What model do you have?: 2.3L 69; 1302; P/Van
- Location: Klipheuwel (near Durbanville), Cape Town or working at sea
- Has thanked: 192 times
- Been thanked: 488 times
Re: Tony's 1302S
OK, I'll be honest, the amount of work I have done so far is very little
One project that I have had the time to get to is to make a strut brace for the car.
Being that funds are a bit tight, I didnt want to buy a brace, plus the fact that I have the machinery to make my own. Also, the majority of "off the shelf" strut braces do not work as well as they advertise. Reason being, many have heim joints or similar to make alignment of the brace easier. Being that this joint is "flexible", this allows some movement of the brace. The reason for the brace is to stop movement and keep the shock towers in the same position relative to each other at all times.
So...
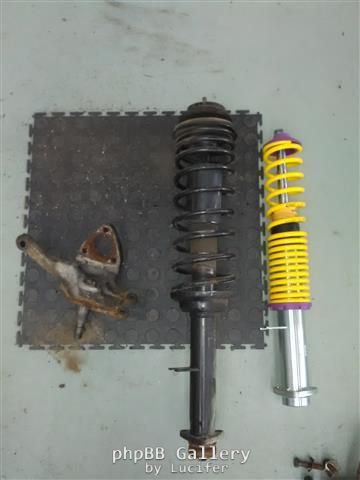
A while back I imported a set of Kerscher coil over shocks for the 1302. These are gems.
Here you can see one next to the standard shock which it is replacing.
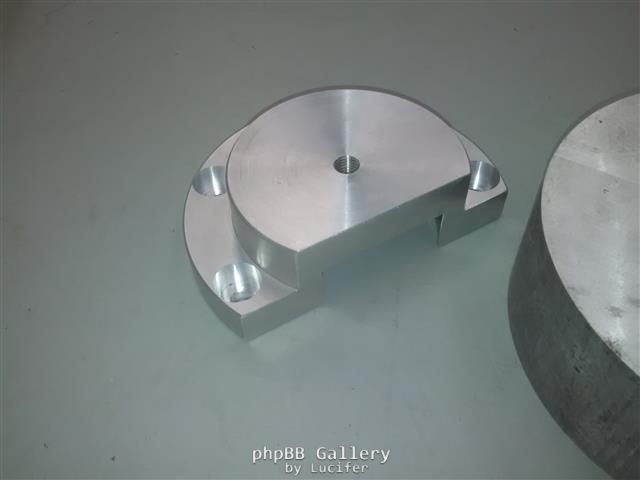
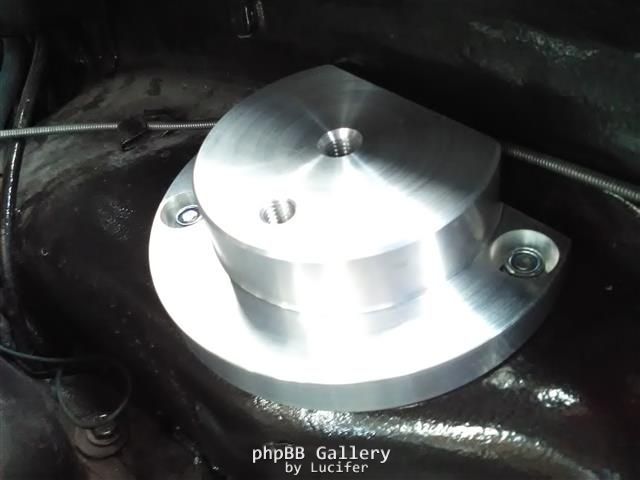
Below you can see the brace mounts which I made up. They are a bit overkill, but seeing as I am not using heim joints, I went through various options in my head os what will work and quite a few of them had to be given up on based upon the size of the material that I had at hand. At the end of the day, the design I chose to use is probably also the best design that I came up with and barely cost me a cent based on the fact that I used offcuts that I had lying around.
The mounts were made from 2 blocks of aluminium which I had leftover from another project.
Turned in the lathe to the size I wanted, then trimmed off in the mill. Also drilled for the mounting bolts and the brace mount.


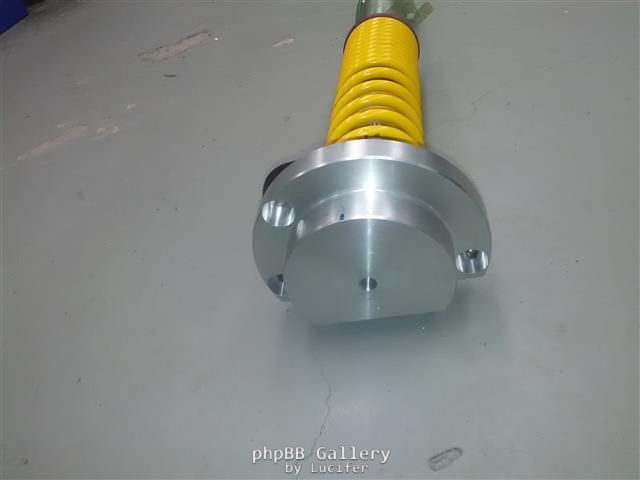
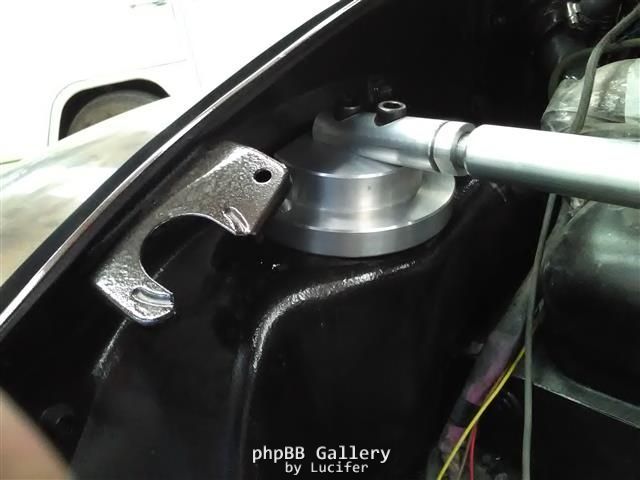
Here I have the new shock mount and bearing installed on the shock.
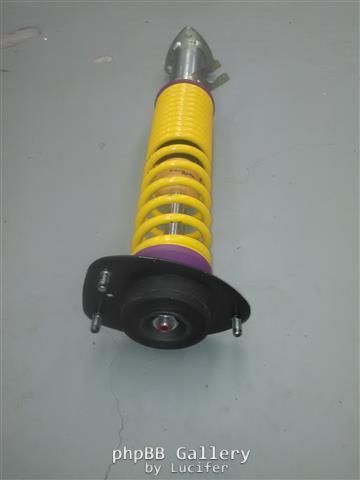
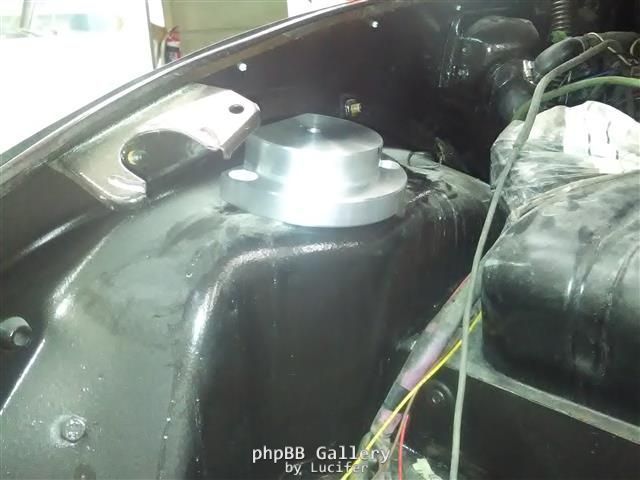
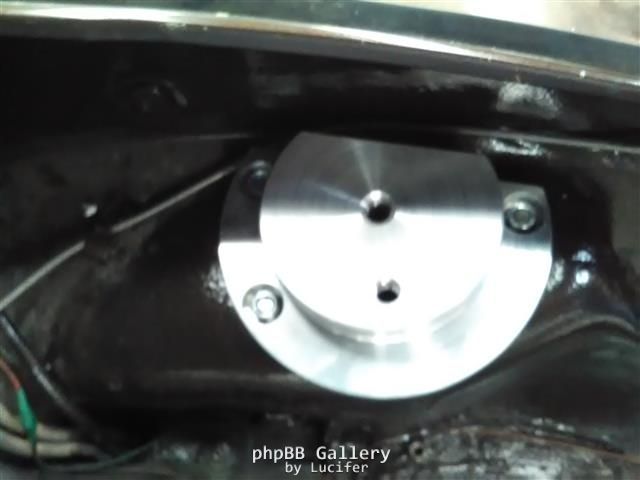
And the strut brace mount mocked up on it
And now mocked up in the car
And now for the fun that drove me up the wall - making the bar.
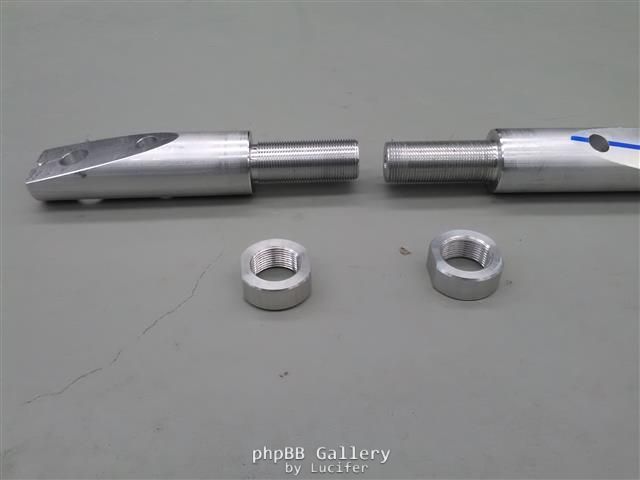
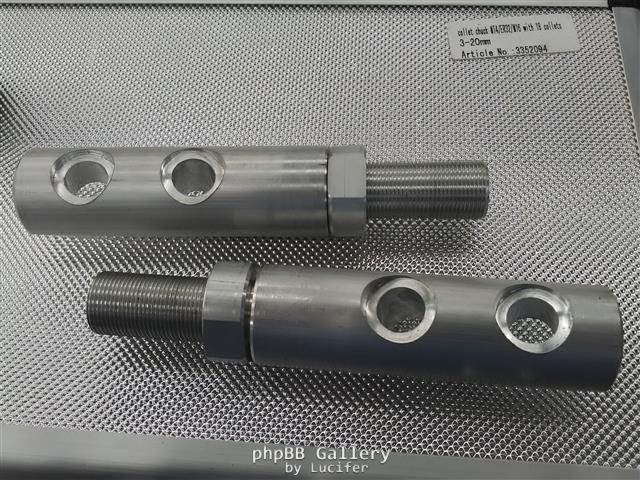
I chose to use a leftover piece of 30mm solid aluminium bar. I cut two end pieces, which I machined to fit onto the mounts. I measured the angle that these end pieces need to be trimmed at to match the mounts, and this came to a nice 11.3deg. So I cut both to suit and drilled one mounting hole to begin the mockup. I also drilled a smaller hole for a second mounting bolt which I finished later.
On these end pieces, to make the bar adjustable to properly fit the car, I threaded the ends. This little project drove me nuts.
I decided on a custom thread size of M20x1.25. Reason being that my internal threading bar can only thread up to a max pitch of 1.5mm.
There isnt exactly much tutorial on the internet on how to calculate the sizes that you need to work with and the info I found, might be mathematically correct, but didnt work for shiv when I cut my thread to those sizes... so after 3 days of threading and learning, I finally had a set of dimensions that I could work with and actually use.
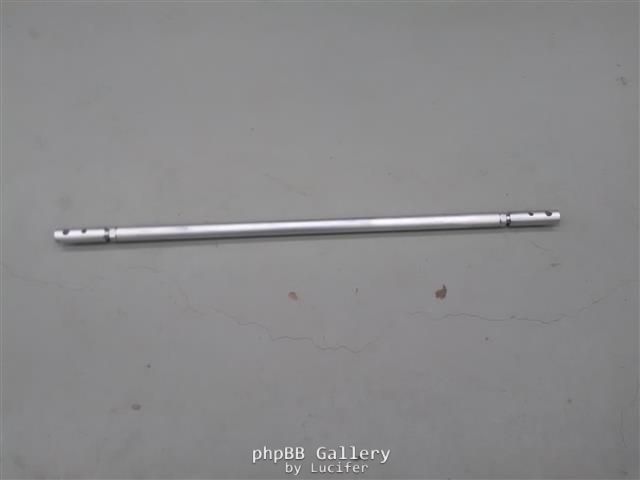
So now I could finish my end pieces and the tie rod itself.
And yes, one side is light hand thread, the other is left hand thread to allow on car adjustment.
I also made up two lock nuts and milled them for use with a 27mm spanner.
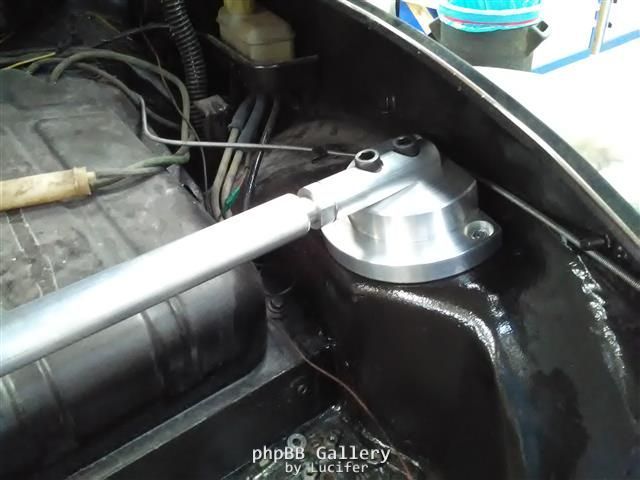
Then it came to mounting on the car and drilling and tapping my second bolt hole.
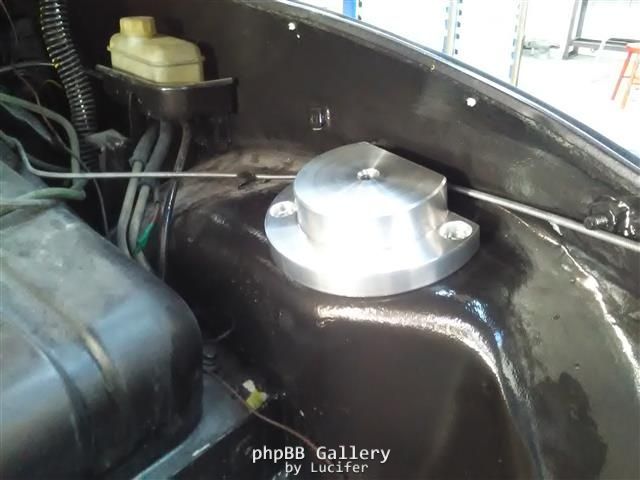
After all that was done and said, the entire project was bolted to the car.
The M8 shock mounting nuts torqued to spec and the M12 cap screws torqued to 80Nm. Also, being that the cap screws are mild steel and the mounts are aluminium, I used a LOT of grease to attempt to keep corrosion at bay (galvanic action).
And not to forget, the cap screws through holes also had to be milled at 11.3degress. OK, this was easy as after I cut the original mounting surface at 11.3deg, I just drilled the holes perpendicular to the surface.
Final pics
And yes, the whole system lines up perfectly.
Now I've got some more household projects that need attending to and hopefully I'll be able to get back into this 1302 soon
One project that I have had the time to get to is to make a strut brace for the car.
Being that funds are a bit tight, I didnt want to buy a brace, plus the fact that I have the machinery to make my own. Also, the majority of "off the shelf" strut braces do not work as well as they advertise. Reason being, many have heim joints or similar to make alignment of the brace easier. Being that this joint is "flexible", this allows some movement of the brace. The reason for the brace is to stop movement and keep the shock towers in the same position relative to each other at all times.
So...
A while back I imported a set of Kerscher coil over shocks for the 1302. These are gems.
Here you can see one next to the standard shock which it is replacing.
Below you can see the brace mounts which I made up. They are a bit overkill, but seeing as I am not using heim joints, I went through various options in my head os what will work and quite a few of them had to be given up on based upon the size of the material that I had at hand. At the end of the day, the design I chose to use is probably also the best design that I came up with and barely cost me a cent based on the fact that I used offcuts that I had lying around.
The mounts were made from 2 blocks of aluminium which I had leftover from another project.
Turned in the lathe to the size I wanted, then trimmed off in the mill. Also drilled for the mounting bolts and the brace mount.
Here I have the new shock mount and bearing installed on the shock.
And the strut brace mount mocked up on it
And now mocked up in the car
And now for the fun that drove me up the wall - making the bar.
I chose to use a leftover piece of 30mm solid aluminium bar. I cut two end pieces, which I machined to fit onto the mounts. I measured the angle that these end pieces need to be trimmed at to match the mounts, and this came to a nice 11.3deg. So I cut both to suit and drilled one mounting hole to begin the mockup. I also drilled a smaller hole for a second mounting bolt which I finished later.
On these end pieces, to make the bar adjustable to properly fit the car, I threaded the ends. This little project drove me nuts.
I decided on a custom thread size of M20x1.25. Reason being that my internal threading bar can only thread up to a max pitch of 1.5mm.
There isnt exactly much tutorial on the internet on how to calculate the sizes that you need to work with and the info I found, might be mathematically correct, but didnt work for shiv when I cut my thread to those sizes... so after 3 days of threading and learning, I finally had a set of dimensions that I could work with and actually use.
So now I could finish my end pieces and the tie rod itself.
And yes, one side is light hand thread, the other is left hand thread to allow on car adjustment.
I also made up two lock nuts and milled them for use with a 27mm spanner.
Then it came to mounting on the car and drilling and tapping my second bolt hole.
After all that was done and said, the entire project was bolted to the car.
The M8 shock mounting nuts torqued to spec and the M12 cap screws torqued to 80Nm. Also, being that the cap screws are mild steel and the mounts are aluminium, I used a LOT of grease to attempt to keep corrosion at bay (galvanic action).
And not to forget, the cap screws through holes also had to be milled at 11.3degress. OK, this was easy as after I cut the original mounting surface at 11.3deg, I just drilled the holes perpendicular to the surface.
Final pics
And yes, the whole system lines up perfectly.
Now I've got some more household projects that need attending to and hopefully I'll be able to get back into this 1302 soon
ANGRRR
http://www.aircooledvwsa.co.za/viewtopi ... 23&t=14775
1302S
http://www.aircooledvwsa.co.za/viewtopi ... 23&t=33521
Panel Van
http://www.aircooledvwsa.co.za/viewtopic.php?p=288723
http://www.aircooledvwsa.co.za/viewtopi ... 23&t=14775
1302S
http://www.aircooledvwsa.co.za/viewtopi ... 23&t=33521
Panel Van
http://www.aircooledvwsa.co.za/viewtopic.php?p=288723
vader wrote: The Force is strong with you young Sith Lord Z!
-
Chardivw
- Oil Seal
- Posts: 490
- Joined: Sat Jan 18, 2014 7:56 pm
- What model do you have?: 78 kombi 2000l
- Facebook: Snowater photography
- Location: East london
- Has thanked: 12 times
- Been thanked: 15 times
Re: Tony's 1302S
Really impressive stuff! Well done really dig how u take time to explain your process.
-
Terry Phillips
- Fuel Injection
- Posts: 2005
- Joined: Mon Jul 16, 2012 5:56 pm
- What model do you have?: T3,1beetle
- Location: Kempton Park
- Has thanked: 193 times
- Been thanked: 121 times

-
fourier
- Oil Cooler
- Posts: 342
- Joined: Fri Sep 26, 2008 1:21 pm
- What model do you have?: '59 Ghia, '77 Beetle
- Location: Melkbosstrand, Cape Town
- Has thanked: 31 times
- Been thanked: 37 times
Re: Tony's 1302S
Excellent work Tony! Truly something you can be proud of, when someone looks under the bonnet. Probably quite tricky finding the correct angles...
(o= i =o) (o\ ! /o)
-
acpaterson

- Carburettor
- Posts: 1960
- Joined: Sat Jan 05, 2013 6:50 pm
- What model do you have?: Winston, a 74 Bay
- Location: Parklands, Cape Town
- Has thanked: 80 times
- Been thanked: 131 times
- Contact:
-
Cyndi Kritzinger

- Donor
- Posts: 1291
- Joined: Wed Apr 24, 2013 3:49 pm
- What model do you have?: '76 BRAZILIA '78 BAY
- Facebook: yes
- Location: DURBAN
- Been thanked: 64 times
-
acpaterson
- Carburettor
- Posts: 1960
- Joined: Sat Jan 05, 2013 6:50 pm
- What model do you have?: Winston, a 74 Bay
- Location: Parklands, Cape Town
- Has thanked: 80 times
- Been thanked: 131 times
- Contact:
-
Tony Z
- Donor
- Posts: 14992
- Joined: Wed Sep 14, 2005 8:33 am
- What model do you have?: 2.3L 69; 1302; P/Van
- Location: Klipheuwel (near Durbanville), Cape Town or working at sea
- Has thanked: 192 times
- Been thanked: 488 times
Re: Tony's 1302S
Thanks guys. I do like to over achieve sometimes... 
This will only work on a 1302 and 1303 though.
Yea, that colour really comes alive in the sun. I am really looking forward to the day that the car is done and rolls out into the sunshine for its maiden voyage.Jdt1976 wrote: Wed Jul 26, 2017 7:09 pm The colour came out nice. Sure it looks a lot different in the sun and shade.
I am not planning on making it an off the shelf item, but I still have all my notes and drawings, so I could repeat it again.Terry Phillips wrote: Tue Jul 25, 2017 9:26 pm Nice job Tony is it now going to be a off the shelf item soon.
This will only work on a 1302 and 1303 though.
ANGRRR
http://www.aircooledvwsa.co.za/viewtopi ... 23&t=14775
1302S
http://www.aircooledvwsa.co.za/viewtopi ... 23&t=33521
Panel Van
http://www.aircooledvwsa.co.za/viewtopic.php?p=288723
http://www.aircooledvwsa.co.za/viewtopi ... 23&t=14775
1302S
http://www.aircooledvwsa.co.za/viewtopi ... 23&t=33521
Panel Van
http://www.aircooledvwsa.co.za/viewtopic.php?p=288723
vader wrote: The Force is strong with you young Sith Lord Z!
-
jolas

- Donor
- Posts: 4245
- Joined: Fri Jul 16, 2010 10:11 am
- What model do you have?: '65 Kombi
- Location: Klapmuts, Western Cape
- Has thanked: 393 times
- Been thanked: 173 times
Re: Tony's 1302S
Nice work there Tony !!!!
by fig » Mar 26, 2018
Sambas in South Africa are good for only 2 things: showing off and sunburn.
Sambas in South Africa are good for only 2 things: showing off and sunburn.
-
Donovan D
- Donor
- Posts: 2231
- Joined: Sun Jun 01, 2008 6:27 pm
- What model do you have?: 67 Panel
- Facebook: http://www.facebook.com/profile.php?id=536371512
- Location: Brackenfell
- Has thanked: 150 times
- Been thanked: 73 times
Re: Tony's 1302S
Great work as always !
This is going to be one hell of a beetle.
This is going to be one hell of a beetle.
---------- 67 Panelvan -----------
---------- 56 Oval ----------
---------- 56 Oval ----------