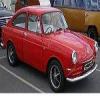
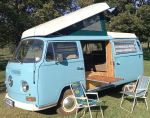
Retrovan's Hahn SP - Project
-
retrovan
- Donor

- Posts: 8710
- Joined: Mon Feb 07, 2011 8:51 pm
- What model do you have?: 52T1,68FB,72Bay,75FL
- Location: Eich! no, in Jefferys Bay
- Has thanked: 421 times
- Been thanked: 541 times
- Contact:

Re: Retrovan's Hahn SP - Project
WEEK 4 of build
Thanks guys
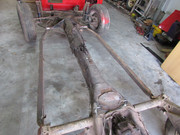
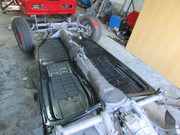
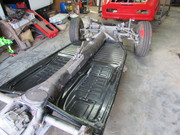
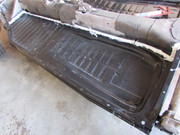
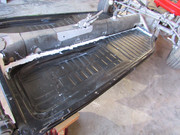
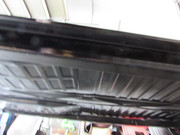
So we managed to sandblast the chassis and got it ready for the welding in of the new floor pan's.
1st the jack points as well as the seat rails had to be removed as this would not work on the Hahn
Then the pan sections where welded into place at the same spacing as the original spot-welds.
Also did the sealing of the edges so no water will be drawn into the joint.
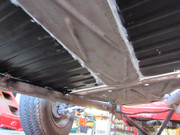
The chassis will now be epoxy primer coated underneath and then top coated with the same 2 K coating as we are going to use on top.
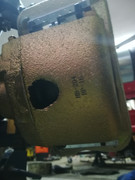
we also did the outside of the fuel tank with a light coat of epoxy and this will be top coated with gloss black when dry.
As said we did get the Disk brake kit for up front and smooth drums for the back.
These we machined so that we can use either a 100 x 4 bolt or a 100 x 5 bolt or 205 wide by 5 wheels on the back and either of these on the front should we used a adapter for the wide 5.
As we can not get the wide semi-sealed head light that it was designed for, we are going to manufacture a wide headlight with the park and flasher incorporated in it. This will look like the MR 2 Capri headlights that is also not made anymore.
This we have to do to fill the hole that was moulded in for the big wide headlight that is not available any longer.
But more on this later in the build.........
So to end off this week we drop the photo's below.
Enjoy
Herman


Thanks guys
So we managed to sandblast the chassis and got it ready for the welding in of the new floor pan's.
1st the jack points as well as the seat rails had to be removed as this would not work on the Hahn
Then the pan sections where welded into place at the same spacing as the original spot-welds.
Also did the sealing of the edges so no water will be drawn into the joint.
The chassis will now be epoxy primer coated underneath and then top coated with the same 2 K coating as we are going to use on top.
we also did the outside of the fuel tank with a light coat of epoxy and this will be top coated with gloss black when dry.
As said we did get the Disk brake kit for up front and smooth drums for the back.
These we machined so that we can use either a 100 x 4 bolt or a 100 x 5 bolt or 205 wide by 5 wheels on the back and either of these on the front should we used a adapter for the wide 5.
As we can not get the wide semi-sealed head light that it was designed for, we are going to manufacture a wide headlight with the park and flasher incorporated in it. This will look like the MR 2 Capri headlights that is also not made anymore.
This we have to do to fill the hole that was moulded in for the big wide headlight that is not available any longer.
But more on this later in the build.........
So to end off this week we drop the photo's below.
Enjoy
Herman
Last edited by retrovan on Wed Dec 22, 2021 10:38 am, edited 2 times in total.
1952 Split Beetle 1835cc
1968 Fastback 2Lt.type4
1972 Low Light Bay Panel Van 2Lt type 4
1975 Fleetline Panel Van 1914cc
2020 MeFusco Beetle Truck 2Lt type 4
1972 FT Hahn SP 1776 cc
1968 Fastback 2Lt.type4
1972 Low Light Bay Panel Van 2Lt type 4
1975 Fleetline Panel Van 1914cc
2020 MeFusco Beetle Truck 2Lt type 4
1972 FT Hahn SP 1776 cc
-
retrovan
- Donor
- Posts: 8710
- Joined: Mon Feb 07, 2011 8:51 pm
- What model do you have?: 52T1,68FB,72Bay,75FL
- Location: Eich! no, in Jefferys Bay
- Has thanked: 421 times
- Been thanked: 541 times
- Contact:
Re: Retrovan's Hahn SP - Project
WEEK 5 of build
As we are busy building a new factory for one of our customers, not much is being done.
When I am not working on the Hahn, the other two just stay away.........


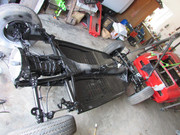
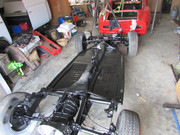
But yes we have coated the chassis under with epoxy primer then top coated it with 2K black both bottom and top,
and got it ready for the next part of the build., looks fantastic...
Also striped the old engine tins, phosphated them, electro plated them, and then powder coated them, looks like new.
So now we wait for the gear box to return from its JHB visit, and we can start getting it ready with the gearbox,
fit back brakes and smooth drum's, and disks up front.
Till then
Herman
As we are busy building a new factory for one of our customers, not much is being done.
When I am not working on the Hahn, the other two just stay away.........
But yes we have coated the chassis under with epoxy primer then top coated it with 2K black both bottom and top,
and got it ready for the next part of the build., looks fantastic...
Also striped the old engine tins, phosphated them, electro plated them, and then powder coated them, looks like new.
So now we wait for the gear box to return from its JHB visit, and we can start getting it ready with the gearbox,
fit back brakes and smooth drum's, and disks up front.
Till then
Herman
Last edited by retrovan on Wed Dec 22, 2021 10:37 am, edited 1 time in total.
1952 Split Beetle 1835cc
1968 Fastback 2Lt.type4
1972 Low Light Bay Panel Van 2Lt type 4
1975 Fleetline Panel Van 1914cc
2020 MeFusco Beetle Truck 2Lt type 4
1972 FT Hahn SP 1776 cc
1968 Fastback 2Lt.type4
1972 Low Light Bay Panel Van 2Lt type 4
1975 Fleetline Panel Van 1914cc
2020 MeFusco Beetle Truck 2Lt type 4
1972 FT Hahn SP 1776 cc
-
AlanH
- Crankshaft
- Posts: 765
- Joined: Thu Jan 17, 2013 7:20 am
- What model do you have?: '70 Westy
- Location: Pretoria
- Has thanked: 128 times
- Been thanked: 86 times

Re: Retrovan's Hahn SP - Project
Wow, Herman you are moving. Wish I could spend more time on the Westy.
There always seems to be something else that takes priority.
There always seems to be something else that takes priority.
Wanted parts:
Left sunvisor
Sink faucet
Exhaust to swap for Beetle exhaust
Left sunvisor
Sink faucet
Exhaust to swap for Beetle exhaust
-
retrovan
- Donor
- Posts: 8710
- Joined: Mon Feb 07, 2011 8:51 pm
- What model do you have?: 52T1,68FB,72Bay,75FL
- Location: Eich! no, in Jefferys Bay
- Has thanked: 421 times
- Been thanked: 541 times
- Contact:
Re: Retrovan's Hahn SP - Project
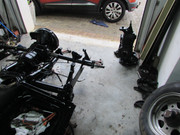
WEEK 6 of build
Thanks Alan,
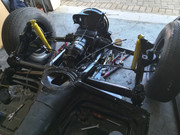
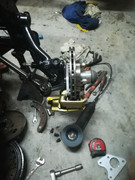
This week we managed to get the AS gearbox back form Jhb, and started exchanging the two gearboxes.
1st we had to change the two nose cones as the shift side mountings differed from the body.
Also managed to apply final paint coat to the fuel tank.
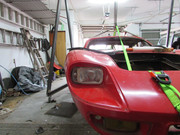
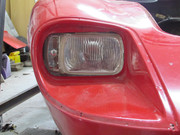
As I was excited like a kid in a candy store about my idea to rebuild the head light, I had to do the 1st one and fit it to the body
Will have to get the rear bearing kits , as well as the brake shoe's and the flexible brake pipes this week so we can do the back drums.
Thanks for looking.
Herman
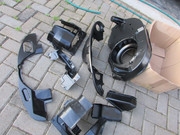
Fuel tank finally done.
Gearbox swap from SFAB to the SFAS with longer 4th gear.


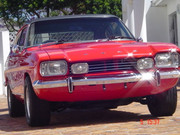
Here is the head light when I got the car, not the correct light by far...
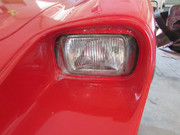
This is what the OEM original build looked like...
But as the original Escort head light is not to be found, the next best is to go to the MR2 Ford Capri head light with side light.....
BUT ...the side light section also not available any more....
So here is the MR2 Capri light fitted by it self, right shape but too narrow....
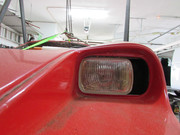
Then we cut yet another Capri head light to get the corner bit for the indicator/park light build section...
Then we buy a Golf 2 bumper indicator/ park light unit and cut it up as well to fit into the section of Capri headlight.
And we epoxy it all together....
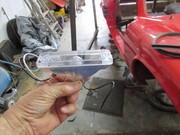
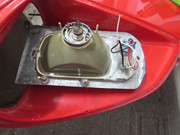
We now have a full width headlight with indicator and park light in one unit, that fills the hole nicely....
Thanks Alan,
This week we managed to get the AS gearbox back form Jhb, and started exchanging the two gearboxes.
1st we had to change the two nose cones as the shift side mountings differed from the body.
Also managed to apply final paint coat to the fuel tank.
As I was excited like a kid in a candy store about my idea to rebuild the head light, I had to do the 1st one and fit it to the body
Will have to get the rear bearing kits , as well as the brake shoe's and the flexible brake pipes this week so we can do the back drums.
Thanks for looking.
Herman
Fuel tank finally done.
Gearbox swap from SFAB to the SFAS with longer 4th gear.
Here is the head light when I got the car, not the correct light by far...
This is what the OEM original build looked like...
But as the original Escort head light is not to be found, the next best is to go to the MR2 Ford Capri head light with side light.....
BUT ...the side light section also not available any more....
So here is the MR2 Capri light fitted by it self, right shape but too narrow....
Then we cut yet another Capri head light to get the corner bit for the indicator/park light build section...
Then we buy a Golf 2 bumper indicator/ park light unit and cut it up as well to fit into the section of Capri headlight.
And we epoxy it all together....
We now have a full width headlight with indicator and park light in one unit, that fills the hole nicely....
Last edited by retrovan on Wed Dec 22, 2021 10:36 am, edited 1 time in total.
1952 Split Beetle 1835cc
1968 Fastback 2Lt.type4
1972 Low Light Bay Panel Van 2Lt type 4
1975 Fleetline Panel Van 1914cc
2020 MeFusco Beetle Truck 2Lt type 4
1972 FT Hahn SP 1776 cc
1968 Fastback 2Lt.type4
1972 Low Light Bay Panel Van 2Lt type 4
1975 Fleetline Panel Van 1914cc
2020 MeFusco Beetle Truck 2Lt type 4
1972 FT Hahn SP 1776 cc
-
Haans
- Pushrod
- Posts: 900
- Joined: Wed Apr 20, 2016 7:10 pm
- What model do you have?: 1960 ghia
- Location: Nelson Mandela Metro
- Has thanked: 1 time
- Been thanked: 107 times

Re: Retrovan's Hahn SP - Project
Carefull boet..............at this rate you will be in the missus' way by Christmas !!!!!!

 . Great pace here Herman !!!
When you get to front brakes...... your pics will be appreciated,... considering disc's up front.
Regards Haans


 . Great pace here Herman !!!
When you get to front brakes...... your pics will be appreciated,... considering disc's up front.
Regards Haans
-
V6 Capri

- Oil Stain
- Posts: 195
- Joined: Sun Sep 23, 2018 9:06 pm
- What model do you have?: 1972
- Location: East Rand
- Has thanked: 7 times
- Been thanked: 29 times
Re: Retrovan's Hahn SP - Project
Poor Capri... -> Me being biast 
But the headlight does look much better!
But the headlight does look much better!
1964 Ford Anglia 997cc
1972 Ford Capri 3L GT
1994 Escort Cosworth (replica)
1996 Escort 2L Zetec
2016 VW Touran 1.6TDi
1971 Baywindow project
1972 Ford Capri 3L GT
1994 Escort Cosworth (replica)
1996 Escort 2L Zetec
2016 VW Touran 1.6TDi
1971 Baywindow project
-
retrovan
- Donor
- Posts: 8710
- Joined: Mon Feb 07, 2011 8:51 pm
- What model do you have?: 52T1,68FB,72Bay,75FL
- Location: Eich! no, in Jefferys Bay
- Has thanked: 421 times
- Been thanked: 541 times
- Contact:
Re: Retrovan's Hahn SP - Project
V6 Capri wrote: Tue Nov 09, 2021 8:43 am Poor Capri... -> Me being biast
But the headlight does look much better!
Thanks, sure the 4 letter car guys will forgive me ....
Herman
1952 Split Beetle 1835cc
1968 Fastback 2Lt.type4
1972 Low Light Bay Panel Van 2Lt type 4
1975 Fleetline Panel Van 1914cc
2020 MeFusco Beetle Truck 2Lt type 4
1972 FT Hahn SP 1776 cc
1968 Fastback 2Lt.type4
1972 Low Light Bay Panel Van 2Lt type 4
1975 Fleetline Panel Van 1914cc
2020 MeFusco Beetle Truck 2Lt type 4
1972 FT Hahn SP 1776 cc
-
retrovan
- Donor
- Posts: 8710
- Joined: Mon Feb 07, 2011 8:51 pm
- What model do you have?: 52T1,68FB,72Bay,75FL
- Location: Eich! no, in Jefferys Bay
- Has thanked: 421 times
- Been thanked: 541 times
- Contact:
Re: Retrovan's Hahn SP - Project
so due to the flu, the kids here for the weekend, and the grand daughter brightening up our lives for a few days,
the Hahn has not had work done to it this week.
We have how ever collected required parts and things needed for the next weeks efforts.
So till then , enjoy your project and see you back next week.
Thank you
Herman
the Hahn has not had work done to it this week.
We have how ever collected required parts and things needed for the next weeks efforts.
So till then , enjoy your project and see you back next week.
Thank you
Herman
1952 Split Beetle 1835cc
1968 Fastback 2Lt.type4
1972 Low Light Bay Panel Van 2Lt type 4
1975 Fleetline Panel Van 1914cc
2020 MeFusco Beetle Truck 2Lt type 4
1972 FT Hahn SP 1776 cc
1968 Fastback 2Lt.type4
1972 Low Light Bay Panel Van 2Lt type 4
1975 Fleetline Panel Van 1914cc
2020 MeFusco Beetle Truck 2Lt type 4
1972 FT Hahn SP 1776 cc
-
retrovan
- Donor
- Posts: 8710
- Joined: Mon Feb 07, 2011 8:51 pm
- What model do you have?: 52T1,68FB,72Bay,75FL
- Location: Eich! no, in Jefferys Bay
- Has thanked: 421 times
- Been thanked: 541 times
- Contact:
Re: Retrovan's Hahn SP - Project
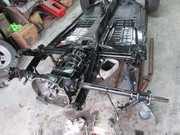
WEEK 7 of build
Yes I know its not Sunday Night, but I have been working a bit on the Hahn.
So we have completed the rear brake rework and fitted the following;-
AS gearbox fitted
No the gear lever shaft has not been fitted as we going to change the bushes 1st....
New Bearings,
New Seals,
New Brake shoes
New Brake drums
New flexible Brake hoses,
New solid Brake Hoses.
Cleaned and painted the shocks
Set up the brake shoes adjusters.
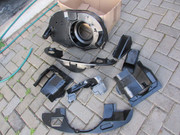
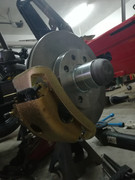
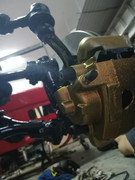
We striped out the old drum brakes in the driver side front wheel,
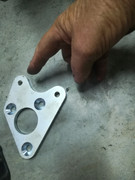
And fitted the caliper mounting bracket. Please note it should face down on the two ears as per photo
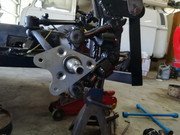
Here I have a bracket to show the incorrect positioning on top of the fitted correct bracket.
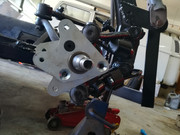
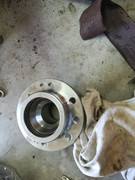
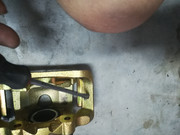
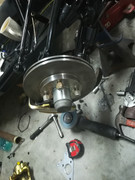
Then we had to assemble the hub with the bearings and seal.
And here are the parts

Before assembling the hub, we made sure the bearing slipped over the axle shaft
this can not be a tight fit or you will damage the seal every time you remove the hub.
To make the bearing outer fit easier, we heated the hub and pushed in the two outer 's
After cooling we Lubed up the Larger bearing and fitted it into the hub seated into the outer, then the seal was pressed in.

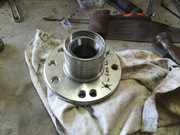
More lub was added and the hub fitted over the axle shaft.
And the small bearing fitted.
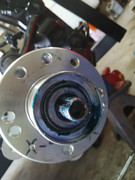
Then the old keyed washer is fitted before the lock nut is turned on touch tight.
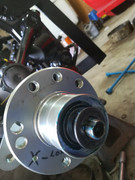
And the old grease cap fitted.
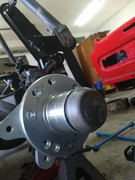

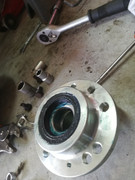
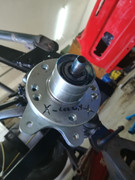
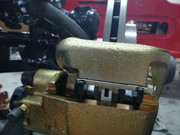
Then we fitted the rotor, or Disk to the hub.
As this kit was made up of Golf 1 mount bracket and Golf 2 Disk brake parts,
the disk rubbed up on the caliper and the mount bracket interfered with the brake shoe.
So we had to grind the two parts for clearance.
Now please note as these are Golf parts fitted to a beetle chassis, the two calipers need to be inverted ,
so the left side goes on the right and the right side goes on the left,.......
Why you all ask in one voice....
Well you need to get the bleeder nipple to the top or you will not be able to bleed all the air out......
The confusing part is the anti chatter plated, as you have a left and a right.
Well after a long session of debate between the 3 of use and a lot of trial and error,
we got it fitted AFTER the shoes where in place and all the bolts tightened.
So now we go to the other side and repeat ...
Till later, thanks for looking.
Herman
Yes I know its not Sunday Night, but I have been working a bit on the Hahn.
So we have completed the rear brake rework and fitted the following;-
AS gearbox fitted
No the gear lever shaft has not been fitted as we going to change the bushes 1st....
New Bearings,
New Seals,
New Brake shoes
New Brake drums
New flexible Brake hoses,
New solid Brake Hoses.
Cleaned and painted the shocks
Set up the brake shoes adjusters.
We striped out the old drum brakes in the driver side front wheel,
And fitted the caliper mounting bracket. Please note it should face down on the two ears as per photo
Here I have a bracket to show the incorrect positioning on top of the fitted correct bracket.
Then we had to assemble the hub with the bearings and seal.
And here are the parts
Before assembling the hub, we made sure the bearing slipped over the axle shaft
this can not be a tight fit or you will damage the seal every time you remove the hub.
To make the bearing outer fit easier, we heated the hub and pushed in the two outer 's
After cooling we Lubed up the Larger bearing and fitted it into the hub seated into the outer, then the seal was pressed in.
More lub was added and the hub fitted over the axle shaft.
And the small bearing fitted.
Then the old keyed washer is fitted before the lock nut is turned on touch tight.
And the old grease cap fitted.
Then we fitted the rotor, or Disk to the hub.
As this kit was made up of Golf 1 mount bracket and Golf 2 Disk brake parts,
the disk rubbed up on the caliper and the mount bracket interfered with the brake shoe.
So we had to grind the two parts for clearance.
Now please note as these are Golf parts fitted to a beetle chassis, the two calipers need to be inverted ,
so the left side goes on the right and the right side goes on the left,.......
Why you all ask in one voice....
Well you need to get the bleeder nipple to the top or you will not be able to bleed all the air out......
The confusing part is the anti chatter plated, as you have a left and a right.
Well after a long session of debate between the 3 of use and a lot of trial and error,
we got it fitted AFTER the shoes where in place and all the bolts tightened.
So now we go to the other side and repeat ...
Till later, thanks for looking.
Herman
Last edited by retrovan on Wed Dec 22, 2021 10:35 am, edited 1 time in total.
1952 Split Beetle 1835cc
1968 Fastback 2Lt.type4
1972 Low Light Bay Panel Van 2Lt type 4
1975 Fleetline Panel Van 1914cc
2020 MeFusco Beetle Truck 2Lt type 4
1972 FT Hahn SP 1776 cc
1968 Fastback 2Lt.type4
1972 Low Light Bay Panel Van 2Lt type 4
1975 Fleetline Panel Van 1914cc
2020 MeFusco Beetle Truck 2Lt type 4
1972 FT Hahn SP 1776 cc
-
Pine
- ACVWSA Junkie
- Posts: 15033
- Joined: Sun Sep 18, 2005 5:54 pm
- What model do you have?: Oil on the driveway
- Location: Wilderness
- Has thanked: 231 times
- Been thanked: 233 times
- Contact:
Re: Retrovan's Hahn SP - Project
Excellent progress Herman! I went through the same process with the Puma recently. What brake master cylinder are you using? Please send me your number on Whatsapp 079 079 3561 if you want me to add you on the Puma SA Gp? The other Hahn owner is on it as well.
-
retrovan
- Donor
- Posts: 8710
- Joined: Mon Feb 07, 2011 8:51 pm
- What model do you have?: 52T1,68FB,72Bay,75FL
- Location: Eich! no, in Jefferys Bay
- Has thanked: 421 times
- Been thanked: 541 times
- Contact:
Re: Retrovan's Hahn SP - Project
thanks Pine, Did send my number 
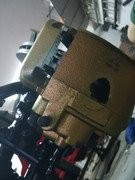
Using a Kombi MC so I have more fluid to move, so my peddle will not stop near the floor.
Matter of fact I fitted it a few minutes ago, so will have a photo of it installed tomorrow night.
Herman
Using a Kombi MC so I have more fluid to move, so my peddle will not stop near the floor.
Matter of fact I fitted it a few minutes ago, so will have a photo of it installed tomorrow night.
Herman
1952 Split Beetle 1835cc
1968 Fastback 2Lt.type4
1972 Low Light Bay Panel Van 2Lt type 4
1975 Fleetline Panel Van 1914cc
2020 MeFusco Beetle Truck 2Lt type 4
1972 FT Hahn SP 1776 cc
1968 Fastback 2Lt.type4
1972 Low Light Bay Panel Van 2Lt type 4
1975 Fleetline Panel Van 1914cc
2020 MeFusco Beetle Truck 2Lt type 4
1972 FT Hahn SP 1776 cc

-
retrovan
- Donor
- Posts: 8710
- Joined: Mon Feb 07, 2011 8:51 pm
- What model do you have?: 52T1,68FB,72Bay,75FL
- Location: Eich! no, in Jefferys Bay
- Has thanked: 421 times
- Been thanked: 541 times
- Contact:
Re: Retrovan's Hahn SP - Project
Oh Yes, as the Hahn is build on a standard Beetle Chassis73type2 wrote: Sat Nov 20, 2021 10:37 pm Good tips, Herman. Can I do the same if I want a front disc setup on a Beetle?
So it will be the same as any Beetle build.
1952 Split Beetle 1835cc
1968 Fastback 2Lt.type4
1972 Low Light Bay Panel Van 2Lt type 4
1975 Fleetline Panel Van 1914cc
2020 MeFusco Beetle Truck 2Lt type 4
1972 FT Hahn SP 1776 cc
1968 Fastback 2Lt.type4
1972 Low Light Bay Panel Van 2Lt type 4
1975 Fleetline Panel Van 1914cc
2020 MeFusco Beetle Truck 2Lt type 4
1972 FT Hahn SP 1776 cc
-
Tony Z

- Donor
- Posts: 15010
- Joined: Wed Sep 14, 2005 8:33 am
- What model do you have?: 2.3L 69; 1302; P/Van
- Location: Klipheuwel (near Durbanville), Cape Town or working at sea
- Has thanked: 192 times
- Been thanked: 488 times
Re: Retrovan's Hahn SP - Project
bigger master cylinder will make the brake pedal feel firmer (harder).
There is nothing wrong with using a beetle MC if it'll work
There is nothing wrong with using a beetle MC if it'll work
ANGRRR
http://www.aircooledvwsa.co.za/viewtopi ... 23&t=14775
1302S
http://www.aircooledvwsa.co.za/viewtopi ... 23&t=33521
Panel Van
http://www.aircooledvwsa.co.za/viewtopic.php?p=288723
http://www.aircooledvwsa.co.za/viewtopi ... 23&t=14775
1302S
http://www.aircooledvwsa.co.za/viewtopi ... 23&t=33521
Panel Van
http://www.aircooledvwsa.co.za/viewtopic.php?p=288723
vader wrote: The Force is strong with you young Sith Lord Z!