swb buggy pan
-
dubster
- Valve
- Posts: 1145
- Joined: Tue Nov 06, 2007 6:30 pm
- What model do you have?: buggy and '74 beetle
- Location: Amanzimtoti
- Been thanked: 3 times
swb buggy pan
hey guys got this swb buggy to replace the baja body but now i need to cut the pan and i dont know where?all advice would be apreciated...thanks...
1974 1300tp type 1
kart kraft 1717cc buggy
''BLOOD AND TEARS WILL FLOW FOR ACVW'S,FOR LIFE''
kart kraft 1717cc buggy
''BLOOD AND TEARS WILL FLOW FOR ACVW'S,FOR LIFE''
-
Pine
- ACVWSA Junkie
- Posts: 15033
- Joined: Sun Sep 18, 2005 5:54 pm
- What model do you have?: Oil on the driveway
- Location: Wilderness
- Has thanked: 231 times
- Been thanked: 233 times
- Contact:

Re: swb buggy pan
Full instructions here: http://www.meyersmanx.com/garage/garage_shorten_p4.htm
This might also help:
This might also help:
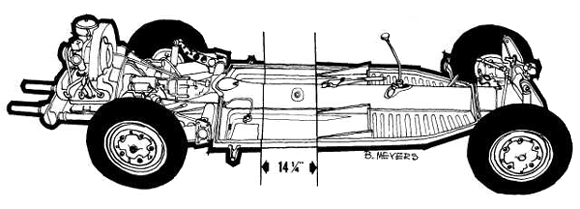
Frame Shortening Alignment Tip
From an email sent by Ron Ashley
I just read your outline re shortening a VW pan, and thought I'd pass along a tip on aligning it that I read in a buggy mag a couple of decades ago. . . . if you're interested. Being a Manx dealer, I was always on the lookout for a better way to build the things, and this is one of the better tips that I ever read. It sure beats all that measuring with a tape from corner-to-corner, etc.
Before cutting, make three sets of exactly equal-length "X" or "cross" marks on the frame, one set on top of the tunnel, and one set on each side of the frame (I made mine on top of the raised channel that the body bolts to). Of course, the equal-length marks must be made far enough apart and spaced so that they will still be on the frame after the 14 1/2 inch section is removed! The "taper" of the side channels will somewhat dictate the distance between the marks, but I think 16 1/2 - 17 inches was about what I used. Also scribe a center line on top of the tunnel. After cutting, pull the two frame halves together, align the tunnel by using the scribed line, and tack-weld it at the top-center of the tunnel. Then (with a jack centered under the tunnel and spanning the two cut-lines) raise-lower the jack and shift the side rails until all three pairs of marks are exactly equal again. It doesn't matter what the distance is as long as all three pairs or sets of marks are equal. Then tack the side rails, recheck the dimensions, and finish welding.
Being an engineer, you probably understand the triangulation principle involved. The three marks, one being on a different plane from the other two, assures alignment as long as the pairs of marks are exactly the same distance apart before cutting and after cutting.
-
dubster
- Valve
- Posts: 1145
- Joined: Tue Nov 06, 2007 6:30 pm
- What model do you have?: buggy and '74 beetle
- Location: Amanzimtoti
- Been thanked: 3 times
Re: swb buggy pan
thanx pine i was hoping you would respond ,looks like al i need..thanx
1974 1300tp type 1
kart kraft 1717cc buggy
''BLOOD AND TEARS WILL FLOW FOR ACVW'S,FOR LIFE''
kart kraft 1717cc buggy
''BLOOD AND TEARS WILL FLOW FOR ACVW'S,FOR LIFE''
-
Pine
- ACVWSA Junkie
- Posts: 15033
- Joined: Sun Sep 18, 2005 5:54 pm
- What model do you have?: Oil on the driveway
- Location: Wilderness
- Has thanked: 231 times
- Been thanked: 233 times
- Contact:
Re: swb buggy pan
You're welcome. IMPI, who is an experienced MIG welder, helped me a few years ago to shorten my pan. It was done over two days at his place. We did it without removing the front suspension and the gearbox, making careful use of a spirit level to ensure the chassis is true.