Page 8 of 28

Re: My bug - ANGRRR - the ongoing project (new name)

Posted: Tue Feb 15, 2011 5:24 pm
by Tony Z
Well, on Sunday it was my cars birthday. I got her 14 years ago - 13 Feb 1997

Re: My bug - ANGRRR - the ongoing project (new name)

Posted: Tue Feb 15, 2011 5:32 pm
by Tony Z
The last few days has had me taking my time doing some much needed work to the bug.
I have pulled the engine out of the bug for a clutch change and pressure plate upgrade - this was the easy part.
While taking the engine out, I found that one of my cylinder head tins have cracked, so this will need replacing too.
I also decided to cut the cylinder head exhaust bolts shorter so I dont have to curse and swear the way I usually do when removing the exhaust. It did come off pretty easily this time.
I also removed the beauty plate firewall. I cleaned up some wiring and connections I made against the firewall once upon a time and installed some sound deadening material onto the wall. Lets hope this helps in making the car a little quieter inside.

The next few days will have me re-doing my Kaefer cup brace which after taking all the time to do it once before, had to be removed when it didnt clear the exhaust.

More to come over the next few days... :mrgreen: :mrgreen: :mrgreen:

Re: My bug - ANGRRR - the ongoing project (new name)

Posted: Tue Feb 15, 2011 7:54 pm
by TonyE
Tony Z wrote:Well, on Sunday it was my cars birthday. I got her 14 years ago - 13 Feb 1997

Oh , that is why you slept so late , you were celebrating. :mrgreen: :mrgreen: :mrgreen: :mrgreen:

Re: My bug - ANGRRR - the ongoing project (new name)

Posted: Wed Feb 16, 2011 7:58 am
by flatfourfan
Tony, good work, question, if you ever go EFI, would you run your return line on the other side or would you get both in on one side? Looks a bit tight there for 2.

Re: My bug - ANGRRR - the ongoing project (new name)

Posted: Wed Feb 16, 2011 8:54 am
by Tony Z
flatfourfan wrote:Tony, good work, question, if you ever go EFI, would you run your return line on the other side or would you get both in on one side? Looks a bit tight there for 2.
neither.... I would use the stock line as the return ;-)

Give me a few years :hangloose:

Re: My bug - ANGRRR - the ongoing project (new name)

Posted: Wed Feb 16, 2011 9:44 am
by flatfourfan
aaaaaaaaaah, gotcha. I'm going this route as well, but don't want to use my stock lines fullstop.

Re: My bug - ANGRRR - the ongoing project (new name)

Posted: Thu Feb 24, 2011 6:07 pm
by Tony Z
A few days ago I handed in a new pulley which I needed balanced. I got it back yesterday and decided to fit it this morning.
Doesnt fit. So I heat it, still doesnt fit.
After plenty cursing and swearing, I realise that it was clamped so hard in the balancing machine that the hub is buckled. Keep in mind, this is a sand seal pulley, so the pulley thread has been removed and replaced by a stainless steel sleeve. This sleeve has 6 teeth marks in it, and when fitting the pulley, each point where the pulley grabs is directly under one of the tooth marks. Filing the center away (and taking my time doing it) isnt difficult - but with the bent stainless steel, the seal itself is rendered useless.

I took it back to them - now they are seeing what they can do.
Totally lost interest in doing any more work today.
Another day lost, more petrol wasted in getting things for this project.....


But on a positive note, I did find a new fuse box for kit cars which I will be installing along with a 30A relay for things like my gauges and radio so I can take them off the stock fuses. I am gradually reworking plenty of the wiring that I did years ago which could have been better.

Hold thumbs, hopefully I'll get my pulley back early enough tomorrow so I can make some progress before the weekend.
So far this week I have managed to do add some wiring to the car, I have remade my kaefer cup brace mounts which should now clear my exhaust and added some more sound deadening to the engine bay.

I cant believe the price of sound deadening.... I spoke to one sound guy who recommended I use a certain product. R65 per sheet. A sheet is about 300mm x 100mm. So I did some more shopping around and went to a haberdashery who once told me they have should deadening material. It turned out to be exactly the same sheets but this time for R28 each. Unbelievable. There is a difference between making a profit and ripping people off.

Anyway, lets hope I manage to put more than 5 hours work into the car next week....

Re: My bug - ANGRRR - the ongoing project (new name)

Posted: Thu Feb 24, 2011 6:18 pm
by Blitzkrieg
I paid R20-00 per sheet for the same dimension Sound Deadening here by Pro Auto Rubber...

If you buy more than 20 sheets, they work out a better price...

It's quite heavy and thick.

Re: My bug - ANGRRR - the ongoing project (new name)

Posted: Fri Feb 25, 2011 2:01 pm
by vader
Oi Chrome Dome....

When you need my help????

Re: My bug - ANGRRR - the ongoing project (new name)

Posted: Fri Feb 25, 2011 4:54 pm
by Tony Z
Engine is in now... but you welcome to come visit anytime and give me moral support - or just laugh

Re: My bug - ANGRRR - the ongoing project (new name)

Posted: Sat Feb 26, 2011 12:17 am
by Ron&Gill
Timing's f-ing perfect, again...hahaha...

Re: My bug - ANGRRR - the ongoing project (new name)

Posted: Thu Apr 14, 2011 7:41 pm
by Tony Z
Finally time for another update.

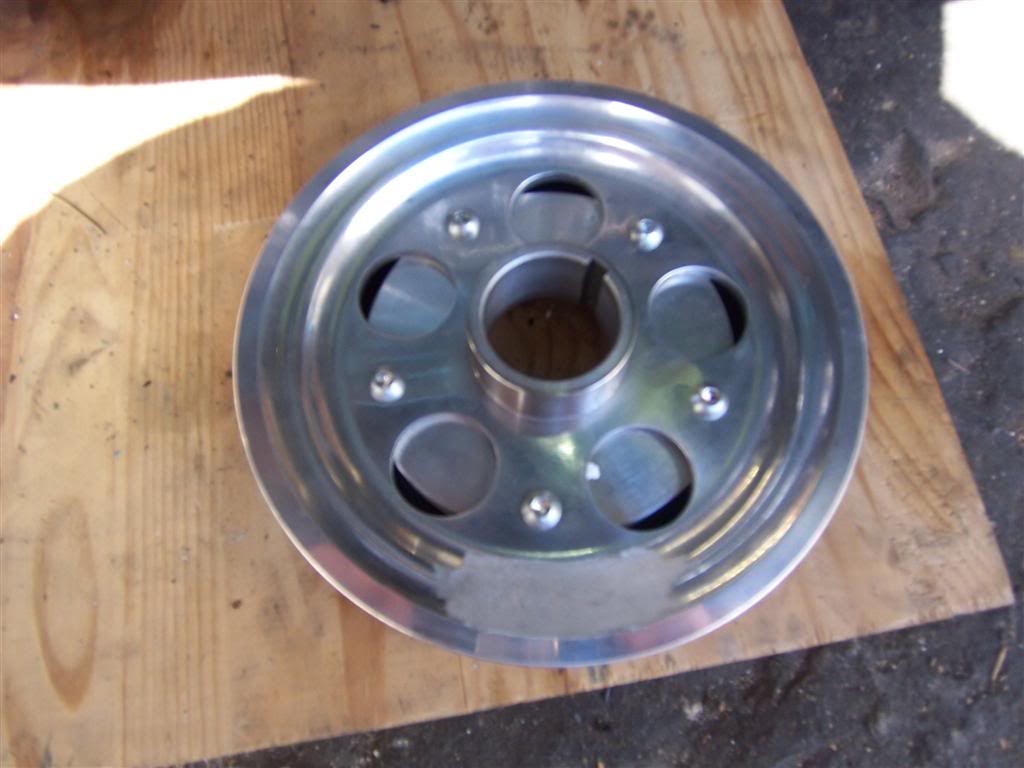
After my last update, I finally got my pulley back after the balancing company sent it in for a slight trim of the sealing face. Decent work was done and the seal is actually good, much to my surprise.

After having discussions with 4AGE (Louis) on this forum, I purchased a Gotech Pro X system from him with a semi made up wiring harness based on my current application.
Image

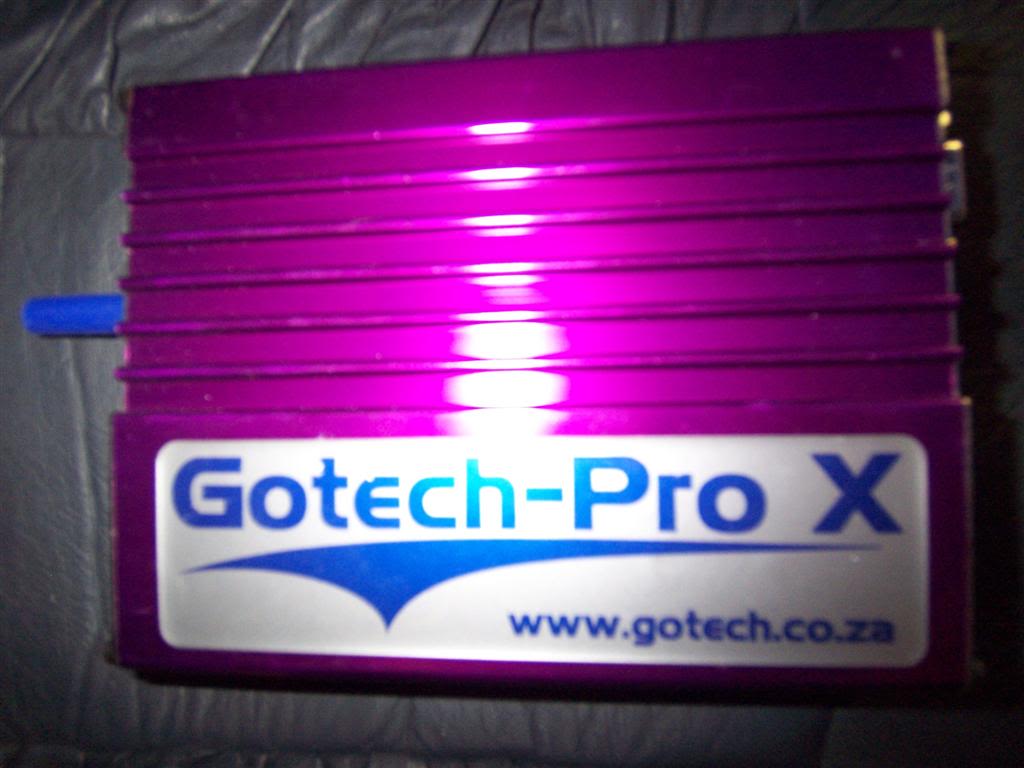
I was thinking about running the mormal MSD setup that many others have done in the past. But then after talking to Louis, I realised that for a little extra than the MSD system, I would have a full electronic system will unlimited tuning adjustment. Plus for a long time I have been secretly wanting to run a fuel injection system. So if I ever do get to the stage that I decide to make that leap, then I already have the Gotech system to run the fuel injection with, at which time I would have had to discard the MSD system anyway.
For now, I am using the Gotech Pro X for timing ONLY. The 48IDF carburetors are still in place where they belong. Louis - I did look at the website you sent me to - those throttle bodies are the bomb and would be so nice to have. Nice to have and no more (for now).

Another beauty of this Gotech system (Louis, you can pay me later for all the advertising and name throwing :mrgreen: ) is that it cleans up the engine bay nicely.

Take one Delrin plug which I made up on my last ship
Image

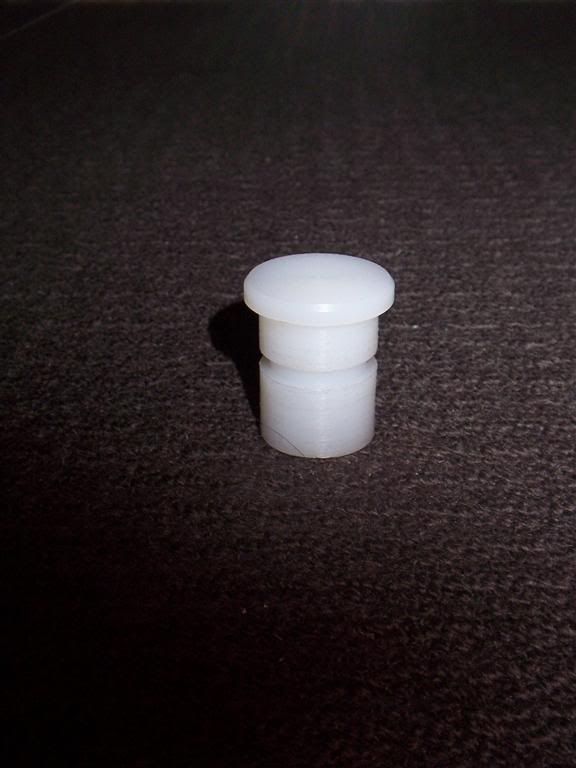
and insert this plug into the engine where the distributor used to live.

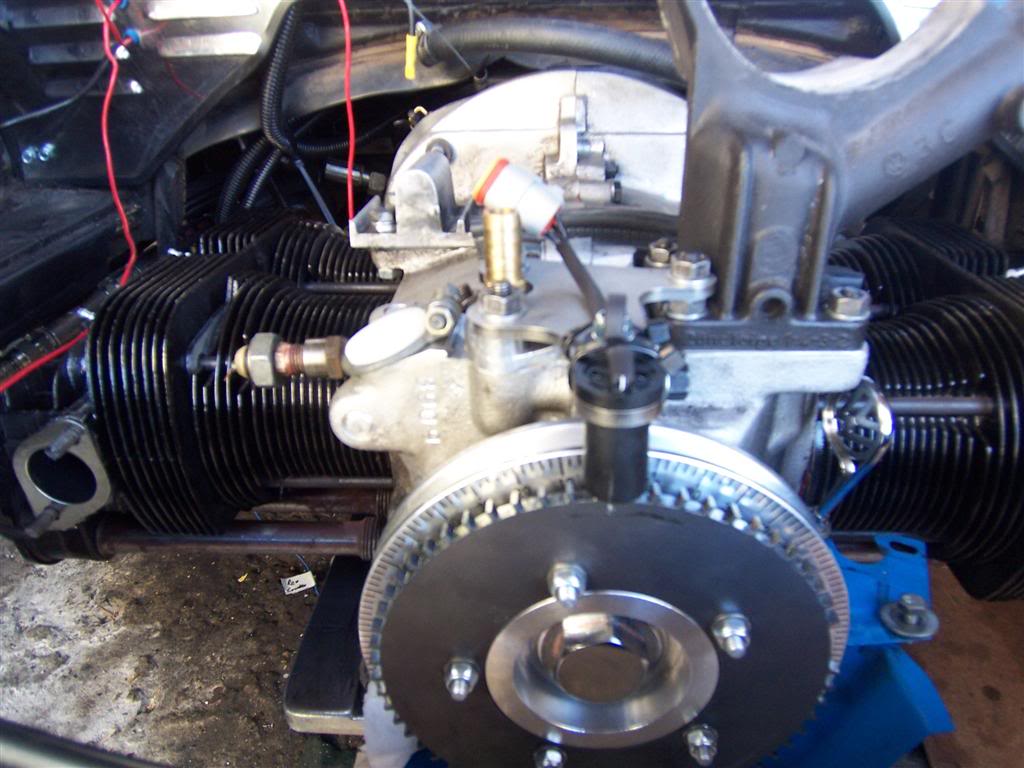
First though, it is time for pics of my pulley.
Note the amount cut away to get the unit balanced. Also note the 5 allen head bolts inserted into the back
Image

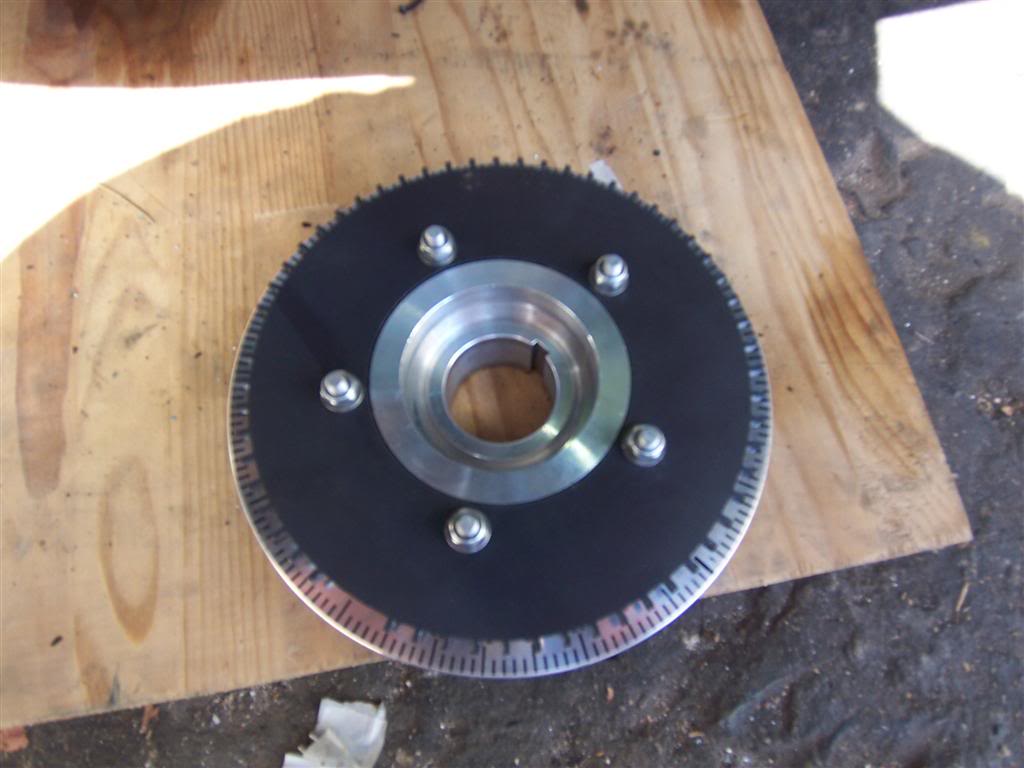
On the front of the pulley you can see the 60-2 timing wheel which tells the Gotech unit's hall sensor where the engine is in relation to crank angle.
Image


Now you can see the engine with the pulley, hall sensor and the distributor plug installed
Image

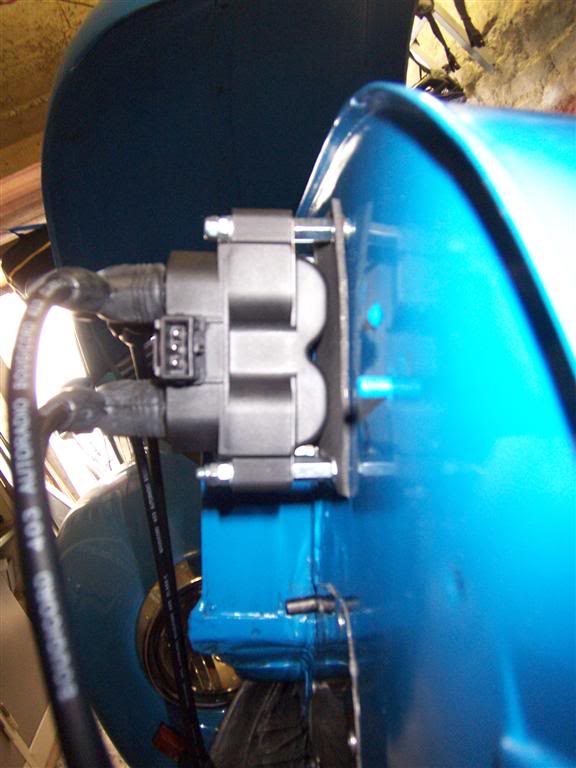
Then it was time for the coil pack to be mounted.
The coil comes from an early 16V Opel. it is a twin coil pack designed to run in wasted spark mode. The term wasted spark describes the spark event and in this case one spark is wasted. Coils designed for this have 2 spark plug leads attached to each coil, so it fires two cylinders at the same time. One of these cylinders is the cylinder that need spark, the other is busy in its exhaust stroke (this is the spark that is wasted). So with the beetle having a 1-4-3-2 firing order, cylinders 1&3 are connected to the same coil and 2&4 are connected to the other.
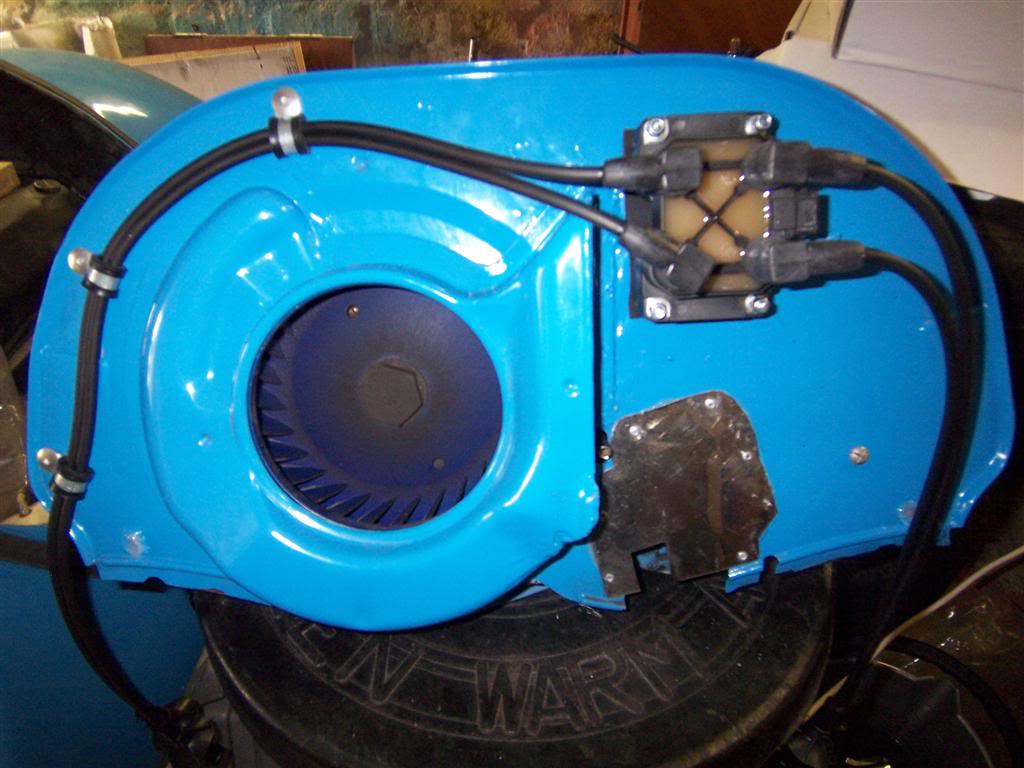
I mounted the coil to the back of the fan housing and mounted the spark plug wires to the housing to for a clean look. I'll tell you what though, using riv-nuts without a riv-nut gun is quite the accomplishment, but I got it right.
Here you can nicely see the twin coil pack
Image

I am actually proud of the way I ran the plug wires - not once do they cross each other. Running side by side all the way from the coil until they separate to attach to the plugs.
Image

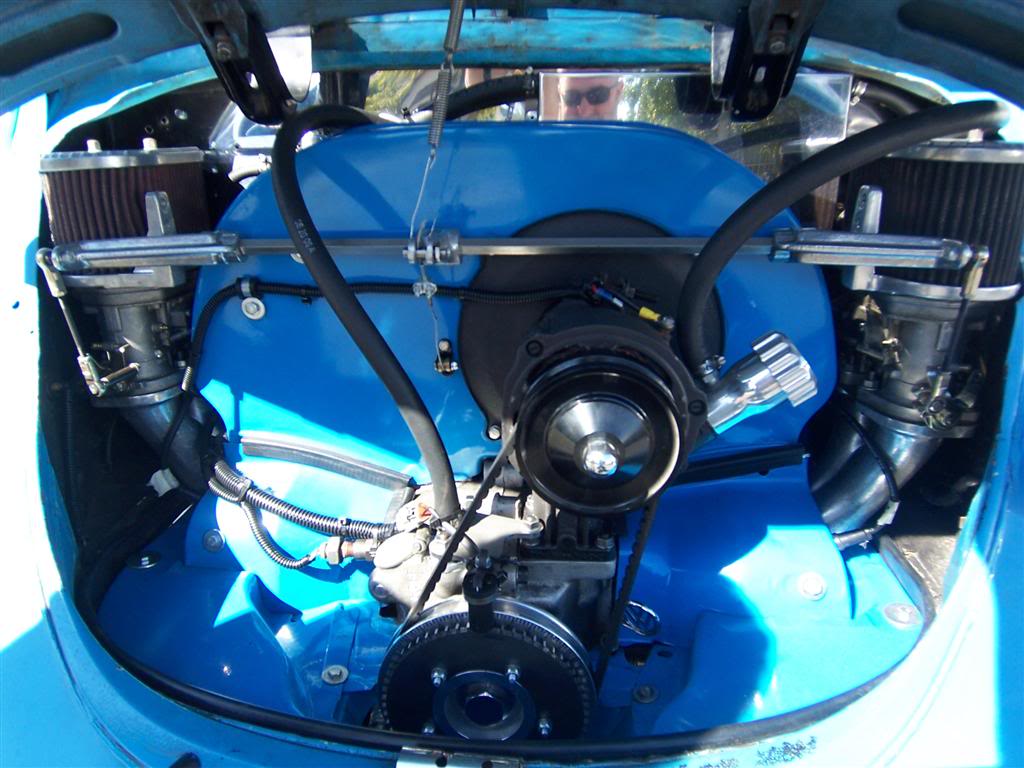
From there, it was a point of installing the exhaust and all the fuel lines.
Then running all the electrics from the Gotech unit into the engine bay. After that, I finished assembling the cooling tin and the rest of the engine bay.

Connecting the Gotech to my laptop was an issue all in its own - thanks Windows. But I did finally get it going.
I made some rough timing maps. I turned the key and the engine started on its first try. Wow was I impressed. It took me a little getting used to the tuning program, but after a while I had it going (more or less). The timing is now set perfectly at idle. The beauty is that I can run one set of timing for startup and another timing point at idle. I still have a lot of work to do to get my full timing map set up correctly, but thats a project for next holiday.

Before the Gotech install, the bug would barely make it to 5800rpm in second and nothing above 5000 in 3rd after starting in first gear and putting my foot flat on the floor. Now I can smash it through 1st, 2nd and 3rd - hitting 135 in 3rd at just under 6000 with the bug still pulling like a banshee.

Pic of the engine bay as it looks now
Image


Then on to the interior. I ran another power lead from the battery to the front of the car. This is fused at the battery and connects to a new fuse box via a relay which only closes when the ignition is started. All my gauges now have their own fuse. Fuel pump, tachometer and radio now also have their own fuses, as does lambda sensor and anything else in the front that needs a fuse. The Gotech system is still lying loose in the back at the moment because I am still busy with wiring. It is plugged into battery through a fuse now. I have an ignition on signal from the switch operating a relay which switches on the Gotech module. I also have an immobilizer to install next time I get home.

But for now, I am back at work and sitting on a ship. So the bug is parked up and resting until I get home again. More planned for next time.

Re: My bug - ANGRRR - the ongoing project (new name)

Posted: Thu Apr 14, 2011 8:31 pm
by TonyE
Looks good . :hangloose:

Re: My bug - ANGRRR - the ongoing project (new name)

Posted: Fri Apr 15, 2011 7:56 am
by Ron&Gill
Pfft... Work, it always gets in the way of fun... :mrgreen:

I like the engine bay, all nice and clean. Very neat.

Re: My bug - ANGRRR - the ongoing project (new name)

Posted: Fri Apr 15, 2011 8:51 am
by flatfourfan
damn that's clean......................nice work.