Hot Wheels 2 - Pine's new Buggy build thread
-
Blitzkrieg
- ACVWSA Junkie
- Posts: 10784
- Joined: Wed Mar 07, 2007 10:41 am
- What model do you have?: none
- Location: Johannesburg
- Has thanked: 91 times
- Been thanked: 44 times
Re: Pine's Buggy (Hot Wheels 2?) thread
I just wet my pants after seeing all these chassis pictures!! It was a really good buy hey. I see so many blitzable bits there 
If it's too low, you're too old 
-
Pine
- ACVWSA Junkie
- Posts: 15036
- Joined: Sun Sep 18, 2005 5:54 pm
- What model do you have?: Oil on the driveway
- Location: Wilderness
- Has thanked: 235 times
- Been thanked: 234 times
- Contact:

Re: Pine's Buggy (Hot Wheels 2?) thread
On the IRS chassis I stripped tonight, both washers were on the outer side as well. This should be as they were installed in the factory.Tom Bishop wrote:
Question?> Where do the 2 washers go. Some books indicate one on each side of the bush while other indicate both on the outer side.
-
Chris
- ACVWSA Junkie
- Posts: 11732
- Joined: Sun Jun 10, 2007 11:02 pm
- What model do you have?: Beach Buggy
- Location: Port Elizabeth
- Been thanked: 1 time
Re: Pine's Buggy (Hot Wheels 2?) thread
Can't that pan be used to build an automatic buggy?
Damn,I'm good!
Beach Buggy (Running and now Aircooled!)
VW TDi DC
Jetta V TDi
Beach Buggy (Running and now Aircooled!)
VW TDi DC
Jetta V TDi
-
Pine
- ACVWSA Junkie
- Posts: 15036
- Joined: Sun Sep 18, 2005 5:54 pm
- What model do you have?: Oil on the driveway
- Location: Wilderness
- Has thanked: 235 times
- Been thanked: 234 times
- Contact:
Re: Pine's Buggy (Hot Wheels 2?) thread
I thought of that myself, but you have to keep in mind that the Type 3 chassis has a different shape than that of a Type 1 Beetle chassis, so you would have to to make some serious modifications. Also the tunnel is more squared-off, and buggy shells are typically moulded to fit the round tunnel of a Beetle. And then there is also the question of sourcing the auto 'box...Chris wrote:Can't that pan be used to build an automatic buggy?
-
Bugger
- Advertiser

- Posts: 7951
- Joined: Fri Jun 09, 2006 6:25 pm
- What model do you have?: a Few Models
- Facebook: Pierre Bugger Eksteen
- Location: Johannesbirg
- Has thanked: 19 times
- Been thanked: 58 times
Re: Pine's Buggy (Hot Wheels 2?) thread
Adapterplates Available for Rotary in Beetle and others aswell
And Special Boxes built for Rotary Conversions and Scubies
Pierre
082 600 8663
CLick on Banner Below to be routed to the Web site

And Special Boxes built for Rotary Conversions and Scubies
Pierre
082 600 8663
CLick on Banner Below to be routed to the Web site
-
Pine
- ACVWSA Junkie
- Posts: 15036
- Joined: Sun Sep 18, 2005 5:54 pm
- What model do you have?: Oil on the driveway
- Location: Wilderness
- Has thanked: 235 times
- Been thanked: 234 times
- Contact:
Re: Pine's Buggy (Hot Wheels 2?) thread
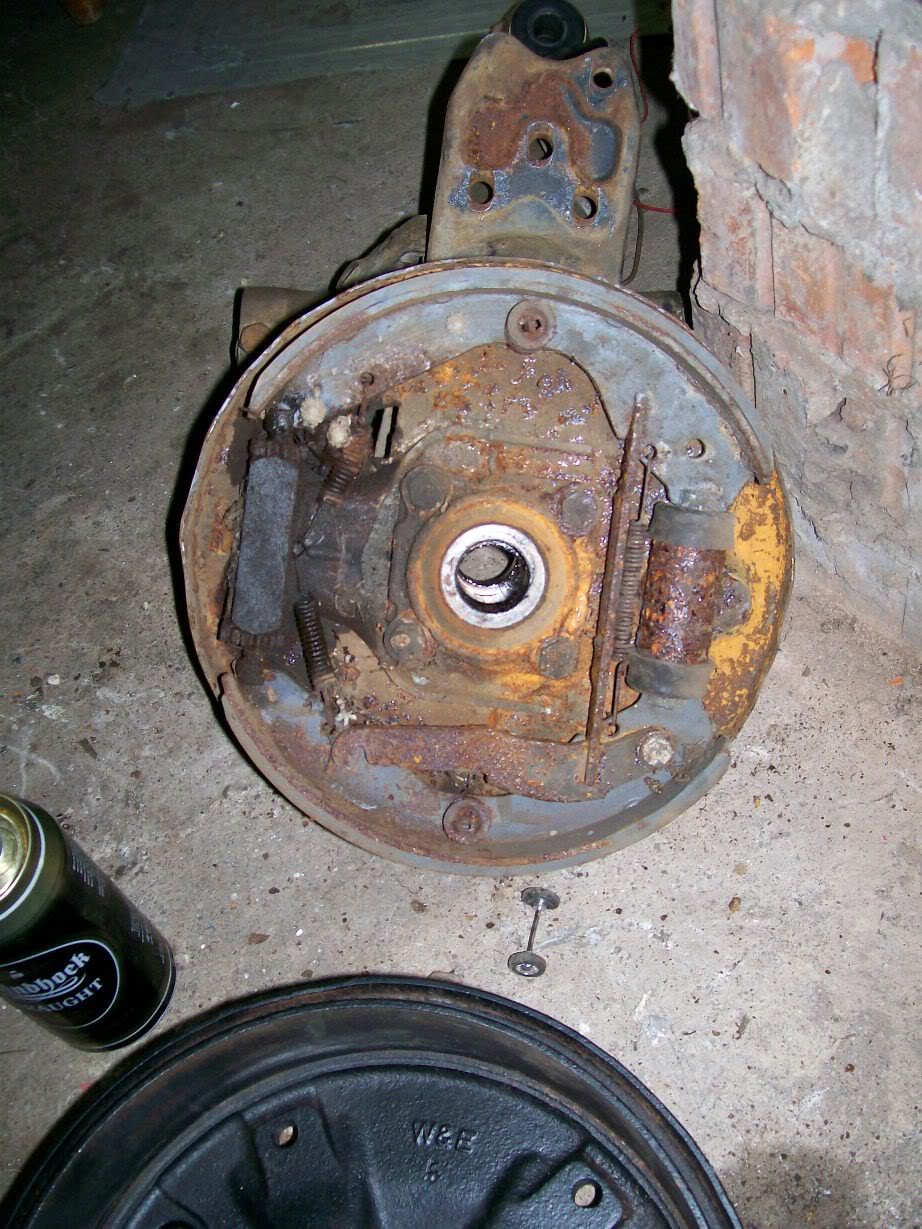
Update 07/03/09: Rear brakes - completed, at last!
Got the rear brake backing plates back from the powder coaters yesterday. The reason why I chose this finish was because it wont be attacked by brake fluid (compared to a sprayed backing plate) if one of the slave cylinders leaks. So the rear brakes are now sorted out, from this
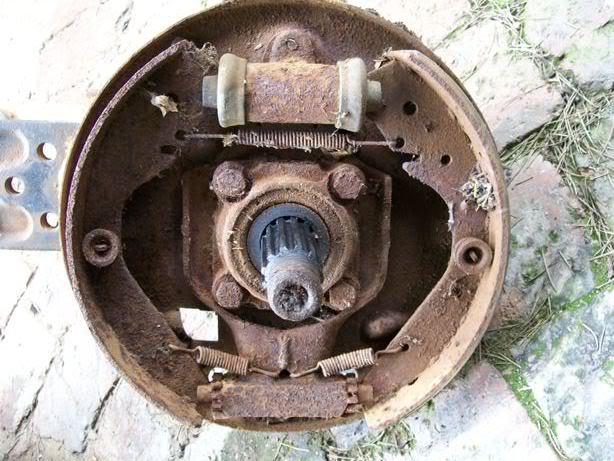
to this
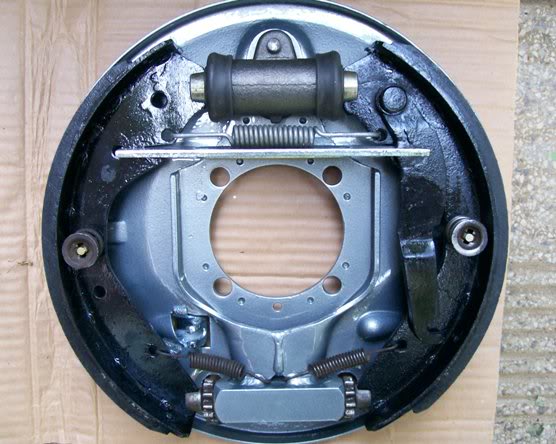
In the pic above
- powder coated backing plate
- new slave cylinder
- re-bonded brake shoes (although I spent some time to carefully wirebrush all the rust off the brake shoes, the brake guys did not do a great job in painting the metal parts of the shoes black)
- electroplated handbrake link and handbrake cable bracket
Plans for coming week:
This is going to be a short week as Teresa and I are flying down to George on Thursday morning for my folks' 60th birthday celebrations, and we are only coming back on Monday evening, the 16th March. I will however try to completely strip the ('new') Type 3 IRS trailing arms in the next few days so that they can be handed in for sandblasting & powder coating. Only when that is completed, can the rear axles, bearings and brakes be installed. Once the rear suspension is completed, the focus will shift to the front suspension - i.e. the welding of the lowering brackets, king/link pins, tie-rod ends, steering box, front disk brake conversion. This might take several week, as it goes together with some more $$$ spending - opening the (already empty) wallet everytime to throw more money into this project is probably the least pleasant experience.... but as my dad always said 'jy het 'n lat vir jou eie gat gepluk' (something like you chose the cane for your hiding yourself)
Got the rear brake backing plates back from the powder coaters yesterday. The reason why I chose this finish was because it wont be attacked by brake fluid (compared to a sprayed backing plate) if one of the slave cylinders leaks. So the rear brakes are now sorted out, from this
to this
In the pic above
- powder coated backing plate
- new slave cylinder
- re-bonded brake shoes (although I spent some time to carefully wirebrush all the rust off the brake shoes, the brake guys did not do a great job in painting the metal parts of the shoes black)
- electroplated handbrake link and handbrake cable bracket
Plans for coming week:
This is going to be a short week as Teresa and I are flying down to George on Thursday morning for my folks' 60th birthday celebrations, and we are only coming back on Monday evening, the 16th March. I will however try to completely strip the ('new') Type 3 IRS trailing arms in the next few days so that they can be handed in for sandblasting & powder coating. Only when that is completed, can the rear axles, bearings and brakes be installed. Once the rear suspension is completed, the focus will shift to the front suspension - i.e. the welding of the lowering brackets, king/link pins, tie-rod ends, steering box, front disk brake conversion. This might take several week, as it goes together with some more $$$ spending
-
Pine
- ACVWSA Junkie
- Posts: 15036
- Joined: Sun Sep 18, 2005 5:54 pm
- What model do you have?: Oil on the driveway
- Location: Wilderness
- Has thanked: 235 times
- Been thanked: 234 times
- Contact:
Re: Pine's Buggy (Hot Wheels 2?) thread
While on the topic of of rear brakes, you will notice on this (parts catalogue pic) of an IRS VW rear brake backing plate that it has four large holes at the bottom. Two of them are used to access the star-shaped adjusters (no more taking off the wheel to adjust the brakes, like on a Beetle) and two of them are for inspection of the thickness of the brake shoe lining.
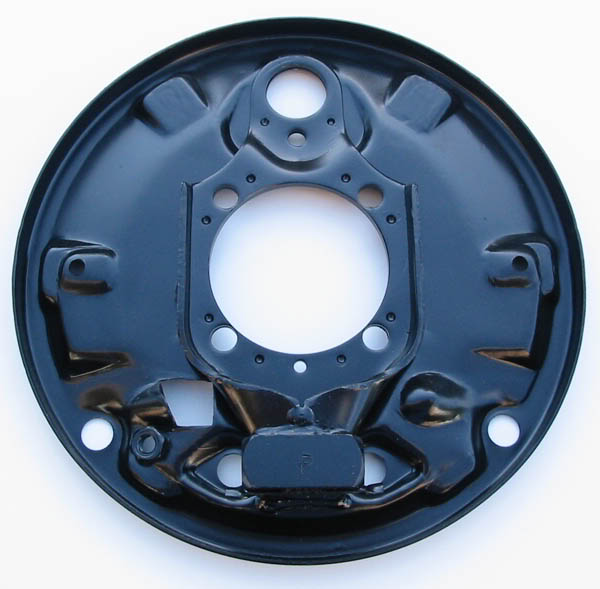
These holes need to be covered when not used, to prevent dust/mud/water/gunk from entering the brake setup. I am looking for the correct rubber plugs to cover these holes, as in pic below. The Type 4, however, has two of these plugs joined into one unit, thus decreasing the risk of losing them on the road. Does anyone know where I can get some NOS plugs, or good used ones?
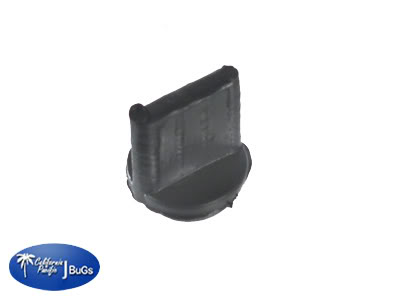
These holes need to be covered when not used, to prevent dust/mud/water/gunk from entering the brake setup. I am looking for the correct rubber plugs to cover these holes, as in pic below. The Type 4, however, has two of these plugs joined into one unit, thus decreasing the risk of losing them on the road. Does anyone know where I can get some NOS plugs, or good used ones?
-
Pine
- ACVWSA Junkie
- Posts: 15036
- Joined: Sun Sep 18, 2005 5:54 pm
- What model do you have?: Oil on the driveway
- Location: Wilderness
- Has thanked: 235 times
- Been thanked: 234 times
- Contact:
Re: Pine's Buggy (Hot Wheels 2?) thread
Thanks Friekske, but since I'm on a shoestring budget I'll see if I can get used ones first (here in SA)
Update 11/03/09
Not a lot has happened the past week but I stripped the Type 3 IRS trailing arms the weekend. Getting the rusted 4-stud drums off was quite a mission, but eventually I succeeded. In spite of the very bad rust, the brake shoes are in quite a good condition. Won't use this rear brake setup now, but keep it for the future.. they are hard enough to source in any condition.
I was still a bit worried that the handbrake plates of the Type 3 are gonna differ from the Type 1's I had plated, and installed already, but I compared the two and they were exactly the same (still no left of right plates, all side same side)
I gave the two trailing arms in for sandblasting on Monday afternoon, and got them back yesterday morning - as new as the day they were made in the factory. (Haven't taken pics yet) I'll have them powder coated, but I first need to cover the bush casing as well as the bearing housing, so that it does not get powder coated as well (the backing plates are quite a tight fit, so they need to be clean)
Off to George tomorrow morning, coming back Monday afternoon - so no work on the buggy this weekend.
-
beetlefanatic

- Donor

- Posts: 3014
- Joined: Wed Jan 30, 2008 9:59 am
- What model do you have?: Late Bay, Syncro x 2
- Location: Pretoria
- Has thanked: 8 times
- Been thanked: 12 times
Re: Pine's Buggy (Hot Wheels 2?) thread
Looking Pine. 
Have a good trip.
Have a good trip.
The only substitute for cubic inches are more cubic inches.
-
Pine
- ACVWSA Junkie
- Posts: 15036
- Joined: Sun Sep 18, 2005 5:54 pm
- What model do you have?: Oil on the driveway
- Location: Wilderness
- Has thanked: 235 times
- Been thanked: 234 times
- Contact:
Re: Pine's Buggy (Hot Wheels 2?) thread
Back from Paradise, so the Buggy build can proceed. Gave the two trailing arms in for powder coating at around 10:00 this morning, got a call at 15:30 this afternoon to come and fetch it. I am speechless 
Will go and fetch it hopefully tomorrow, if time permits (and post pics!)
Will go and fetch it hopefully tomorrow, if time permits (and post pics!)
-
buggyfan

- Long Block
- Posts: 2979
- Joined: Wed Mar 12, 2008 2:26 am
- What model do you have?: lwb beachbuggy
- Location: newlands,jhb
- Has thanked: 95 times
- Been thanked: 87 times

Re: Pine's Buggy (Hot Wheels 2?) thread
i remember seeing some of them but cant remember where ,until i removed my type1 front suspension!!!!!These holes need to be covered when not used, to prevent dust/mud/water/gunk from entering the brake setup. I am looking for the correct rubber plugs to cover these holes, as in pic below. The Type 4, however, has two of these plugs joined into one unit, thus decreasing the risk of losing them on the road. Does anyone know where I can get some NOS plugs, or good used ones?
oh by the way pine ,they came of hw1s front suspension .
You do not have the required permissions to view the files attached to this post.
http://www.aircooledvwsa.co.za/viewtopi ... tt#p269451" onclick="window.open(this.href);return false;
-
Pine
- ACVWSA Junkie
- Posts: 15036
- Joined: Sun Sep 18, 2005 5:54 pm
- What model do you have?: Oil on the driveway
- Location: Wilderness
- Has thanked: 235 times
- Been thanked: 234 times
- Contact:
Re: Pine's Buggy (Hot Wheels 2?) thread
Update 22/03/09
After spending the weekend at IMPI, the chassis is 99% complete. A few small more welds, and it can be sandblasted, galvanised and powder coated. As explained before, an entire 'space frame' was built around the center tunnel, adding strength and rigidity (is there such a word? ) to the chassis, that has been shortened by exactly 381mm
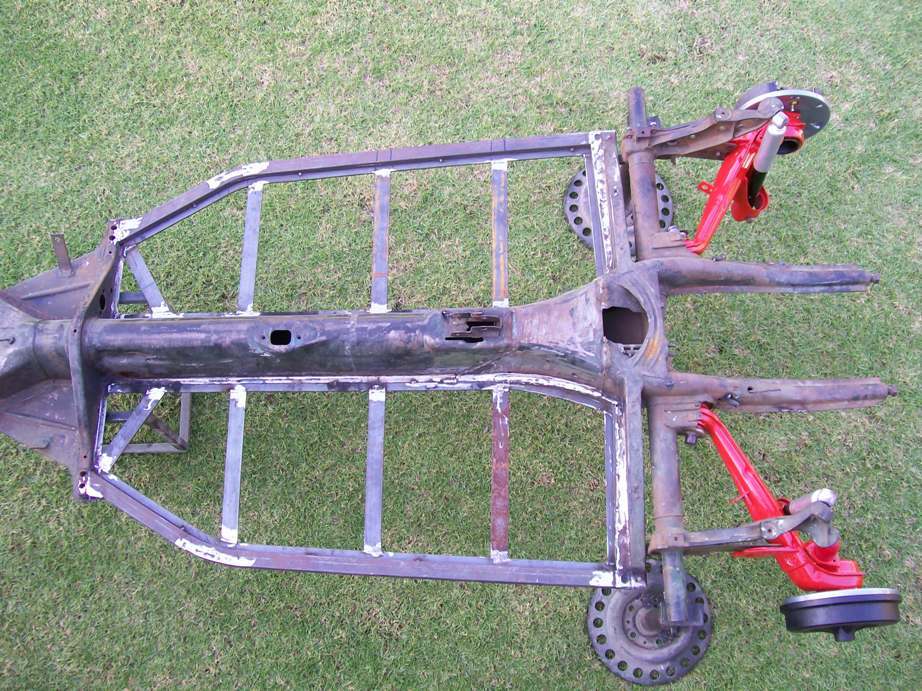
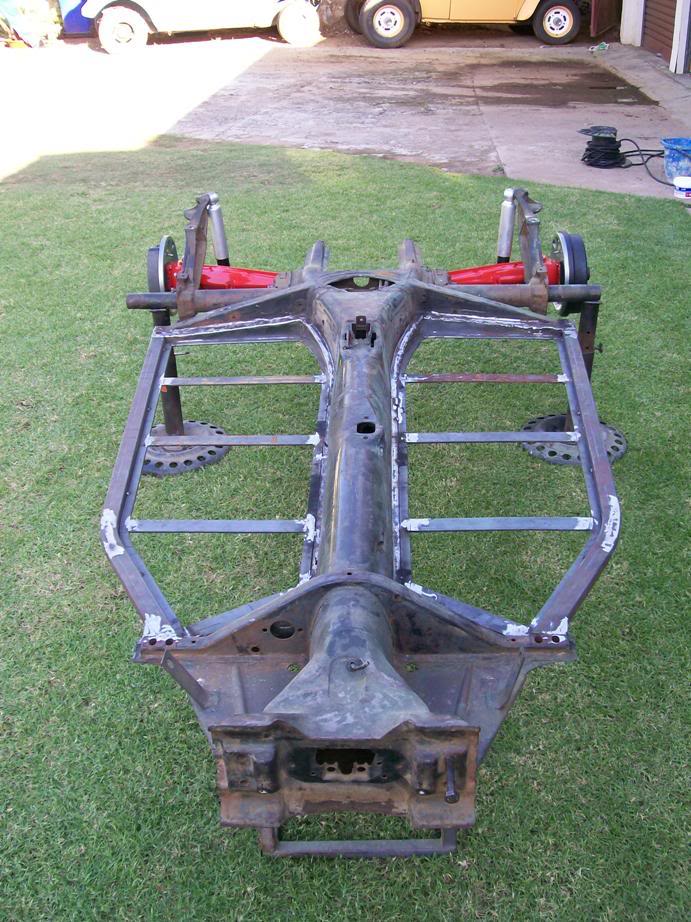
I also trial-fitted the freshly powder coated trailing arms on the chassis and fitted the Urethane bump stops. The shocks are original Type 3 rears (have a VW logo and a 311- part number), but they will be replaced by new ones.
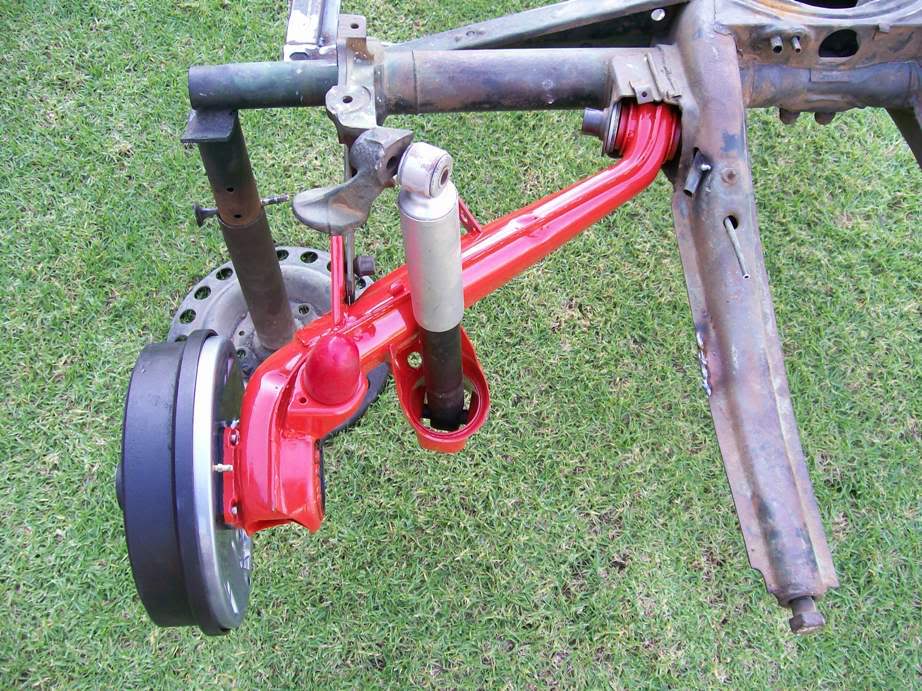

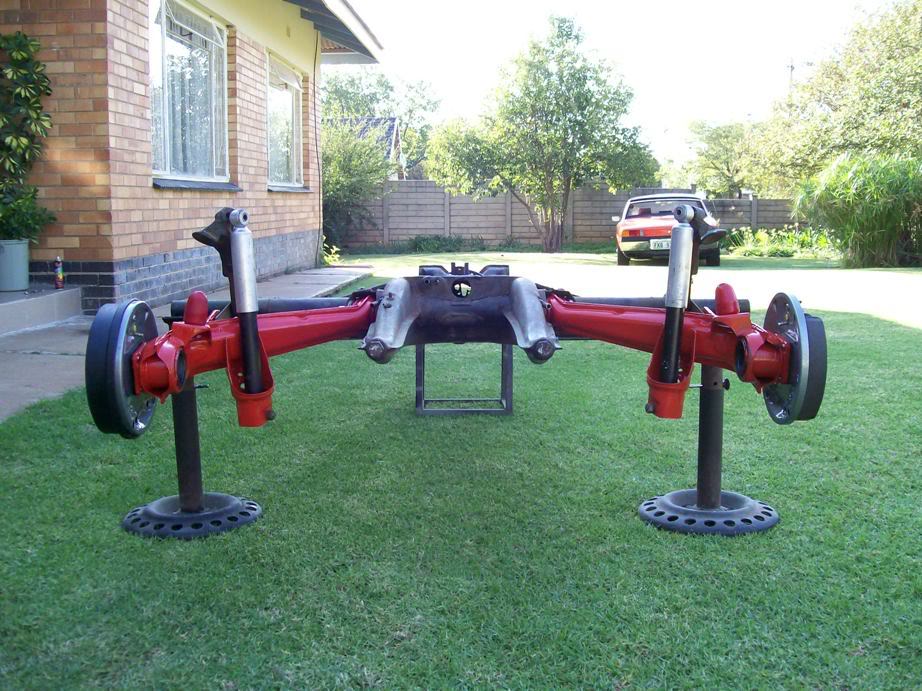
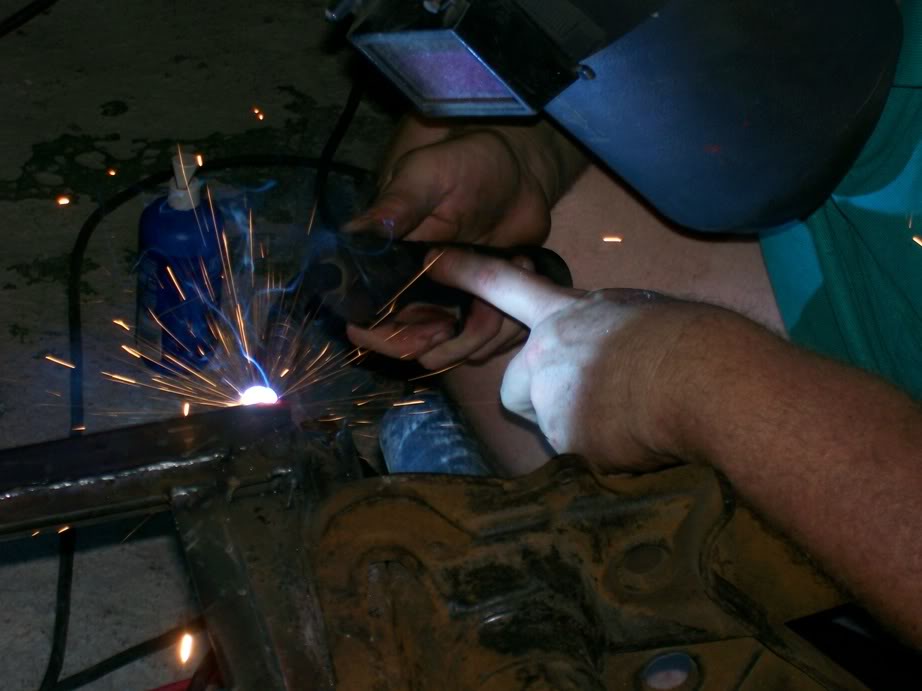
A huge thanks to Armand who spent most of his Saturday behind a welder's mask
After spending the weekend at IMPI, the chassis is 99% complete. A few small more welds, and it can be sandblasted, galvanised and powder coated. As explained before, an entire 'space frame' was built around the center tunnel, adding strength and rigidity (is there such a word?
I also trial-fitted the freshly powder coated trailing arms on the chassis and fitted the Urethane bump stops. The shocks are original Type 3 rears (have a VW logo and a 311- part number), but they will be replaced by new ones.
A huge thanks to Armand who spent most of his Saturday behind a welder's mask
-
Chris
- ACVWSA Junkie
- Posts: 11732
- Joined: Sun Jun 10, 2007 11:02 pm
- What model do you have?: Beach Buggy
- Location: Port Elizabeth
- Been thanked: 1 time
Re: Pine's Buggy (Hot Wheels 2?) thread
Now I'm jealous!
Looking great Buddy!
Looking great Buddy!
Damn,I'm good!
Beach Buggy (Running and now Aircooled!)
VW TDi DC
Jetta V TDi
Beach Buggy (Running and now Aircooled!)
VW TDi DC
Jetta V TDi