Page 44 of 68

Re: Hot Wheels 2 - Pine's new Buggy build thread

Posted: Thu Dec 10, 2009 9:32 pm
by Pine
Thanks, guys - for now the engine will stay as is, except for the EMPI valve covers that I still have to put on. Will probably also go the degree pulley route, as I have decided against fitting the Badger aluminium fanbelt cover - I trial-fitted it, and it obstructs the dipstick, making it difficult to remove. Also fitted an EMPI billet aluminium sump plate last week, the old metal sump plate seemed a bit warped, and I don't want oil leaks! :mrgreen:

Image

Will try to sort out the brakes in the next week, and as soon as I get the gearbox back from Bugger, it will be installed, and the engine can go onto the chassis. Next big expenditure will then be 4 x new CV's and a new clutch (got a quote for around R 1000 last week, I thought clutches were cheaper? :shock: )

Re: Hot Wheels 2 - Pine's new Buggy build thread

Posted: Thu Dec 10, 2009 9:37 pm
by Farhaad
they are all a bunch of liars. there is no such thing as cheap
:twak:

Re: Hot Wheels 2 - Pine's new Buggy build thread

Posted: Fri Dec 11, 2009 8:24 am
by IMPI
If you compare that clutch to a Nissan Navvarra at R18000 then maybe it is cheap or my favorite the Ferrari formula1 at around a Million a pop then that clutch is mighty cheap
Armand

Re: Hot Wheels 2 - Pine's new Buggy build thread

Posted: Fri Dec 11, 2009 11:51 am
by Pine
Less than two years ago I paid between R 500 and R 600 for this clutch kit - was very happy with the quality, and did not have any problems. My question is, if it is possible that the same clutch can almost DOUBLE in price since then??

...don't waste your money on offshore investments, buy clutch kits locally and store them :?

Image

Image

Image

Re: Hot Wheels 2 - Pine's new Buggy build thread

Posted: Fri Dec 11, 2009 12:40 pm
by hitlers revenge
My last LUK Clutch was R750 so I dont think R1000 is a bad price today.

Re: Hot Wheels 2 - Pine's new Buggy build thread

Posted: Mon Dec 14, 2009 11:07 pm
by Pine
Update 14 Dec 09:

Between Saturday and today, I got all the plumbing needed for the brakes - it is A LOT of pipes, but in a nutshell :shock:

- 2 x standard male to female brake hoses from the callipers inwards
- 2 x galvanised clips to secure the rubber hoses to the chassis mounts
- 1 long, 1 short steel pipe from the front hoses to the m/c
- 1 shortened centre steel line, running on the right-hand side of the transmission tunnel, to the rear

(this is where it gets interesting)

- from the center steel line, to the r/h T-piece
- one arm of the T to a custom short male to female rubber hose (IRS, remember - standard Beetle short hoses are female to female)
- rubber hose to r/h rear steel line, running on the trailing arm to the r/h rear slave cylinder
- other arm of the r/h T-piece to a steel line, jumps accross the gearbox, to the l/h T-piece
- 2 x galvanised clips to secure the rubber hoses to the trailing arm mounts (total of 4, instead of normal 6 on a Beetle)
- center of l/h T-piece blocked off
- other arm of l/h T-piece goes to short another custom male to female rubber hose
- from the short rubber hose, another steel line on the l/h trailing arm to the l/h rear slave cylinder

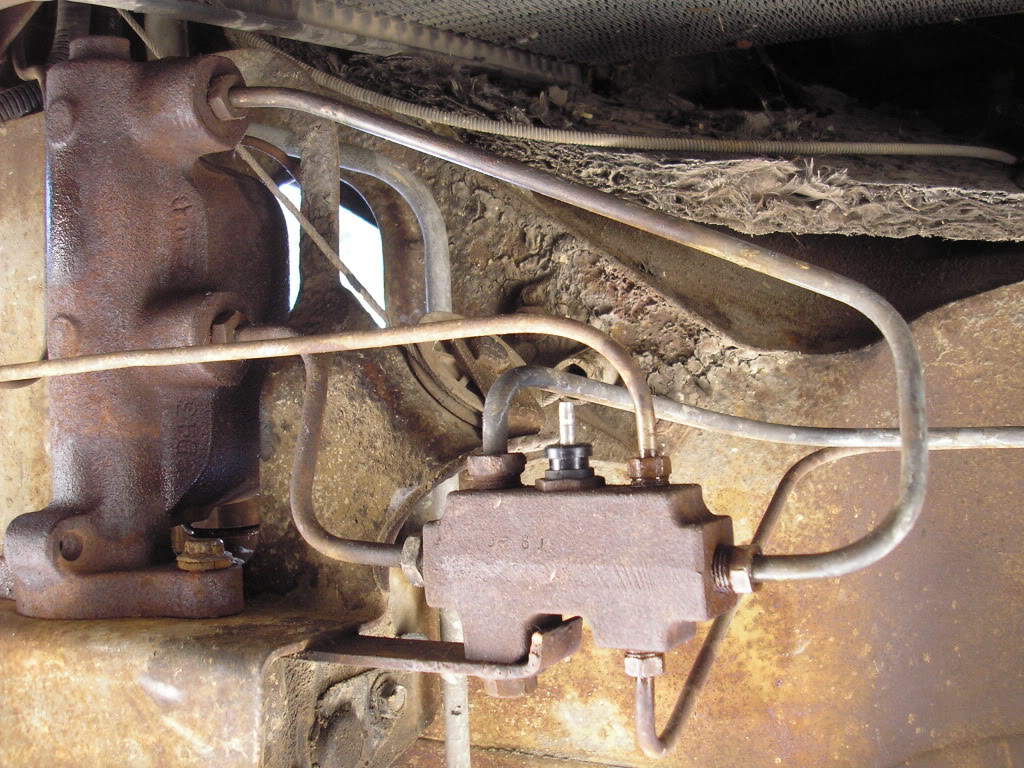
The master cylinder is an early Citi unit, dual stage, with a matching reservoir that fits snugly on top of the m/c rubber grommets. The m/c has no less than EIGHT (8) holes! :shock:

After some dry-fitting, this is how I plan to route the plumbing from the 8 holes of the m/c:

Front stage

Top - fluid reservoir front chamber
Left - l/h brake calliper
Bottom - r/h brake calliper
Right - brake switch

Rear stage

Top - fluid reservoir
Left - blanked off (against the transmission tunnel anyway)
Bottom - blanked off
Right - rear brake circuit

The front left part of the m/c is also very close to the transmission tunnel, so IMPI suggest that I route the steel line of the l/h calliper through the tunnel, instead of jumping it accross, like a standard Beetle. This seems like a good suggestion, I only need to get some rubber grommets for where the steel line goes through the tunnel, after drilling two holes through it.

I am halfway through the fitting of all the lines, but the darkness caught me, will probably continue tomorrow, first need to spray the master cylinder though (hope the sun shines tomorrow afternoon!), as it is currently bare metal and will rust on the outside with the slightest moist...

After all the plumbing is connected, the next big step will be to bleed the brakes, I am a little bit worried about the rear slave cylinders, as I couldn't find the correct Type 3 ones, for the wider rear Type 3 drums and backing plate. The issue is that the bleeding nipple is now below the steel line (Beetle slave cylinders), so I just hope a bubble doesn't get cought somewhere it can't get out. Another option will be to bleed the rear brakes from behind :shock: - but I have never done that before.

The advantage of the dual circuit system is that the front and the rear brakes will work completely independently, so if one circuit fail, the other will still work 100%.... in other words no sickening feeling of slamming on brakes, only to find there aren't any :shock:

Pics to follow soon....

Re: Hot Wheels 2 - Pine's new Buggy build thread

Posted: Mon Dec 14, 2009 11:24 pm
by Chris
I don't believe a f#rkin word!

Re: Hot Wheels 2 - Pine's new Buggy build thread

Posted: Tue Dec 15, 2009 12:05 am
by Mr9A
R1000 for a clutch kit is :surprised: i paid R700 for my master clutch clutch kit in benoni :lol:

And any progress pcs :D

Re: Hot Wheels 2 - Pine's new Buggy build thread

Posted: Tue Dec 15, 2009 12:21 am
by Pine
Chris wrote:I don't believe a f#rkin word!
Image

Re: Hot Wheels 2 - Pine's new Buggy build thread

Posted: Tue Dec 15, 2009 12:55 am
by karmakoma
Interesting setup, I am used to the usual beetle and golf MC's. Thanks for the pic, now we almost believe you.
Except for the fact that your car's pan looked a lot cleaner and neater, you mentioned you were going to spray it, and since when do you have a turbovan ?

Re: Hot Wheels 2 - Pine's new Buggy build thread

Posted: Tue Dec 15, 2009 10:32 pm
by Dutch_Diver
That's a first.....I used to believe a picture painted a 1,000 words, but this is the first time for me that the words made more sense than the pictures WTF!!!! :shock:

Re: Hot Wheels 2 - Pine's new Buggy build thread

Posted: Wed Dec 16, 2009 6:36 am
by IMPI
Pine look at the orientation of the front wheel cylinders they are now at the back and will bleed properly

Re: Hot Wheels 2 - Pine's new Buggy build thread

Posted: Fri Dec 25, 2009 8:30 pm
by Pine
Update 25/12/09

Blew the entire Christmas bonus on the last few parts, burned the midnight oil the past 96 hours - and I'm done!

Took the buggy to the beach today :callook: , and it immediately caught the eye of some seat covers! :flash:

Image

Re: Hot Wheels 2 - Pine's new Buggy build thread

Posted: Fri Dec 25, 2009 8:34 pm
by 69bug
You're allowed to dream!! but we know your buggy will look better and attract more attention!!

Re: Hot Wheels 2 - Pine's new Buggy build thread

Posted: Fri Dec 25, 2009 8:54 pm
by Pine
69bug wrote:You're allowed to dream!! but we know your buggy will look better and attract more attention!!
Thanks, André - but there is still A LOT of work (and dreaming) to be done...

Image

But seriously, since I spent the day alone anyway, I did indeed do some work on the buggy. Got the gearbox back in the week (thanks Bugger), so I hooked the compressor up this morning, masked the gearbox, and sprayed all the bare metal bits black, to prevent it from rusting. Put the urethane gearbox mounts back on, and the gearbox into the chassis again. Also put the engine back in (although I still need to get the clutch), and started it - just to hear the sound! :hangloose:

Also completed the plumbing for the brake system, after I drilled two holes both sides of the front part of the tunnel, for the LH front calliper steel pipe to go through. I forgot to buy brake fluid, and obviously no place was open today, so I couldn't bleed the brakes.

Will take and post pics tomorrow... Image