Kestrel Buggy Rodification

Give details and pictures of your ACVW projects here.
User avatar
Retro13
Oil Leak
Posts: 85
Joined: Fri Jan 11, 2013 8:56 am
What model do you have?: Kestrel Buggy
Location: Germiston
Has thanked: 7 times
Been thanked: 3 times

Kestrel Buggy Rodification

Post by Retro13 »

Greetings all :hangloose:

After much procrastinating I've decided to start my own project thread and show you guys what I've been up to with the rebuild of my Kestrel buggy. First, a bit of gen:

The story of how I came to own this car is (to me at least) very interesting. My friend's dad, an internationally acclaimed artist, decided to take a bit of a road trip down to Plettenberg Bay with his younger son. Unfortunately, they were involved in a terrible accident near Graaff-Reinet. They escaped largely unscathed, but the car was a total wreck. However, instead of throwing in the towel, they decided that they would buy the cheapest car they could find and continue with the trip. The car they bought was a tatty blue VW beach buggy. With the deal done and the paperwork sorted, they were on their way again, albeit at a much more leasurely pace. Although the car had been sold with a roadworthy certificate, it was anything but. Several breakdowns and close shaves later they finally arrived in Plett, with their lives considerably shortened. The car was parked up at a family home and they decided to return back to Jo'burg by plane. My friend made the trip down a few weeks later to recover the car with his sturdy Land Rover Defender.
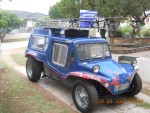
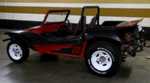
Once the car was back in Jo'burg my friend started disassembling the buggy with the intention of building a sort-of rail car from it, and subsequently chucked away a lot of the rusty tin-ware and seats. However, a '68 Alfa Duetto Spider found its way home and the buggy was sidelined. Eventually, tired of the buggy being in the way, they offered it to me for a very low price, just to get rid of it. Sadly, I didn't have the readies at the time to even afford the bargain price and reluctantly declined. A few hours later they called me back and said if I was prepared to sort out the paperwork the car was mine. Naturally I accepted and a while later, on my birthday, the car was towed to my house. And this is what I got as a present:
IMG_2148 (Medium).JPG
IMG_2149 (Medium).JPG
IMG_2150 (Medium).JPG
IMG_2152 (Medium).JPG
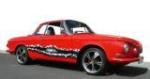
I initially thought I'd do a quick fixer-upper in a 70's style, with orange metalflake paint and white steel mags, but after much head scratching and soul searching, I've decided to combine this build with my love of old skool (read period correct) hot rods. This means a solid, no frills colour, stock steel wheels, white walls and lots of period style accessories. Here's what I've got in mind:

For the colour, I've drawn inspiration from my beloved Honda Mini Trail (monkey bike) and decided to paint the car in the same Honda Phoenix yellow and VW Ivory White. The ivory white will make its way onto the windscreen, roll bar and some of the interior parts, such as the gear lever and seat frames etc.
IMG_4336 (Medium).JPG
Image2274 (Medium).jpg
387512_10150412095951713_282140182_n.jpg
The wheels will be standard steelies painted red, with Smart car tyres in the front and slightly widened steelies with 205's at the back, obviously with the obligatry chrome hub caps and wide band white walls.
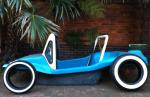
Something like this:
12542782006I5kGla.jpg
IMG_4519 (Mobile).PNG
So that's the plan. I'll post some progess pictures shortly, but if you've got any ideas, suggestions or helpful hints, I'd love to hear from you.

Ciao
T!M
You do not have the required permissions to view the files attached to this post.
Never ride faster than your guardian angel can fly...
Pine
ACVWSA Junkie
Posts: 15033
Joined: Sun Sep 18, 2005 5:54 pm
What model do you have?: Oil on the driveway
Location: Wilderness
Has thanked: 231 times
Been thanked: 233 times
Contact:
Netherlands

Re: Kestrel Buggy Rodification

Post by Pine »

What an exciting project! :hangloose: Can't wait to see the progress, really like your ideas. Do you have a canopy for it as well?

Click on the link below for some Kestrel pics I have posted on TheSamba -

:arrow: http://www.thesamba.com/vw/forum/album_ ... ts=summary
User avatar
Ron&Gill
Full-time Bug Nutter
Posts: 4054
Joined: Fri Aug 29, 2008 4:16 am
What model do you have?: Type 1, 21b, 34, 316
Location: St Lucia KZN/Cameron LA
Has thanked: 1 time
Been thanked: 21 times
Netherlands

Re: Kestrel Buggy Rodification

Post by Ron&Gill »

Your bug looks exactly like my first one, Blou Gemoerte, with the only exception being the Smith wheels and the rear lights, mine were the rectangular clusters. I had standard beetle rims in white. Yokohama Superdiggers on the back... Mine had a bootlid cut into the front which allowed for easy access to the fuel tank. It had a 1300 twin port engine and it was a demon on Grotto beach, Modder rivier mond, Springfontein, Waaisand and Blouberg. Sold it in 1998. One thing that impressed me about these buggies, is the thickness fibreglass of the body. They are tough. The stories I can tell about the adventures I had in that buggy. Hahaha!!

Enjoy, you have a class toy there.
1964 T34 - The Razor: viewtopic.php?f=23&t=10290
1956 T2 1b - Gill's bus: viewtopic.php?f=23&t=10948
1967 T316 - viewtopic.php?f=23&t=10931 & viewtopic.php?f=23&t=15977
2000 beach buggy - viewtopic.php?f=23&t=10915
User avatar
MrHappypants
Oil Stain
Posts: 105
Joined: Mon May 28, 2012 2:43 pm
What model do you have?: Baja Bug
Location: P.E
Has thanked: 16 times
Been thanked: 4 times

Re: Kestrel Buggy Rodification

Post by MrHappypants »

Howsit man ... awesome buggy! I love that Kestrel shape! keen to see the progress...
User avatar
Retro13
Oil Leak
Posts: 85
Joined: Fri Jan 11, 2013 8:56 am
What model do you have?: Kestrel Buggy
Location: Germiston
Has thanked: 7 times
Been thanked: 3 times

Re: Kestrel Buggy Rodification

Post by Retro13 »

Thanks for the compliments guys, much appreciated.

Pine, your HW2 build thread was the catalyst for my project and actually inspired me to join up in the first place, so a massive thanks to you. :hangloose: The car never came with the canopy, but to be honest I've never been a fan of the Kestrel's roof arrangement. I've been toying with the idea of sticking a surfboard on top, but will have to see if it would clear my head :lol:

Ron&Gill, you're absolutely right about the thickness of the body; this thing is seriously staunch. I'd love to see a pic of your old buggy if you have any; I'm really curious to see how it looks with the stock wheels.

Thanks again all, I'll post some strip down pics shortly so you can all see what I'll be working with.

Ciao for now.
Never ride faster than your guardian angel can fly...
User avatar
MarshallGTi
Camshaft
Posts: 883
Joined: Wed Feb 01, 2012 4:16 pm
What model do you have?: GTi 16v
Location: Alberton, JHB
Has thanked: 7 times
Been thanked: 11 times

Re: Kestrel Buggy Rodification

Post by MarshallGTi »

cool little buggy, i like where your plan is headed
Ryan Marshall

An ingenius solution to a problem that should have never existed in the 1st place

My Bug http://www.aircooledvwsa.co.za/viewtopi ... 37&t=25752" onclick="window.open(this.href);return false;
3250
User avatar
Retro13
Oil Leak
Posts: 85
Joined: Fri Jan 11, 2013 8:56 am
What model do you have?: Kestrel Buggy
Location: Germiston
Has thanked: 7 times
Been thanked: 3 times

Re: Kestrel Buggy Rodification

Post by Retro13 »

Right, let's get the top off this thing and see what's what...

First job was to free the plastic bit from the rusty bit. This wasn't too difficult as my mate had already previously partially stripped the car. First impressions were "oh dear, maybe there was a reason they wanted to get shot of the car", but in the persuit of knowledge and uncovering the truth, I pressed on. First job: give the poor thing a good wash.
IMG_4169 (Medium).JPG
IMG_4172 (Medium).JPG
IMG_4174 (Medium).JPG
IMG_4176 (Medium).JPG
IMG_4177 (Medium).JPG
IMG_4178 (Medium).JPG
After its first bath in probably 20 years, things looked a lot more promising than first thought. A lot of old grime and gunge was removed, which also revealed a few 'drainage holes'. Not to worry, these can be welded up and painted over. I had initially planned to just patch a few holes and paint the pan with motor and transaxle in situ, but as is always the case, OCC set in and I decided to strip the whole thing and paint it properly. A much better idea as will soon be revealed.

Stay tuned...
You do not have the required permissions to view the files attached to this post.
Never ride faster than your guardian angel can fly...
User avatar
jolas
Donor
Donor
Posts: 4253
Joined: Fri Jul 16, 2010 10:11 am
What model do you have?: '65 Kombi
Location: Klapmuts, Western Cape
Has thanked: 393 times
Been thanked: 173 times

Re: Kestrel Buggy Rodification

Post by jolas »

Congrats, cool buggy, story and pics 8)

Those tail lights don't look so nice, you going to replace them ? Good luck with the rest of the project :hangloose:
by fig » Mar 26, 2018
Sambas in South Africa are good for only 2 things: showing off and sunburn.
User avatar
Retro13
Oil Leak
Posts: 85
Joined: Fri Jan 11, 2013 8:56 am
What model do you have?: Kestrel Buggy
Location: Germiston
Has thanked: 7 times
Been thanked: 3 times

Re: Kestrel Buggy Rodification

Post by Retro13 »

Aah, those tail lights: a true sign of quality. :wink: Yeah, I am most definitely changing the Truck Lamps. That was number one on the agenda during the planning stages and I agonised for ages over what would replace them. All will be revealed, however, in due time, hehehe.

So, I started stripping the chassis of all it's major components. Removing the front suspension revealed a rather nasty surprise: instead of seeing a nice solid bulkhead, I found a big rust hole, a broken stud that had rusted itself vas, and a missing cover that had allowed many years of sand, water, gunge and grime to enter the tunnel. Removing this lot was going to be a fun exercise.
IMG_4217 (Medium).JPG
IMG_4218 (Medium).JPG
Moving aft, some metal cancer had set in on the flanks of the pan, no doubt thanks to the neoprene gasket that had been used to mount the body to the pan. Those of you that do scuba diving will know that neoprene is likes to retain water, which makes getting your wetsuit off a little more interesting and tends to rust holes into the pan of your ancient VW beach buggy.
IMG_4219 (Medium).JPG
IMG_4220 (Medium).JPG
Time to strip back that rubberising and get to bare metal.
IMG_4405 (Medium).JPG
IMG_4406 (Medium).JPG
IMG_4407 (Medium).JPG
IMG_4409 (Medium).JPG
IMG_4410 (Medium).JPG
After the 'success' of wire brushing the pan, I decided to call it quits for the day and tackle the job at a later stage once I had calmed down.
I guess I shouldn't have been surprised but like everything else, it seemed like a good idea at the time.

More after the break...
You do not have the required permissions to view the files attached to this post.
Never ride faster than your guardian angel can fly...
User avatar
Loopy
Oil Cooler
Posts: 318
Joined: Fri Dec 25, 2009 8:15 pm
What model do you have?: Beach Buggy
Location: Brackenfell, Western Cape
Has thanked: 11 times
Been thanked: 6 times

Re: Kestrel Buggy Rodification

Post by Loopy »

Subscribed!

O,that sounds so familiar: "it seemed like a good idea at the time....."

The things we need to go through to become wiser? :TIC:
"What I would suggest is that you draw up a project plan and then prioritise the things you NEED to do linked to the budget you have." by Vader
Truer words have never been spoken...
User avatar
Retro13
Oil Leak
Posts: 85
Joined: Fri Jan 11, 2013 8:56 am
What model do you have?: Kestrel Buggy
Location: Germiston
Has thanked: 7 times
Been thanked: 3 times

Re: Kestrel Buggy Rodification

Post by Retro13 »

I would say it was out of sheer laziness. However, you soon remember that you're only short changing yourself by taking shortcuts. Plus, people will always crit your work; why not do something that you can be proud of. :D

So a new day dawned and with a clear head, I decided that the best course of action would be to strip back the pan entirely and fix and paint it properly.

Starting at the front, I removed all the remaining components, including the pedal cluster, master cylinder and what was left of the brake hoses.
IMG_4521 (Medium).JPG
IMG_4522 (Medium).JPG
Once all the other small bits had been removed, it was time to tackle the oily bits at the back.
IMG_4523 (Medium).JPG
IMG_4525 (Medium).JPG
A few more bolts and I finally had a bare pan.
IMG_4526 (Medium).JPG
IMG_4529 (Medium).JPG
Once I had the loose pan, I set up a bit of a makeshift booth at home (which didn't really work to be honest) and set about attempting to sandblast all the old crap off it using a stand alone blasting pot and a meneer of a blasting gun. However, once again, as with all the best laid plans, the equipment decided that it didn't want to play ball, and kept clogging up. After much fighting and with the sun beating down on me, I eventually managed to blast the worst affected areas of the pan and then coated the entire thing in Deoxidine, which I can highly recommend. This helps to convert any rusty areas and neutralises the bare metal to prevent further corrosion.
This I decided, would be how I would prep the pan before welding all the holes shut. Or so I thought.
IMG_4730 (Medium).JPG
IMG_4732 (Medium).JPG
IMG_4733 (Medium).JPG
IMG_4734 (Medium).JPG
Once this was done, I dragged the pan across to a friend's place in preperation to weld all the cracks and holes closed using his oxy acetylene torch. What followed after that was something of a turning point as far as the pan was concerned, and it will certainly make for a better end result. Stay tuned as all will be revealed.

Ciao for now
T!M
You do not have the required permissions to view the files attached to this post.
Never ride faster than your guardian angel can fly...
User avatar
SouL
Oil Pump
Posts: 208
Joined: Thu Oct 06, 2011 12:28 pm
What model do you have?: Jenna Jameson
Location: Johannesburg
Has thanked: 20 times
Been thanked: 1 time
Contact:

Re: Kestrel Buggy Rodification

Post by SouL »

To be honest won't it just be easier finding a new donor chassis and floor pan?

I can't believe that some people have this much pride in what they do, why even bother with it in the first place. Unless it once was in awesome shape before someone else bought it as a everyday car and very strapped on cash and did whatever they could to keep it on the road?

Good luck with your rebuild..looks like it's going to keep you out of trouble for a while :hangloose:
User avatar
Retro13
Oil Leak
Posts: 85
Joined: Fri Jan 11, 2013 8:56 am
What model do you have?: Kestrel Buggy
Location: Germiston
Has thanked: 7 times
Been thanked: 3 times

Re: Kestrel Buggy Rodification

Post by Retro13 »

Hey SouL, in all honesty you are probably right and the best thing to do would be to replace the rusty old thing. However, due to the weird way my mind works, I decided rather to give the old pan a new lease on life, for a few (although not necessarily the right) reasons:

* I wanted to keep as much of the original car as possible. I keep this same mantra when I restore vintage motorcycles; it keeps the vehicle's identity (call it soul if you will) intact, and for me this is quite important. This is also why I'm keeping the Kestrel's rather less attractive windscreen in place.
* I don't want to get involved in red tape trying to sort out numbers and such with the traffic department. I've been stung too many times and prefer to avoid any unnecessary hassles at all costs.
* I revel in the challenge of bringing something that is dead back to life, and I like to think that I have sufficient skills to tackle most jobs. When I struggle with something I call on the help of my very talented friends. As Loopy said: "the things we need to go through to become wiser".

At the end of the day, if the end result is not satisfactory or I deem it to be unsafe, I will throw in the towel and seek out a better chassis, but at least I will know I've tried to save another original part from the scrap heap.

Thanks for the comments. Stay tuned to see how these efforts turn out, as I finally give that bloody wire brush the boot (sort of). :mrgreen:

Ciao
T!M
Never ride faster than your guardian angel can fly...
User avatar
SouL
Oil Pump
Posts: 208
Joined: Thu Oct 06, 2011 12:28 pm
What model do you have?: Jenna Jameson
Location: Johannesburg
Has thanked: 20 times
Been thanked: 1 time
Contact:

Re: Kestrel Buggy Rodification

Post by SouL »

Well seems you have the will power so I'm sure it'll turn out great looking forward to see the end product...keep it up!
User avatar
Retro13
Oil Leak
Posts: 85
Joined: Fri Jan 11, 2013 8:56 am
What model do you have?: Kestrel Buggy
Location: Germiston
Has thanked: 7 times
Been thanked: 3 times

Re: Kestrel Buggy Rodification

Post by Retro13 »

Thanks man, hope I don't disappoint.

Ciao for now
Never ride faster than your guardian angel can fly...
Post Reply