Well it is about time that I started this thread. A couple of months back A body kit was purchased from Replicars, I got lucky and purchased a chassis kit from a failed project for a third of the price of a new one.
The plan was to keep the car looking fairly stock but with a sting. no, canon under the hood! As I currently have a speedster with a Scooby turbo motor it was a no brainer to go the same route.
As the spyder is mid engine-ed I have fitted the Scooby 5 speed box that I converted from 4wd to 2 wd. Down the line I can easily fit a limited slip diff. (off the shelf) The rear suspension is completely custom, making use of the Scooby rear hubs with parallel lower arms with a trailing link with a custom McPherson type coil over Koni shocks.
The brakes are 320mm Ultra light rotors on locally machined billet hats with 4 pot Wilwood callipers all round. The brakes have a wildwood proportioning valve.
I have designed and manufactured a hydraulic handbrake / gear shifter from stainless steel. The design is based on the original handbrake lever. Actuation of the handbrake is via an inline master cylinder.
All of the bits and pieces have been purchased both locally and imported, I have a table full of parts waiting to go onto the car as soon as the body is back from paint.
The plan is to get the final welding done on the chassis during the course of next week and then get it of to be re-powder coated. I have done a lot of cutting and welding of new engine, gearbox and suspension mounts.
I took one look at the front suspension mounting system and cut it all off and started again. I have over engineered just about everything on this project. I am sure that I could shave a good 30kg by using a lighter gauge steel for the mounts etc.
I fitted a corsa rack to the link pin front end. The front end has dual adjuster so I should be able to tune the height and stiffness of the front suspension. I have a standard front anti-roll bar with urethane bushes and new clamps. I think with the light body the stock anti roll bar should work pretty well.
I have sourced 3 rims so far from a Renault megane, this will allow me to fit 205/60-16 tyres to the front and 225/55-16 tyres to the rear. I suspect that the turning circle is going to be a little crappy. These may still get chromed and will have Porsche nipple cap hubcaps fitted.
A golf mk2 radiator along with two very powerful 12” dual speed fans with a custom fibreglass cowl should (hopefully provide enough cooling. The engine management will control the low speed setting of the fans with a thermostat handling the second stage.
The engine management is the Go tech pro X with a 60-2 gear. We may well decide to run full sequential injection, because we can!
The standard exhaust manifolds fouled with the suspension / engine mounts so I have fabricated a custom manifold from 40mm ID steam pipe and bends. Even if I say so myself they came out really well.
The exhaust makes use of a pair of FX/1 150mm diameter polished cans with lots and lots of 64mm dairy bends. There is very little room under the rear hood when you have all this kit there. The thought of being able to carry a space saver spare went out the window a long time ago.
I have really struggled to get the right seats for the spyder, Replicars are busy with the third attempt at getting what I need. As the car is so small I really need all the space I can get so I will keep at it till I get what I want.
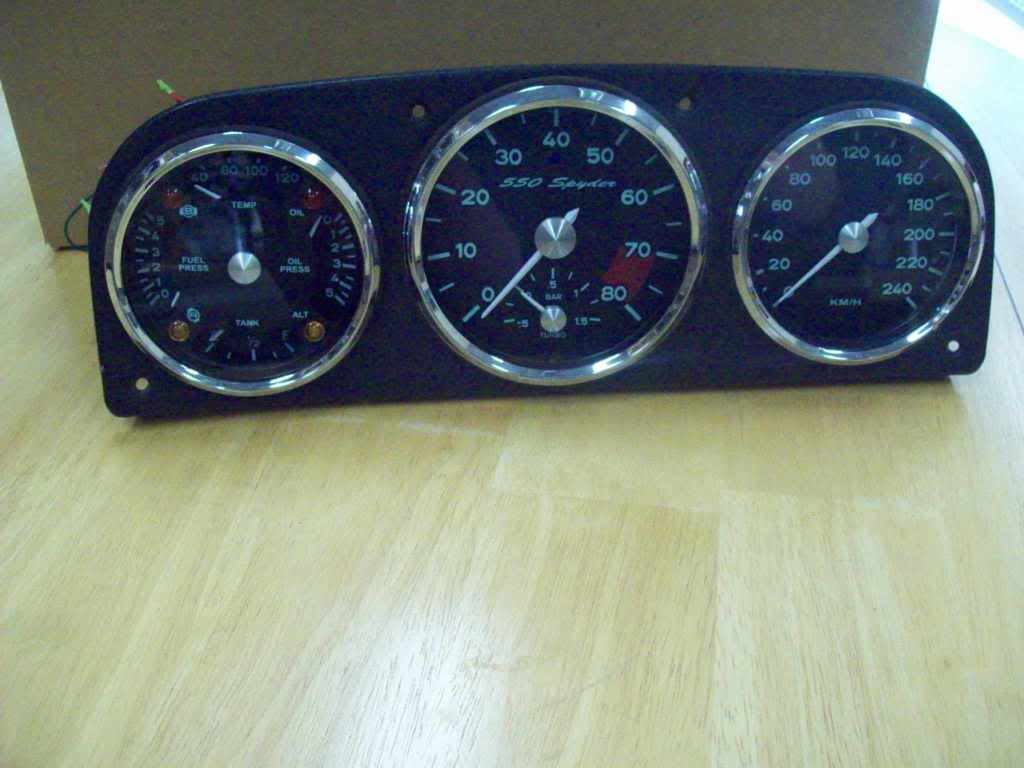
Inside we have had a magnificent set of gauges custom made in the States by NewVintage Gauges. Mark of New Vintage has been fantastic. They have supplied exactly what I wanted. OK there was one area I had to compromise and that is a digital trip. As I wanted to be able to calibrate the speedo myself I had no choice. The clocks are based on the stock 550 type clocks with a rev counter red lining at 7000rpm along with a 1.5bar boost gauge below. The third set of clocks includes the fuel gauge, Oil pressure, Water temperature and for good measure fuel pressure. I could have had volts but a charge light will let me know when the alternator is on the blink. These cost about R10K. But they come complete with all the right sendors, speedo cable, converter in fact even with adaptors to make sure all the sendors work!
Ok, Ok I will start posting pics as I start with the final assembly. A they say a picture is worth a thousand words, well I think you have the first thousand words!
550 scooby powered spyder build
-
black speedster
- Drip
- Posts: 27
- Joined: Fri Feb 22, 2008 10:14 am
- What model do you have?: speedster
- Location: pretoria
- Been thanked: 1 time
-
black speedster
- Drip
- Posts: 27
- Joined: Fri Feb 22, 2008 10:14 am
- What model do you have?: speedster
- Location: pretoria
- Been thanked: 1 time
Re: 550 scooby powered spyder build
Clocks 
Picture. . . . Sorry, the board attachment quota has been reached, what can I say
Picture. . . . Sorry, the board attachment quota has been reached, what can I say
-
beetlefanatic

- Donor

- Posts: 3014
- Joined: Wed Jan 30, 2008 9:59 am
- What model do you have?: Late Bay, Syncro x 2
- Location: Pretoria
- Has thanked: 8 times
- Been thanked: 12 times
Re: 550 scooby powered spyder build
Put your pics on Photobucket and just paste the links here.
The only substitute for cubic inches are more cubic inches.
-
karmakoma
- Full-time Bug Nutter
- Posts: 4126
- Joined: Sat Mar 29, 2008 9:11 pm
- What model do you have?: 69 dual trunk coupe
- Location: Gauteng
- Has thanked: 1 time
- Been thanked: 8 times
Re: 550 scooby powered spyder build
and please do so soon, 'cause it sounds fantastic. I have seen some pics of new vintage work (think it was in the Porsche 356 club mag) and WOW. very nice. This car should go like a rocket!
pics, pics , pics
pics, pics , pics
-
black speedster
- Drip
- Posts: 27
- Joined: Fri Feb 22, 2008 10:14 am
- What model do you have?: speedster
- Location: pretoria
- Been thanked: 1 time
-
splitfan

- Carburettor
- Posts: 1966
- Joined: Fri Jul 20, 2007 1:23 pm
- What model do you have?: 56,71,75
- Location: Port Shepstone KZN
- Has thanked: 46 times
- Been thanked: 26 times
- Contact:

Re: 550 scooby powered spyder build
Now how sweet are those !
My biggest fear is that my wife sells my cars for what i told her they cost !!
-
karmakoma
- Full-time Bug Nutter
- Posts: 4126
- Joined: Sat Mar 29, 2008 9:11 pm
- What model do you have?: 69 dual trunk coupe
- Location: Gauteng
- Has thanked: 1 time
- Been thanked: 8 times
Re: 550 scooby powered spyder build
Took the words out of my mouth splitfan. 
But did they steal the rest of the car and leave the clocks? I only see one pic
But did they steal the rest of the car and leave the clocks? I only see one pic
-
beetlefanatic
- Donor
- Posts: 3014
- Joined: Wed Jan 30, 2008 9:59 am
- What model do you have?: Late Bay, Syncro x 2
- Location: Pretoria
- Has thanked: 8 times
- Been thanked: 12 times
Re: 550 scooby powered spyder build
Berry berry Nice!
The only substitute for cubic inches are more cubic inches.
-
black speedster
- Drip
- Posts: 27
- Joined: Fri Feb 22, 2008 10:14 am
- What model do you have?: speedster
- Location: pretoria
- Been thanked: 1 time
Re: 550 scooby powered spyder build
Sorry guys, that is the only pic I have at the moment, When the body is back from paint I will start putting up pics.
-
flatfourfan
- Full-time Bug Nutter
- Posts: 4195
- Joined: Tue Nov 08, 2005 12:06 pm
- What model do you have?: Speedster Replica
- Location: Pretoria
- Has thanked: 36 times
- Been thanked: 50 times
-
dubster
- Valve
- Posts: 1145
- Joined: Tue Nov 06, 2007 6:30 pm
- What model do you have?: buggy and '74 beetle
- Location: Amanzimtoti
- Been thanked: 3 times
Re: 550 scooby powered spyder build
Hey speedster,please post some pics of the suspension and mid mount arrangement of the box and stuff please...my short long term plan is to build a space frame like this but then just poping a buggy body over it...so if you dont mind sharing how the chassis is built it would help alot...great project by the way im a big fan of your black subby speedster...
1974 1300tp type 1
kart kraft 1717cc buggy
''BLOOD AND TEARS WILL FLOW FOR ACVW'S,FOR LIFE''
kart kraft 1717cc buggy
''BLOOD AND TEARS WILL FLOW FOR ACVW'S,FOR LIFE''
-
JohnHoffe
- Exhaust Pipe
- Posts: 1633
- Joined: Wed Sep 17, 2008 10:28 am
- What model do you have?: Buggy,Fleetline,Ghia
- Location: East Rand
- Been thanked: 1 time
Re: 550 scooby powered spyder build
Sounds like an awesome project you have going there!!
Where did you source the brake rotors? Do they bolt onto steel hubs?
Cheers,
John
Where did you source the brake rotors? Do they bolt onto steel hubs?
Cheers,
John
-
black speedster
- Drip
- Posts: 27
- Joined: Fri Feb 22, 2008 10:14 am
- What model do you have?: speedster
- Location: pretoria
- Been thanked: 1 time
Re: 550 scooby powered spyder build
Hey Dubster, I see you are listed as resident in pretoria, why not pop through and look at the chassis in the flesh.
John The brakes are have a front hub for a disk brake conversion available from goldwagen. I then have a machine billet hat / spacer which mounts the rotor to the hub, I also drill out the hubs and fit studs. I also have a custom laser cut bracket to mount the calipers. The rears are pretty much the same they just make use of the scooby rear hub that i re-drill to 4 x 100 from the 5 x 100, again making use of the stock scooby studs. Again the hat is machined from aly billet with a custom laser cut caliper mounting bracket.
Picked up the seats yesterday, it has been a mission trying to find seats that A are wide enough to fit my arse and B narrow enough to fit in the car! Eventually we modified a set of Cobra seats.
Once I have mounted the seats to the chasis they will be sent of for a touch of leather and sponge. Looked at the preparation for the paint job, looking pretty good at this point, Replicars expects to have the body ready to collect on Friday. Not entirely convinced as Friday is a public Holiday.
-
flatfourfan
- Full-time Bug Nutter
- Posts: 4195
- Joined: Tue Nov 08, 2005 12:06 pm
- What model do you have?: Speedster Replica
- Location: Pretoria
- Has thanked: 36 times
- Been thanked: 50 times